Metal Fabrication
A Sharper Image
Sharpen your wood-carving tools
Published
18 years agoon
If you’ve ever perused library books on woodcarving, you’ve likely seen photos of flannel-clad, Al Borlin wannabes at their workbenches, methodically sharpening chisels on whetstones, and dreaming of duck decoys floating merrily on the local pond.
While such leisure may be the life of a wood-duck carver, it is not the life of a wood-sign carver. At least not a profitable wood-sign carver. "Japanese whetstones — any kind of stone, for that matter — have no place in the signshop," sign-maker Jay Cooke, Cooke Sign Co., Stowe, VT, says emphatically. "Carry a stone in your sign kit, sure. But otherwise, stones are too slow for sharpening, too ineffective. If I’m rubbing a stone, all I’m doing is making the stone feel good."
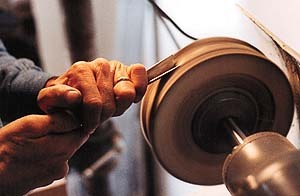
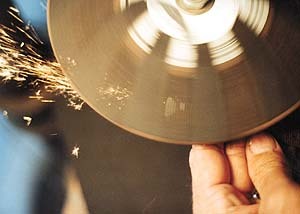
Sharpening a standard chisel
According to Cooke, who runs the Vermont Sign School and teaches carving classes, the home hobbyist may do lots of things that are inefficient. "It’s because no money is involved," he explains. Some home craftsmen, for example, go so far as to mill their own lumber. "But when you move into the signshop, where your goal is to keep more than you spend, such pleasures are cost-prohibitive," Cooke says.
As such, when teaching his carving students how to sharpen their chisels, Cooke first tells them to decide why they’re sharpening. Separate hobby from business, he advises. Sign customers will happily pay a sign-maker to carve a sign, but they’ll be less enthusiastic about paying a sign-maker to sharpen a chisel. The goal, then, is to sharpen efficiently and return quickly to the business of carving.
Sign-maker Paul White, Paul White Woodcarving, E. Sandwich, MA, who also teaches wood-carving courses, tells his students that sharpening a chisel is more difficult than carving with one. Basically, he says, sharpening can be broken down into two steps: grinding (shaping) and honing (polishing). In fact, both Cooke and White use the same methods for accomplishing these two tasks — not surprising, as Cooke says that "90 percent of my sharpening skills came from Paul [White]."
To grind their chisels, they use an abrasive-type wheel from Woodcraft Supply, Parkersburg, WV. Because such tools are no longer offered by Woodcraft, however, Cooke suggests making your own using an S-Jet or Grizzly machine — both of which have vertical, upright tool catalogs. "They look like belt sanders, but are fixed as bench machines," Cooke explains. "Take the machine right out of the hardware catalog and on the bottom, make a sliding tool rest." (Note: Cooke describes how to make a grinding machine, in detail, on his "Dimensional Signage" CD-ROM.)
Using either the Woodcraft-manufactured grinding tool or the retrofitted tool Cooke describes, you should shape the chisel using an 80-grit, general-sanding belt — the more expensive the belt, the better. This will remove a lot of metal from the chisel quickly. Then, switch to a 120-grit belt to reduce the severity of the scratching.
White says that as you’re grinding, you should keep water on-hand to cool your chisel periodically. All carving tools, he says, use "tempered" steel. ("Tempering" describes the way in which the steel is heated and cooled to align the molecules for added strength.) If the tool becomes too hot when grinding, you could theoretically remove its temper. You’ll know if you do this because the steel will turn a purple-blue color and will bend when you carve.
Cooke says he only shapes his carving tools on two occasions: when they’re brand new, and he’s custom-shaping them for the first time; and when they’ve been used for many hours. Usually, he only needs to hone his chisels, which he does after carving each letter on a sign.
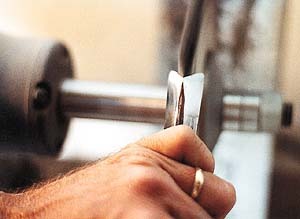
To hone their tools, Cooke and White use a standard, 1/2- to 3/4-horsepower, 20,000-rpm Sears & Roebuck grinder, which they retrofit. Specifically, they turn the machine backwards, so that the rotation goes from the ground upward, instead of from the ceiling downward. Changing the rotation is important because otherwise, your tool could be thrown back at you as you sharpen.
In addition, the sign-makers remove the endplates and grinding wheels, replacing them with muslin wheels. Other materials than muslin can be used — including cotton and leather — but Cooke says that muslin wheels, coated in stainless-steel polishing compound, are the most forgiving. He also says there are numerous brands and colors of polishing compound from which to choose, any of which will work.
Of the retrofitted honing machine, Cooke warns: "This is not necessarily an OSHA-approved machine. If you hold your tool against it incorrectly, you’ll create a lot of shrapnel."
The goal, says White, is to create a bevel on one side of the tool, and a flat side on the other. As a general rule of thumb, you’ll create a longer, more shallow bevel on a chisel for soft wood, and a more vertical angle for hard wood. But it’s also a matter of personal preference, depending on how you, as a carver, hold your tools. "If you buff too much," says White, "the angle on the chisel will start to change. Plus, you have to be careful that you don’t hold the tool at so steep an angle that you round the chisel over."
How sharp should a chisel be? According to White, some people say it should be sharp enough to split a hair. But he disagrees: "It needs to be sharp enough to do the job it has do. And, if you have a great temper, the tool will hold its edge longer. Likewise, if you have a problem with a tool holding an edge, it’s because the polishing was not done properly."
Honing a freshly shaped tool takes a few minutes. However, honing during the carving process takes only a few seconds. Cooke estimates it takes him 10 seconds to move his chisel from a sign he’s carving, to the honing machine, and back to the next letter. For convenience sake, he actually carries his honing machine to the site where he’s carving; he says it makes the work go much faster.
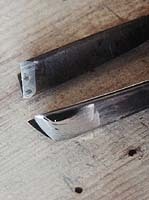
Sharpening a V-chisel
Dusty Yaxley, Letter Art, New Port Ritchey, FL, is among a group of sign carvers who use a V-chisel as their carving tool of choice. And, because of the tool’s unique shape, it requires different sharpening techniques than those described above.
Yaxley shapes the outside edges of a V-tool to create long, angled slopes. Like Cooke and White, his sharpening technique requires two steps. First, he grinds down a V-chisel by holding it underneath a slotted grinding wheel mounted to a drill press. He mounts a light above the drill press, so that he can look through the slots and see the tool as it’s sharpened. He explains that by applying light pressure and moving the tool to the inside of the wheel — where the wheel rotates more slowly — he can grind very accurately.
"The bottom of the ‘V’ must be ground to follow the inside of the shape," he explains. "This prevents a small point protruding forward and causing control problems and rough bottom cutting."
When this shape is achieved, Yaxley begins the honing process. Specifically, he uses a 3/4-horsepower, double-end buffer, placed backwards so that the wheels turn up and away from the operator. On the left end of this machine, Yaxley mounts three 1-inch-thick, 8-inch-diameter muslin cloth wheels; on the right end, he attaches one 1/4-inch-thick, 8-inch-diameter muslin wheel. Onto all the muslin wheels he applies Tripoli, a polishing compound.
Yaxley uses three wide wheels to polish the already-ground outer edges of the V-chisel. He uses the narrow muslin wheel to polish the not-yet-touched, inside of the "V." He alternates between the wide and narrow wheel several times during the polishing process, but says he uses the wider wheel 80 percent of the time.
"Do not allow the chisels to heat hotter than you can comfortably touch," Yaxley warns. "I place considerable pressure on the buffer, at short intervals — one or two seconds at most. I also feel the edge of the chisel to determine when the chisel is heating up to the danger point."
He also advises testing the sharpened chisel on a piece of scrap wood to see if it’s cutting smoothly, without rough places. "Rough places [in the wood] indicate a dull spot [on the chisel]," he says.
Subcontracting sharpening
Should you ever subcontract your sharpening work? Cooke advises against it. Setting up a proper sharpening operation in your shop requires some investment, but if you carve on a regular basis, he says it’s worth the cost. Having your own sharpening system speeds production time, and allows you to customize your tools for optimum effectiveness.
If you only carve a few times a year, and cannot therefore justify the expense of purchasing sharpening equipment, Cooke questions whether you can even justify the expense of actually carving on your own. He suggests it may be more cost- and time-effective to sub-out your occasional wood-carving job.
After all, enjoyment and relaxation drive the wood-carving hobbyist. But profits drive the wood-carving sign-maker.

SPONSORED VIDEO
Introducing the Sign Industry Podcast
The Sign Industry Podcast is a platform for every sign person out there — from the old-timers who bent neon and hand-lettered boats to those venturing into new technologies — we want to get their stories out for everyone to hear. Come join us and listen to stories, learn tricks or techniques, and get insights of what’s to come. We are the world’s second oldest profession. The folks who started the world’s oldest profession needed a sign.
You may like


Advertisement
Subscribe

Magazine
Get the most important news
and business ideas from Signsofthetimes Magazine.
Advertisement
Most Popular
-

 Tip Sheet1 week ago
Always Brand Yourself and Wear Fewer Hats — Two of April’s Sign Tips
-

 Ask Signs of the Times3 days ago
Why Are Signs from Canva so Overloaded and Similar?
-

 Real Deal1 week ago
A Woman Sign Company Owner Confronts a Sexist Wholesaler
-

 Benchmarks5 days ago
6 Sports Venue Signs Deserving a Standing Ovation
-

 Editor's Note2 weeks ago
Why We Still Need the Women in Signs Award
-

 Women in Signs1 week ago
2024 Women in Signs: Megan Bradley
-

 Photo Gallery1 week ago
21 Larry Albright Plasma Globes, Crackle Tubes and More
-

 Women in Signs1 week ago
2024 Women in Signs: Ashley Borell