Vinyl graphics that incorporate paints, inks or thermal prints require additional protection or enhancement to provide chemical, ultraviolet, oxidation and abrasion resistance, as well as provide for texture, gloss range, color fastness, camouflage and artificial aging effects.
These protections and/or enhancements are accomplished by clearcoating vinyl graphics with various products. The protections/enhancements can also be extended to other sign substrates, such as plastic, wood or paper.
If vinyl has been painted or printed, it’s best to apply a clearcoating product, which is either a film or liquid application applied onto the vinyl surface. The clearcoating product should strengthen, rather than reduce, the operational characteristics of the vinyl. While clearcoats shouldn’t reduce the flexibility of vinyl graphics, they should extend the application’s longevity.
The clearcoat and vinyl must be compatible to prevent the product from delaminating or possibly destroying the vinyl. The clearcoat should also improve, rather than corrupt, the vinyl’s appearance. Whether film or liquid, clearcoats can be glossy-, satin- or matte-finished, depending on the desired effect.
Clearcoat films are available in high-performance cast vinyl, intermediate calendered vinyl, polyester and ultra-high-performance polyvinylfluoride, which also offers graffiti resistance and easier maintenance due to its extreme resistance to strong solvents. Liquid clearcoats are available in water-based and solvent formulations. Thermal-print productions can also be overcoated with a clear foil resin as part of the automated printing process.
Clearcoat methods are determined by end need and expectation, plus cost. Film- and foil-based methods will be more expensive in material cost and application labor, depending on the application method.
Films can be applied by hand or an automated applicator/laminator, which applies either cold- or heat-fused films. This equipment is relatively expensive, takes up additional floor space and must be carefully adjusted for optimum performance.
Thermal-printed clearcoats require no additional equipment or labor since they function as just one more process in automated printing.
Liquid clearcoats can be applied using many methods. Solvent formulations are best applied with spray equipment or aerosols. Their fast-drying nature makes it impractical to apply solvent clearcoats with brushes or rollers.
I prefer to use solvent-based clearcoats in pre-mixed aerosol cans for applications to small graphics because the cans are easy to use and require no fuss beyond clearing the spray tip. Using a higher-volume spray gun is the best alternative.
Water-based formulations require the simplest tools, which are cleaned with water. Water-based clearcoats can be applied with spray equipment, foam or bristle brushes, and rollers. These tools are especially effective if you’re deliberately trying to impart surface textures. But usually it’s preferable to create as smooth a surface as possible and in the least amount of time.
Larry’s method
For large graphics, I prefer to use waterbased clearcoats because I have devised a method that is, for me, faster than any other method available, excluding the largest industrial applications. Following my method, I can easily coat 40 sq. ft. of vinyl in less than 30 seconds to create a very smooth application.
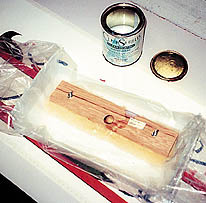
Be sure to work on a long, smooth table. Your equipment should include a 12-in. genuine lamb’s wool, floor-finish applicator, paint tray, water-based clearcoat and graphics.
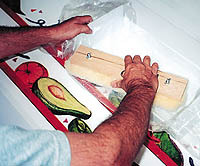
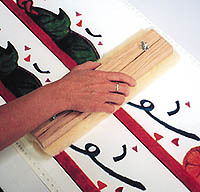
To begin, place the unweeded, unmasked graphics on the table, pour a small quantity of clearcoat in the paint tray (I made one from scrap corrugated plastic and double-stick banner tape, then vinyl roll-packing plastic for a tray liner) and dip the lamb’s wool in the clearcoat. Wipe any excess on the tray’s edge (the applicator shouldn’t be drippy, just wet), place it on the vinyl and wipe over it in one smooth, quick stroke down the length of the table.
Because I have a 5 x 20-ft. project table, I can lay out 20 ft. on each side so it takes less than 30 seconds to coat 40 ft. of vinyl in one walk around the table. I usually perform a final quick pass immediately with the applicator without re-wetting it just to ensure complete coverage. Don’t wipe the vinyl again if the surface has begun to tack or you will risk streaking the production and ruining its self-leveling ability.
A second coat can be applied, if necessary, after the manufacturer’s recommended drying time has passed for the first coat. The end result should be a longer-lasting product that puts a gloss on your reputation for quality, clears the way for increased business and protects your valuable client relationships.


 Tip Sheet4 days ago
 Business Management2 weeks ago
 Women in Signs2 weeks ago
 Real Deal5 days ago

 Editor's Note1 week ago
 Line Time2 weeks ago
 Product Buying + Technology1 week ago