Layout, color contrast and readability comprise a successful sign's key elements. After having graduated from Cornwall, Ontario, Canada's St. Lawrence College with a degree in creative arts and visual communications, as well as having more than 16 years of experience in all aspects of vinyl, electrical and 3-D signage, I've deduced that layout, font size and choice of color need to be mastered to create successful signage.
Sometimes, clients don't understand why I would choose a bolder font when they perceive that a standard font, such as Commercial Script, is the only solid option. My goal is to underscore the differences between devising a successful layout and one that can't be read 20 ft. away.
Ultimately, however, the client pays the bill, and I'm often compelled to compromise or defer to their wishes. But, I remain constant to one credo: Keep the main word(s) large and bold.
Color contrast is also paramount for successful design — for instance, avoid medium colors, such as kelly green or wedgewood blue, when using goldleaf. Goldleaf requires the darkest possible color choice — forest green or navy blue, for instance — for maximum brilliance. Any other color that doesn't provide sufficient contrast requires a drop shadow.
Preparations
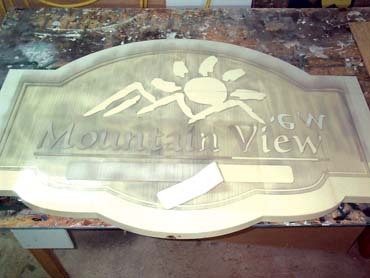
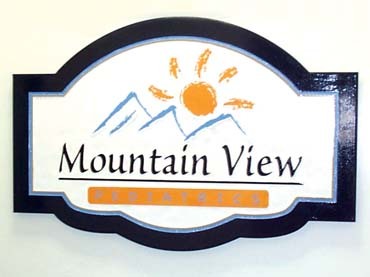
For Mountain View Pediatrics' sign, we used the client's existing logo. They had established a new enterprise within an existing medical facility. Our sign software, Gerber Scientific Products' Graphix Advantage 6.0, handles all logo work and sizing. The available space dictated the sign's size — we enlarged Mountain View's existing, square logo to fit the rectangular space.
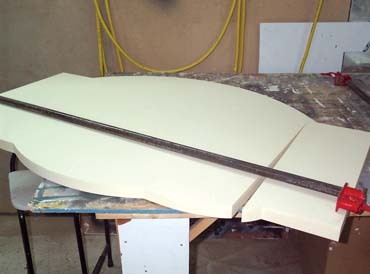
We created a perfect joint by machining HDU with a 4 x 8-ft. Cam Tech CNC router with AXYZ Intl.'s electric attachments and ToolPath™ software. However, a jigsaw and a bit of sanding — 100 grit to start, then 200 to smooth out any rough spots — can also provide satisfactory results.
Advertisement
To save time, material and money, we glued two pieces of Sign•Foam® HDU together with Gorilla Glue, a heavy-duty, polyurethane adhesive. We bound the two pieces together with clamps, which Gorilla Glue's expansion requires.
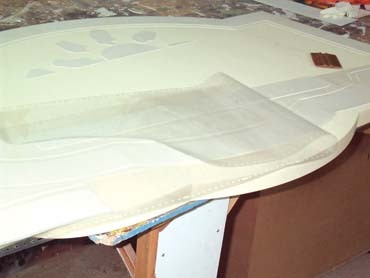
Next, we cut the sandblasting stencil on our 15-in., Gerber Scientific Products Signmaker® IV-E plotter — we separated the stencil pieces on the plotter's surface. We always position the stencil face down to ensure we remove the backing, not the stencil.
To fabricate a double-sided sign, we'll use the same stencil twice instead of producing two stencils. Stencils cost us $14 per yard, but this stencil-cutting method saves us half the time and labor.
We always use Anchor stencils — they weed and adhere better. We don't prime the sign's front side, which keeps more glue on the stencil for the other side. We primed the backside and used 3M Industrial Adhesives & Tapes Div.'s Super 77 spray adhesive to give the stencils more sticking power.
Registering the stencils is simple because they include a clear backing. We simply removed the initial stencil, affixed the clear backing and re-applied the individual pieces over the sandblasted surface. Then, we applied transfer tape, flipped the sign, sprayed the back of the stencil, and then applied it to the surface.
Blast-off
Until recently, we just handled our blasting outdoors because we live in a rural area. However, we've installed a Binks paint booth, which effectively controls the dust factor normally involved with using silica sand to blast.
To sandblast safely, always wear a protective bodysuit and breathing mask, and use a sandblasting hood with a Plexiglas® visor. Also, your air compressor must be able to maintain up to 100 psi for more than one hour without overheating.
Advertisement
The sandblasting process was straightforward. I used medium, 40- to 60-grit sand at 100 psi, and blasted approximately in. deep into the Sign•Foam. Then, I applied the Grain Fraim to achieve the desired texture.
With the Grain Fraim in place, I blasted another in. into the substrate. On a 3 x 4-ft. sign, this requires 10 minutes per side. The Grain Fraim's direction must match the two HDU pieces glued together. This way, we easily hide the joint. Once we sandblasted the sign and removed the stencil, I shaped the edges with a hand router.
Jay Cooke's waterbased primer is the best coating for Sign•Foam. Two coats are required, with light sanding at 200 to 300 grit between coats. After the second primer coat dried, we applied 1Shot's white bulletin color. After the paint dried for 24 hours, we applied paint mask where required.
If paint mask isn't available, we'll use transfer tape. We run a piece of transfer tape through the plotter with a pen attachment and cut shapes with an X-acto® knife (with a new blade).
We apply one coat for light colors, two for darker shades. For maximum opacity, we always use 1Shot.
I also like using a thick border complemented with finer pinstripes. I think this more effectively frames the graphics, but I don't believe it's a common practice. But, if you hold different signs side by side, the sign with the thicker painted border is always preferred.
For instance, when decorating a 4 x 8-ft. sign, I often create a 4- or 5-in. border, leave a -in. space and apply a -in. stripe of a complementary color. Pinstriping always sharpens the edges and makes the sign look cleaner. Remember to maximize your color palette, and avoid multiple signs with identical color choices.
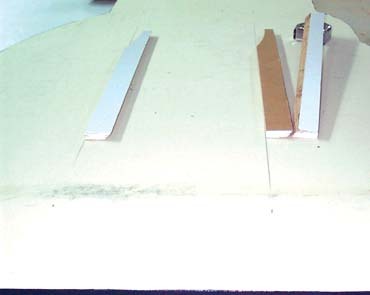
For wall-mounted installations such as this, we use the French cleat method. First, we cut four pieces of MDO. Usually, these pieces are 2 in. high, approximately two-thirds the sign's length and in. thick, but rough surfaces may require 1-in.-thick pieces.
Advertisement
Then, we create a 45° angle on one side of all four pieces, glue and screw two pieces to the sign's back, and apply the other two pieces to the wall. This installation method hides all hardware, and clients can complete installation themselves in roughly 15 minutes.
A sign that incorporates sculpted or appliquéd elements can be simply screwed to a plywood table from the underside. With the piece screwed to the table, sculpting progresses much faster. I always use HDU because it contains no grain and is very workable.
I find my work extremely satisfying — there's no other industry where one can have so much fun creating and manufacturing such diverse work. It's never boring, because every new client presents the opportunity to create your best sign to date.
Equipment and Materials
Adhesive: Gorilla Glue polyurethane adhesive, from the Gorilla Glue Co. (Cincinnati), (513) 271-3300 or www.gorillaglue.com; Super 77 spray adhesive, from 3M Corp. (St. Paul, MN), (800) 362-3550 or www.3m.com/industrial.
Paint: 1Shot lettering enamels, from One Shot LLC (Gary, IN), (219) 949-1684 or www.1shot.com; Jay Cooke's all-purpose sign primer, from Jay Cooke (Stowe, VT), (800) 598-2723.
Plotter: 15-in. Gerber Signmaker 4-E plotter, from Gerber Scientific Products (South Windsor, CT), (800) 222-7446 or www.gspinc.com.
Routers: 4 3 8-ft. refurbished router table, from Cam Tech Industries (Calgary, Alberta, Canada), (403) 236-4464 or www.camtech.ca; electric router-table components, from AXYZ Automation (Burlington, Ontario, Canada), (800) 361-3408 or www.axyz.com; hand router with -in. bit, available at hardware stores.
Sandblasting: Anchor 15-in., perforated sandblasting stencils, from Intertape Polymer (Montreal, Quebec, Canada), (877) 447-4832 or www.intertapepolymer.com; sandblasting booth, from Binks Inc. (Glendale Heights, IL), (630) 237-5000 or www.binks.com; Grain Fraim™, from Sign Arts Products Corp. (Dana Point, CA), (800) 338-4030 or www.signfoam.com; sandblast pot and medium-grit sand, from sign-supply distributors.
Software: ToolPath™ software, from AXYZ Automation; Graphix Advantage 6.0, from Gerber Scientific Products.
Substrates: Sign•Foam® HDU, from Sign Arts Products Inc.; MDO, from Commonwealth Plywood (Saint Therese, Quebec, Canada), (450) 435-6541 or www.commonwealthplywood.com.
AXYZ Automation 3M Industrial Adhesives & Tapes Div.Gerber Scientific ProductsSign Arts Products Corporation


 Tip Sheet3 days ago
 Business Management1 week ago
 Women in Signs2 weeks ago
 Real Deal4 days ago
 Editor's Note1 week ago
 Line Time2 weeks ago
 Product Buying + Technology1 week ago
 Women in Signs4 days ago