Often, there are several ways to accomplish a task. Applying vinyl to a corrugated trailer surface is no exception. The first installation technique I learned involved using a rivet brush to apply vinyl. I used this technique for years, until an installer from California offered his two cents.
He believed that using a squeegee, rather than a rivet brush, stretched the vinyl less, and with less mechanical stress, the vinyl was less likely to tent in corrugation valleys. This technique has served me well for years.
However, approximately 10 years ago, I heard that European installers preferred to apply vinyl to corrugated trailers using hard, felt squeegees. On my next trip to Europe, I visited a Dutch distributor, who gave me a few felt squeegees to try. Guess what? They worked too.
It’s a good idea to learn new tricks of the trade. You can learn correct application techniques at the five-day Professional Decal Application Assn. (PDAA) training course (www.pdaa.com). 3M also sponsors training through the United States Graphics Assn. A veteran graphics professional could also be a valuable resource, if you can find one willing to train you.
Application techniques’ effectiveness will vary. The key is finding a technique that works for you. When you do, continue to use it.
Careful with shortcuts
Advertisement
Not all so-called "tricks of the trade" work. Along with several right ways, wrong ways also exist. Approximately 15 years ago, a colleague called me after having inspected a fleet of corrugated trailers in a Chicago suburb.
He said, "You won’t believe what I saw." Before he had a chance to tell me, I interrupted.
"Let me guess," I said. "All the vinyl has lifted in the corrugation valleys, and much of it has cracked and disintegrated."
How did I know? I hadn’t seen the graphics fail myself, and I’m not a clairvoyant from the Psychic’s Network. But I had seen the graphics’ application, and I envisioned future problems. An installer from Chicago’s South Side had discovered a shortcut that allowed him to apply vinyl to a corrugated surface quickly with relatively few wrinkles and bubbles.
The shortcut involved tacking the graphic into position at the corners, allowing the film to bridge all corrugations. After heating the vinyl with his torch, the installer used a rivet brush to force the film into the valleys.
However, this presents a problem — vinyl will only stretch so far. Overstretching puts too much mechanical stress on the film. Regardless of your vinyl, this shortcut is a ticking bomb that eventually leads to disastrous results. Sooner or later, the vinyl will lift or tent in corrugation valleys.
Advertisement
Survey your fleet
Before applying vinyl to corrugations, take time to inspect the fleet. In my article, "Look Before You Leap" (see ST, July 2001, page 44), I suggest how to conduct a survey.
Historically, vinyl applied to stainless-steel corrugated trailers has been problematic. Applied graphics frequently fail on these trailers. Most often, the vinyl tents around rivet heads. Vinyl should be cut around rivet heads with a rivet cutting tool.
When planning your production, estimate shrinkage of the graphic’s height, as the vinyl wraps around the corrugation. Shrinkage varies with the corrugation type. The simplest solution is to apply a 12-in. piece of vinyl to a corrugated trailer surface, and then measure its actual height.
In many cases, trailer surfaces within a fleet will differ, perhaps being a mixture of flat, riveted-flat and various corrugated surfaces. In these cases, designing one size to fit all works best.
If you’re completely covering trailer sides with graphics panels, make the graphics large enough to cover the trailer surface and largest shrinkage allotment. Create layouts that allow for trimming without losing critical design elements. This way, the graphics can work with little or no shrinkage.
Advertisement
Choosing materials
Research your vinyl choice for corrugated-surface applications. Study the manufacturers’ literature to locate recommended films.
Look for a film with a track record. I have nothing against calendered films or their manufacturers, but, in my opinion, cast vinyl is generally the best choice because it’s much more conformable (see ST, March 2003, page 44).
You’ll also want a film that allows graphic repositioning during application. Films with repositionable adhesives include Avery Dennison Graphics & Reflective Products Div.’ (Painesville, OH) Place-Rite™, Arlon’s (Santa Ana, CA) ProFleet™ and 3M Industrial Adhesives & Tapes Div.’ (St. Paul, MN) Controltac™ and Comply™.
Prepping the substrate
Arrange for the trailer to be washed the day before installation. This allows enough time for the trailer to dry. Any moisture trapped under rivet heads or overlapping panels will cause the vinyl to tent or lift. Wet applications are strictly verboten.
Washing alone won’t remove all contaminants. The next day, remove any residual tar, soot or grease with a cleaner, such as 1949’s™ 3919S PrepSol. The last step involves wiping the surface down using isopropyl alcohol (aka IPA, which isn’t to be confused with India Pale Ale).
Before the solvent evaporates, wipe the substrate dry using lint-free paper towels. For complete details on substrate preparation, read my column, "Next to Godliness" (see ST, September 2001, page 64).
Apply yourself
After cleaning the substrate, position the graphic so the top edge lays in the middle of the flat area between corrugations. Begin the installation procedure by peeling approximately 2 ft. of the release liner from the marking, to expose the adhesive system. Tack the graphic into position — begin at least 6 in. from the top of the marking. Some installers start even further down, perhaps one-third below the top. When applying circular emblems, some start halfway down.
Whether you use a rivet brush or squeegee, systematically work the corrugation’s individual parts. Starting on the crown (also called the ridge), which is the highest point of the corrugation, imagine looking at a surface cross-section.
Corrugated truck surfaces vary, including the spacing arrangements. Whether a corrugation comprises a rounded-bead or V-shaped design, the basic parts remain: two slopes, two valleys, the crown and usually, a flat space that separates the corrugations.
Begin the application on top of the crown, in the panel’s center. Begin the installation sequence by applying the emblem to the crown. Next, affix vinyl to the lower slope, then the lower valley, followed by adhering it to the flat space, then the upper valley; and finishing with the upper slope. For a more detailed step-by-step, review the installation instructions in the sidebar on pages 34-36.
Always start each squeegee stroke in the panel’s center, applying pressure from the center to the outer edge. Resist the natural tendency to apply strokes in one direction rather than using alternating strokes. This causes alignment problems, especially when one graphic panel must match another. By applying strokes in one direction, you’ll likely push the emblem in that direction, distorting the panel.
How to Apply Vinyl Over Corrugated Surfaces
1. The surface temperature should be at least 50° F. In cold weather, you may need to preheat the trailer surface by using either an additional propane torch or placing a torpedo heater inside the rear door, so it heats from the inside out. Heating requires caution: Excessive heat can cause insulation panels to buckle, causing the aluminum skin to separate.
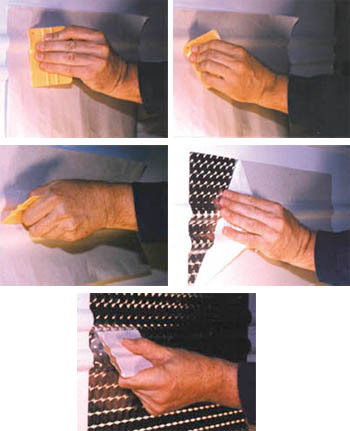
2. Starting in the emblem’s center, squeegee the film to the corrugation’s crown. For most applications, professional installers prefer hard, nylon squeegees, such as 3M’s gold squeegees. However, softer plastic squeegees, such as 3M’s blue squeegees, are preferred for corrugated applications. Softer squeegees will bend and conform around the curved ridges or crowns.
3. Use the squeegee’s corner to apply the vinyl to the lower slope of the corrugation. Some manufacturers recommend first applying the vinyl with your thumb prior to using a squeegee. Using a felt squeegee might also work.
4. Run the squeegee’s edge in the lower corrugation valley.
5. Starting in the lower valley’s center, use overlapping downward strokes to squeegee the film to the flat area between valleys.
6. Use the squeegee’s edge to apply vinyl to the upper valley.
7. Use the squeegee’s corner to apply the film to the upper slope.
8. Repeat the procedure described in steps 1 through 6.
9. Before removing application tape, cut the vinyl at the seams with a utility knife. Uncut vinyl will inevitably tear as trailer panels vibrate and flex with the trailer’s movement. Rather than tearing in a nice straight line, the vinyl rips, leaving ragged, unsightly edges.
10. After cutting the seams, remove the application tape by pulling it 180° against itself.
11. Check for air bubbles under the vinyl. Puncture a bubble edge with an air-release tool or pin and force the air out with your thumb. Never puncture the vinyl with a knife — a knife creates a slash that will eventually open. One or two holes should be perforated at the rivet’s bottom. This eliminates water seeping between the substrate and vinyl.
12. Using an industrial heat gun or propane torch, heat the film and run the edge of a squeegee in the corrugation valleys. To prevent the squeegee from scratching or marring the vinyl surface, place it in a low-friction sleeve. An alternative to a low-friction sleeve — which can scratch the surface — is to use the soft side of a Velcro® sheet or strip. Available in strips or rolls, Velcro can be cut to the squeegee’s size and applied to one edge. This creates one soft edge and one sharp edge.
13. Puncture the film in several places around the rivet heads with an air-release tool or pin. After heating the vinyl, use a rivet brush in a circular motion to burnish the vinyl around the rivet heads. Whatever application technique or tool you use, successful graphics applications to rivets and corrugations require heat and good mechanical pressure. Heat is important in these applications because it softens the vinyl, letting it conform to the irregular shapes of the corrugations and rivet heads. Heat also breaks the "memory" of cast vinyl films, preventing tenting around rivet heads and channeling in corrugation valleys. Heat also softens the adhesive, making it flow and creating a long-lasting bond.
14. Resqueegee all graphic edges.
15. Inspect your job. Make sure the vinyl conforms tightly to rivets and corrugations.
16. Last, but not least, pick up your mess.


 Business Management1 week ago
 Tip Sheet1 day ago
 Women in Signs1 week ago
 Real Deal2 days ago
 Editor's Note6 days ago
 Maggie Harlow2 weeks ago
 Line Time1 week ago
 Product Buying + Technology1 week ago