Carl Adams recently approached Jeff Volino and me about wrapping a trailer for his 501(c)3 nonprofit organization, Tee it Up for the Troops (TIUFTT). J.B. Ball created the organization in 2005 to honor the wishes of his son, Tyler, who enlisted in the U.S. Army after 9/11. When he asked his son what he needed after shipping out, Tyler replied, “Forget about me, do something for the soldiers and their families back home.”
This request led to the founding of TIUFTT, and it now contributes to organizations that help wounded veterans and their families. More than 300 TIUFTT fundraising golf tournaments have been conducted at more than 50 golf courses in 30 states. The organization has raised and donated nearly $4 million to numerous charitable organizations that provide a broad array of support services to injured warriors and their loved ones.
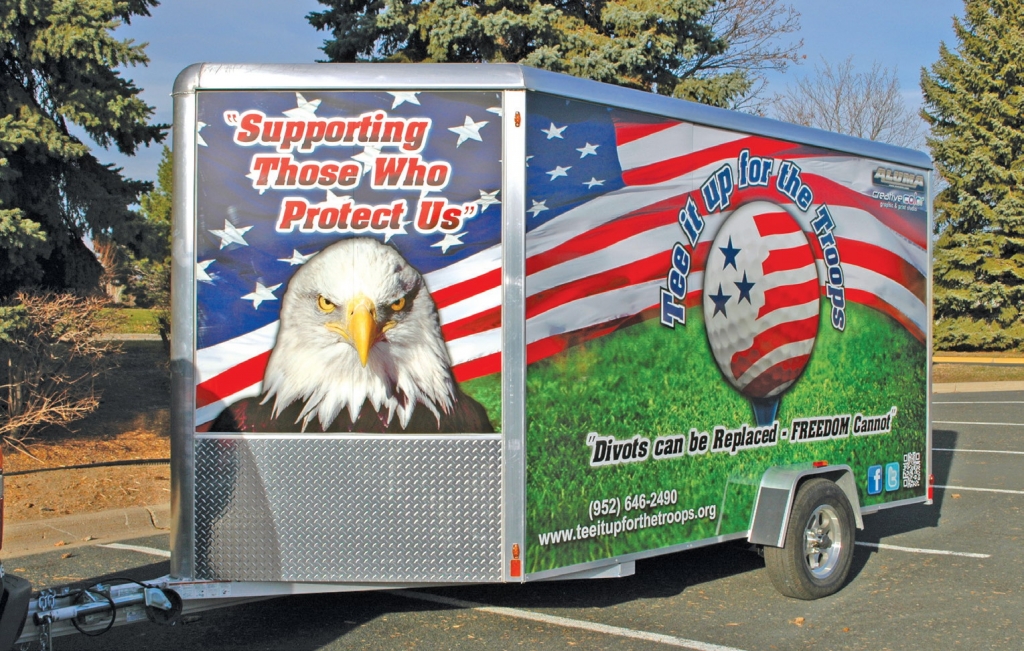
To help promote the organization, we created a unique, 15-ft.-long, transport-trailer wrap. We were honored to participate; we donated the design services and offered a large discount on the wrap. Here’s how we did it.
These colors don’t run
In discussions with TIUFTT’s representative, Carl Adams, we emphasized that we wanted the wrap to burst with patriotic pride – American red, white and blue, bold and from all angles. He supplied the TIUFTT logo and URL, and we had free reign with the design. It’s always a pleasure when we can start from scratch and guide a project from beginning to end.
For the wrap, we decorated a 15-ft.-long Aluma trailer. It had new side panels, and its rivet-free surface really made installation a breeze. To guarantee full wrap coverage, we removed both fenders and tires to access the entire surface. Having the graphic flow beyond the fender always makes a wrap look more complete. The trailer tapers to a point in the front, and we wanted to make sure the design moved seamlessly front to back.
Using Adobe® Photoshop® and Illustrator® CS6, I began my wrap design. I worked on a few similar concepts until we reached the final outcome. I focused on spanning the large American flag across the trailer’s entire length, while keeping the logo as the main focus point. I wanted the flag to appear to be in motion, and I angled the flag to give it this flow.
Advertisement
I changed the logo font to a heavier typeface, Aaron Bold, and added some thick outline strokes
to help the text pop. I wanted an aggressive image for the front, and implemented an imposing, American-eagle image with the tagline, “Supporting Those Who Protect Us,” on both sides. We didn’t want too many American motifs; we strived for simple and clean.
We added in the social-media-marketing logos and URL to the bottom on both sides and the rear. Logos for both of the project’s donors span across the top on both sides. I created the files in high resolution so the colors would really pop, and the image would look crisp – even at close range.
At the armory
With the design stage complete and the project approved, we began printing color samples to assure a vibrant wrap. Bright-green grass and a vivid flag were very important to us and our client. We made some subtle color adjustments to brighten the reds and greens, edited the contrast and filtered the grass to give it a unique look.
With color testing complete, we sent all of our production-ready files to our Onyx Graphics ProductionHouse 10.2 RIP software. Once they were uploaded, we began printing the wrap on our brand-new HP Designjet 28500L 104-in.-wide, latex-ink printer. We still use our Mimaki JV33 solvent-ink printer for many of our graphics, but we’ve used the latex printer extensively for the last month. We like that it doesn’t emit solvents, and that prints don’t have to wait 24 hours to dry. We output the job at 600 x 1,200 dpi in 10-pass mode at a drying temp of 131º F; we cured the print at 230º F. We printed the job on 3M’s Controltac IJ180C-10 with Comply v3 air-release media.
We completed lamination on our 64-in.-wide GBC Arctic Titan pressure laminator with 3M’s 8518 Scotchcal glossy overlaminate. Not having to wait for the prints to outgas was a positive change. This ultra-vibrant image will now withstand the elements, even in Minnesota!
Old Glory waves
Installation occurred in one of our back installation bays. First, we meticulously prepped it by hand with XIM’s GON-2O water-based cleaner and denatured alcohol. To ensure a strong adhesive bond, we applied 3M’s Primer 94 on a few metal and plastic surfaces. We applied some silicone around some edges, fenders and wheels, and we removed rear-door handles prior to installation.
Advertisement
To create the desired effect during application, we bled the colors on our printer, and then installed the panels with a 2-in. overlap. The wrap comprises three panels per side, two in the rear, and one on each tapered front sides. The side panels measured 50 x 84 in.
We set the graphics with Scotch masking tape, one panel at a time, along one side, to ensure fit and finish. Once we’d laid out the first panel on the trailer, our professional team of 3M-certified installers was set to apply the graphics.
The installation team applied all films using felt-tipped 3M Gold nylon squeegees. A propane torch is always necessary to make the graphics more pliable on their edges and surfaces. We completed all necessary trimming with an X-Acto® knife and very steady hands. We trimmed very closely around all the edges, including the trim around the one door. We even spent extra time wrapping the door handle and surfaces.
We applied the graphics with the hinge method. We secured 12 in. of material to the top edge of the trailer, and then slowly pulled away the film’s backing layer, and we worked our way down, stretching the film and heating when needed.
We left sufficient bleed on the panels, which allowed the graphics to completely cover the trailer’s top and bottom. The clean, smooth trailer made the installation easy, and all panels conformed flawlessly.
Our installers worked from the rear of the trailer forward, and applied one sheet at a time as they carefully cut around keyholes, door handles and other obstacles. Once they’d installed the sides, they moved to the rear and applied two large panels from top to bottom.
After application, the crew went back over the entire trailer to carefully trim around all edges, which included the door, edges, handles, etc., using a 3M hole puncher and propane torch to fix any imperfections. Once complete, the team heat-polished the entire trailer with blowtorches, which warmed the graphic’s surface and removed any scratches and hazing the squeegees left on the laminate. The heat re-shrinks the laminate and gives off a flawless, glossy finish like a new trailer when complete.
The two-man crew required nearly eight hours to fully clean all surfaces and install the complete wrap, which included fender removal and installation. We couldn’t be happier with the results, and the client was very happy with the outcome. The design makes a huge impact and really achieved what we were looking for. The patriotic design flows well and will hopefully give TIUFTT large exposure at all the events it attends.
We haven’t had too many patriotic-theme projects, and are very honored to support TIUFTT’s mission.
Advertisement
Equipment and Materials
Laminator: GBC Arctic Titan 165 64-in., from GBC (Lincolnshire, IL), (800) 723-4000, www.gbcconnect.com
Media: Controltac 180-CV3 repositionable media with Comply v3 air-release technology, from 3M Commercial Graphics (St. Paul, MN), (800) 374-6722; www.3m.com; Scotchcal 8518 glossy overlaminate, from 3M Commercial Graphics
Printer: HP Designjet 28500L latex-ink, 104-in.-wide printer, from HP (Palo Alto, CA), www.hp.com, (650) 857-1501
Software: Adobe Creative Suite 6, from Adobe Corp. (San Jose, CA), (408) 536-6000, www.adobe.com
Tools: Felt-tipped, nylon squeegees, from 3M Commercial Graphics; hot-air dryer; X-Acto® changeable-blade knives, propane torch
About Creative Color
Creative Color, Inc. is a full-service graphic and print studio located in Burnsville, MN, near the Twin Cities. For 10 years, owners Jeff Volino and Brent Luther have specialized in creating effective designs that generate successful, printed-advertising solutions for a diverse customer base.
Luther said, “We really love to mix the media that we have at our fingertips. Using large-format latex-, solvent- and UV-cure-ink printers, along with vinyl-cutting plotters and a CNC router, Creative Color produces large wall murals, custom signs, vehicle graphics, banners, tradeshow displays, textiles and more.”
For more information, visit www.creativecolorstudio.com.


 Tip Sheet1 week ago
 Ask Signs of the Times3 days ago
 Photo Gallery1 day ago
 Real Deal1 week ago
 Benchmarks6 days ago
 Editor's Note2 weeks ago
 Women in Signs1 week ago
 Photo Gallery1 week ago