Metal Fabrication
Deneba Software’s Canvas 8
Draw, create, even animate
Published
18 years agoon

Although technology makes our lives easier, it can also complicate them. Signmaking has evolved from Cro-Magnons using charcoal on cave walls to today, when vinyl cutters slice adhesive graphics in dizzying detail, and digital-imaging devices produce wall-sized graphics that appear to have come straight from the photo finishers. The problem is, you need a boatload of computer applications to keep feeding the output devices.
Cutters and printers are dissimilar in that one uses a vector or line-based graphic, and the other requires bitmapped images. To complicate matters further, you try to leverage your existing computer equipment to produce promotional materials, and, if you’re trying to keep up with the times, maintain a Website. The next thing you know, you must remember how to use five or six different applications just to maintain day-to-day business.
Many high-end sign packages have excellent vector capabilities and decent bitmapped-graphics features, but if you want to create a mail piece or an animated graphic for your Website, forget it.
This month, we’re reviewing a product whose original version may be new to you. Canvas 8 Professional Edition, Deneba’s latest release for the Windows platform, addresses a large percentage of creative needs in one package, with a unified tool set and user interface.
Canvas creates vector graphics quite well, and it can create and edit images. It has some text-composition features usually found only in desktop-publishing packages, and it has hooks that let you create Web animations, and even publish directly to a Website, without skimping on any features.
The user interface
When we first fire up an application, we do what every shop does — see how much we can figure out without cracking the books. For Canvas 8, the drawing tools imitate many familiar applications. Creating a new document is easy, and actually drawing something is also a snap.
When it came time to change color or line styles, the hunt began. We had a similar experience with Canvas 8 until we read the "Getting Started" guide and found out how logically the user interface is organized.
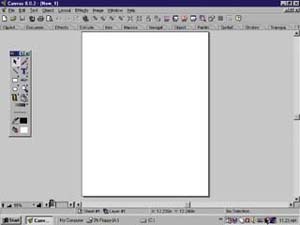
Fig. 1 shows the Canvas window with a blank drawing. Notice the tabs just below the tool buttons. The legends are easy to understand, and, if you click on the tab, a new menu appears.
Want to change color? Just click on "Inks." If you frequently use a menu, hold down the mouse button, and tear off the menu. It will remain a floating menu until you re-doc it as a tab.
Once we figured this out, using Canvas was easy. You can even access Canvas’ extensive clipart library from a tab. This makes it so easy to store and locate commonly used menus and palettes.
Canvas is very powerful, and it creates diverse applications. So what do you call them? Is a brochure artwork? Is a line drawing a Web animation? Deneba refers to all of these examples as documents. So how do you choose a document?
Upon selecting "New" from the file menu (Fig. 2), the program tells you to select an illustration, publication, animation or presentation. An illustration — the general-purpose document you’ll probably use most — contains a few differences from other programs.
Notice the drop-down menu called "Use template," which changes, depending upon the document you’re creating. For example, under "Illustration" is a calendar template.
If you’re creating a publication, templates for Z-fold brochures and newsletters are available. A wizard prompts you to provide information to create a framework for your task. The concept of multi-paged documents is supported by the ability to create master pages that hold information common to all pages.
Canvas includes a full set of drawing aids, including grids, rulers and guidelines. All the tool palettes and menus are easy to use and well organized. Deneba also includes excellent documentation and a nice tutorial as part of the "Help" system. Rather than discuss the various drawing and creation tools now, we’ll discuss the different creation aspects and cover the tools later.
The documents support layers that allow you to place objects on different planes of a document. This function also allows you to apply effects on an isolated group of objects or vary transparency levels so that objects on a lower layer are seen through the top layer. A top-down view of the document, with all its layers, is displayed by opening the "Document" palette (Fig. 3). Layers can be locked, made invisible and set "not to print" if you want to add notes or instructions to the creative staff.
Vector drawing tools
The heart of the Canvas application is its outstanding vector-drawing tool set, which is designed so you can create precise CAD-like drawings or graphic-arts illustrations. Starting with a blank document, you work from the "Tools" palette. You’ll quickly notice that this palette contains tools for working with all object types. The bitmap-editing tools, GIF-animation tool and text-composition tools are all contained in this palette.
Few tools are apparent, but notice that each little box has a small arrowhead pointing to the right. This indicates other tools exist. Just click and hold the mouse button, and an extended palette appears. You can tear off the extended palettes if you’re working with a group of tools. Further, you can create a tab field to quickly recall them.
In all, we counted 13 separate palettes within the compact palettes menu (Fig. 4). The "Objects" palettes include graphics primitives created with lines, ovals, rectangle and paths.
You can draw an object two ways: You can choose the classic click-and-drag to make a freehand object, or, if you want precision, select an object from the palette and click on the document.
A menu appears that allows you to enter exact measurements. This expedites exporting the graphic into a sign package for cutting or finish work.
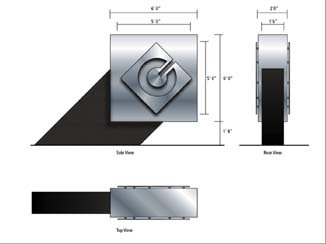
If you’re making precision drawings, you may want to add dimensional callouts (lines with arrow- heads showing the signpost needs to be, say, 13.5 ft. from the sidewalk). Canvas has extensive dimensioning tools that facilitate this task. It even displays the object’s area or shows the angle of two sides. The callouts are fully editable text objects.
For free-form objects, the software provides extensive support for drawing paths. The tools have both freehand and polygon modes, with which you can draw attached line segments. As for editing a path, the "Push" tool lets you coerce a shape; the "Auto Curve" tool converts points to curves; and the "Reshape" tool lets you replace part of a path by drawing over it. Other standard node-editing tools allow the usual add or delete nodes, as well as the ability to smooth line segments or sharpen corners. In all, it’s one of the most extensive sets of path-creation tools we’ve seen.
The "Dimensioning" tool may seem a little unusual, but if you ever need to draw a spiral, this tool produces one with a mouse click and drag. The "Autoshape" tool produces multi-sided polygons. We especially like the "EasyShape" tool, which contains numerous shapes, including arrows, cartoon-speech bubbles and lightning bolts. Some of them have "smart" editing capabilities. For example, a cartoon-thought bubble can be stretched without distorting its overall shape. Other tools in the "Object" palette let you add registration marks, and draw grids and cubes.
We’ve really glossed over the program’s editing capabilities. All the vector objects can, of course, apply line styles, weights, colors and even neon effects. You can fill objects with solid colors, gradients, textures, hatches, patterns and symbols. The menus are easy to follow.
Sprite Effects
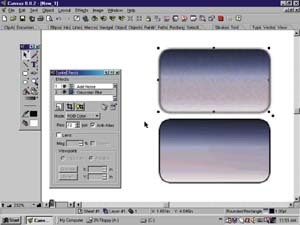
"Sprite Effects" (Fig. 5) brings unprecedented creativity to vector and text objects. In essence, you can apply many of the cool filters and effects that you’ve seen for bitmap images directly to vector artwork or text. Want to blur clipart? Want to emboss or bevel a text heading? No problem. Just apply a sprite effect.
The interface is very easy to use. Select the object or group of objects, and then select "Sprite Effects > Filters" from the "Object" menu. You can also display the Sprite Effects palette from the "Palettes" menu or tab. Here, you can see all the effects set for any objects in the document.
The effects can be applied to newly created objects as well. So if you devise a great set of filters for text effects, you can save them and apply them to new documents. You can also turn the effects off to ease editing.
So what happens if you export a vector or text object with Sprite Effects applied? The graphic is rendered as a bitmap, so all the cool effects are visible. This extremely powerful new feature really makes Canvas a lot of fun.
Image tools
Today, graphics packages typically offer some degree of image manipulation and/or creation. Usually, these tools are offered in a separate package, and images are merely imported into the drawing package, but it’s a pain to shuffle between software packages. Happily, Canvas has a fairly extensive set of image-editing tools within the same package.
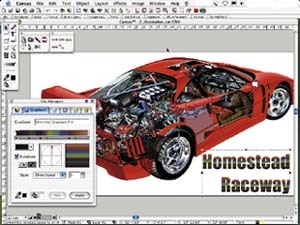
Bitmapped images, such as TIF, JPG and PhotoCD files, can be opened directly or imported via the "Acquire" item in the "Image" menu. You can also scan directly from a Twain-compliant device. Once an image is available, it coexists with vector or text objects in the same document. An auto-trace function converts an image into a vector file. We were extremely pleased to see an acquired Photoshop® PSD file maintain all objects (Fig. 6) in discrete layers, including the transparency settings. In other programs, these files appear as flattened images, making them difficult to edit. Canvas 8 can also convert a vector object or group of objects into a bitmap, which is quite helpful when transferring the file to another program that only accepts bitmaps.
The "Paint" tools palette contains all the usual suspects, such as eraser, saturate/desaturate tool, cropping, selection tools, pencil, paintbrush and airbrush. Such special effects as blurs, sharpens, embosses and bevels can be applied to the image. You can create selection masks for isolating individual items from an image.
Text composition tools
Text is usually an afterthought in graphics programs. In many cases, you import the graphics into a page-design program and then combine text with the image. Canvas 8, on the other hand, has extensive text-editing capabilities. Its document-creation wizard even includes an option for brochures and presentations.
A good set of text tools, such as that found in this software, should create common page layouts, including multi-column pages. Text should flow around graphics without manual adjustment. Fine-tuning text adjustments, such as kerning and leading (adjusting space between letters or lines), should be available for proper layouts.
In addition, text should work well in a graphics environment. You should be able to place text on irregular baselines, such as arcs or paths. The ability to place text in containers should be paired with the text automatically adjusting to the shape.
Canvas 8 allows signmakers to create conceptual drawings to forward directly to the customer.
Canvas 8 offers these features and more. The "Text Properties" palette puts every setting in an easy-to-use menu. Column guides and the concept of master pages ease creation of complex documents with repetitive information, such as your company name or page numbers. The average signshop could probably produce the bulk of its marketing collateral pieces with Canvas 8’s text features.
Conclusion
Our shop uses numerous output devices, but we can never find one specific program to create artwork. If you work with both vector and digital output, you probably run multiple software packages for editing and original-artwork creation.
Canvas 8 offers a robust set of tools that handles vector line work and desktop-publishing documents. The easy user interface offers impressive flexibility. In our opinion, signmakers should definitely consider this product.
Visit the company’s Website, www.deneba.com, to obtain your own demonstration copy.
Company: Deneba Software
1150 NW 72nd Ave.
Executive Tower 1
Miami, FL 33126
Phone: (305) 596-5644
(800) 722-6827
Fax: (305) 406-9802
Company Background: Since 1986, Deneba Software has developed and published graphics software for the global graphic design and technical illustration market.
Contact: Curtis Christensen, public relations manager
Minimum System Requirements: Windows: Pentium II, Windows 95/98, ME, 200, NT 4.0 or XP; 64 MB RAM; 100 MB hard-drive disk space; 16-bit color; 800 x 600 screen resolution.Mac OS X and OS 9: PowerPC processor (G3); System 9.0.4 or Mac OS X (version 10.1); 64 MB RAM for OS 9.0.4; 128 for OS X; 100 MB hard-drive disk space; 16-bit color, 800 x 600 screen resolution.
List Price: $399
Note: ST‘s product-review policy is that items must have been offered for sale for 30 days before the review. Add this to ST‘s typical production time, and at least 60 days may have passed since this product’s introduction. New or revised editions may have come on the market during that time.


SPONSORED VIDEO
Introducing the Sign Industry Podcast
The Sign Industry Podcast is a platform for every sign person out there — from the old-timers who bent neon and hand-lettered boats to those venturing into new technologies — we want to get their stories out for everyone to hear. Come join us and listen to stories, learn tricks or techniques, and get insights of what’s to come. We are the world’s second oldest profession. The folks who started the world’s oldest profession needed a sign.
You may like


Advertisement
Subscribe

Magazine
Get the most important news
and business ideas from Signsofthetimes Magazine.
Advertisement
Most Popular
-

 Tip Sheet1 week ago
Always Brand Yourself and Wear Fewer Hats — Two of April’s Sign Tips
-

 Ask Signs of the Times3 days ago
Why Are Signs from Canva so Overloaded and Similar?
-

 Photo Gallery1 day ago
30 Snapshots of the 2024 ISA Sign Expo
-

 Real Deal1 week ago
A Woman Sign Company Owner Confronts a Sexist Wholesaler
-

 Benchmarks6 days ago
6 Sports Venue Signs Deserving a Standing Ovation
-

 Editor's Note2 weeks ago
Why We Still Need the Women in Signs Award
-

 Women in Signs1 week ago
2024 Women in Signs: Megan Bradley
-

 Photo Gallery1 week ago
21 Larry Albright Plasma Globes, Crackle Tubes and More