All printed graphics used for vehicle wraps should be protected with an overlaminate or a clearcoat.
"Before applying an overlaminate or clearcoat, make sure that the print is completely dry," Laura Wilson, Roland DGA Corporation’s (Irvine, CA) product manager, said. "If you clearcoat, it’s better to apply two thin coats instead of one thick coat. This prevents trapping any residual solvents."
Many companies that specialize in vehicle wraps prefer overlaminates because they give the film extra rigidity. "We use cast-vinyl film from Arlon with their cast-vinyl overlaminate," John Checkal, Straight Line Graphics’ (Huntington Beach, CA) owner, said. "It has high adhesion and seems to handle a lot of distortion without losing tack or adhesion."
When laminating the print, don’t use too much unwind brake pressure, or the overlaminate can stretch. Checkal said, after the graphic has just been printed, the film and adhesive are in their softest state because of some residual solvents. Excessive laminate tension triggers graphic tension, which causes the entire finished product to shrink. Within a day or two, while the graphic remains on its release liner, shrinkage will occur at the edges. A few months after installation, the edges will start to shrink and lift at the overlaps.
Checkal also recommended using an ultra-low-tack premask. He claimed the protective masking gives the print extra stiffness, which eases graphic application and saves time.
"When you apply graphics outside in the heat, cast vinyls tend to stretch," he said. "The masking holds everything together, so one panel lines up perfectly with another with no mis-registration."
Advertisement
Being efficient
Installations are challenging because they impose many obstructions, such as hinges, gas-cap doors and compound curves. Chuck Bules, Arlon’s technical-services manager, recommends removing mirrors, lights and any other detachable impediments.
"If you don’t remove these obstructions, you can waste a lot of time cutting, tucking and wrapping the film," he said. "Usually, it’s much more efficient to remove the obstructions, apply the film and replace the parts. And, organize all of the parts in one place."
By taking these extra steps, installations are usually completed faster and look more professional.
Surface preparation
Successful installation of any vinyl graphics depends on proper surface preparation. Dirty surfaces and poor application techniques most often cause adhesion failure.
Advertisement
Surface preparation is a three-step process. The difference between installing a logo and a few words on the truck’s side, and completely covering a vehicle with graphics, is that vehicle wraps require cleaning every part of the vehicle. This includes the paint at the bottom of the wheel wells, inside the doors and door jambs, and all around the gas-cap door.
Make sure the vehicle is spotless before you start. First, wash the surface with detergent and water. Second, use a solvent cleaner to remove grease, tar and waxes. Finally, wipe the surface with an alcohol-and-water mixture.
Even though a washed surface looks clean, such contaminants as waxes, grease and oils are most likely still present. To remove these contaminants, use DuPont
Successful installation of any vinyl graphics depends on proper surface preparation. Dirty surfaces and poor application techniques most often cause adhesion failure.
Surface preparation is a three-step process. The difference between installing a logo and a few words on the truck’s side, and completely covering a vehicle with graphics, is that vehicle wraps require cleaning every part of the vehicle. This includes the paint at the bottom of the wheel wells, inside the doors and door jambs, and all around the gas-cap door.
Make sure the vehicle is spotless before you start. First, wash the surface with detergent and water. Second, use a solvent cleaner to remove grease, tar and waxes. Finally, wipe the surface with an alcohol-and-water mixture.
Advertisement
Even though a washed surface looks clean, such contaminants as waxes, grease and oils are most likely still present. To remove these contaminants, use DuPont®’s 39192 Prep-Sol or a grease and wax remover. In the sign trade, many graphics installers use such products as Rapid Prep or TFX Professional Striping Cleaner.
After you use the solvent surface cleaner, give the surface a final wipe with denatured or isopropyl alcohol. This last step should be performed with both hands. In one hand, you’ll need a rag saturated with alcohol. In your other hand, keep a clean rag or paper toweling. After you apply the solvent, wipe it dry before it evaporates.
Use caution — as I always say, test, don’t guess. To ensure you don’t damage the paint system of a car or truck, test the solvent on an inconspicuous area of the vehicle before using it. Doing the final cleaning right before vinyl application removes airborne contaminants that may have settled on the vehicle’s surface.
Wet or dry?
Wouldn’t it be nice if you could perform every application in a climate-controlled bubble? Unfortunately, life doesn’t work that way. Sometimes, we have to contend with summertime heat, which may cause adhesives to stick prematurely. When working in hot weather, many people resort to application fluid.
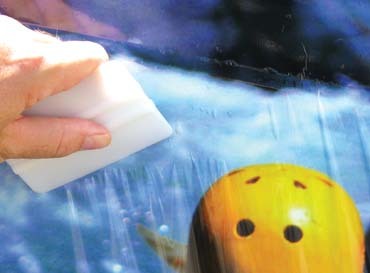
If you can complete the application dry, do so. Many, though, will opt for a wet application. If that’s your choice, here are a few suggestions. First, use a commercial-grade application fluid, such as RapidTac, rather than a homemade concoction. Commercial-grade products ensure consistency.
Also, use the least amount of application fluid necessary. For wet applications, use good squeegee pressure to expel all fluid from underneath the vinyl graphics. Any residual fluid contaminates the graphic’s adhesive, which can lead to adhesion failure.
"Application fluid can impair speed if you use too much of it. If you’re in a real hurry, apply the film dry," Bules said. "Never use application fluid as a crutch. It’s better to learn good installation techniques and continually practice your craft to hone your skills."
The installation process
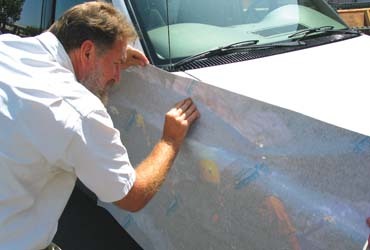
When handling large sections of sticky graphics, you may have wished that God had given us two extra hands.
For vehicle wraps, cut the installation time in less than half by working with a partner. An extra set of hands can help hold the graphic away from the application surface and prevent pre-adhesion accidents. And a partner can help stretch the material to conform around compound curves.
Before starting the application, tape all of the pieces in place to ensure they reach the correct spot. This is also the time to plan the installation sequence. Many installers start with the hood, and then install the sides. Other installers start from the rear of the vehicle and progress towards the front. Decide what works for you.


 Tip Sheet1 week ago
 Ask Signs of the Times3 days ago
 Photo Gallery23 hours ago
 Real Deal1 week ago
 Benchmarks6 days ago
 Editor's Note2 weeks ago
 Women in Signs1 week ago
 Photo Gallery1 week ago