LEDs + Lighting
Glass-o-maniacs
Some hints to improve your glassworking skills
Published
18 years agoon

As an instructor for many neon workshops, I’ve discovered some helpful tips to facilitate and improve your glasswork. Because literature on the subject of neon glassworking is quite rare, some of the tips I offer here are not covered in other publications. In lieu of formal training, many neon fabricators learn by trial and error. Unfortunately, this leads to incorrect techniques that become ingrained. This month, I offer some practical hints to help beginners and old-timers alike.
Setting the fires
Previously, I mentioned that a scientific glassblowing expert once told me, "A good fire is half of a glassbender’s work quality." Assuming that you use the correct torch tip for the type of gas you’re burning, and the gas and air pressure are adequate, how do you determine the correct setting for your fires? My first answer is a common scientist’s response: "That depends." To be more precise, the correct fire setting depends on the type of glass you use.
The lead-glass fire
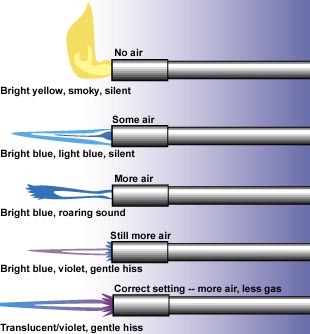
For decades, the U.S. neon industry used lead glass almost exclusively. Lead glass is named for one key ingredient: lead oxide. Today, lead glass contains 12-28% lead oxide by weight. When lead glass is heated in a flame containing unburnt fuel, oxygen atoms are released from this oxide to complete combustion of fuel in the flame. After the oxygen is consumed, metallic lead remains in the glass, forming a black-silver deposit. But when the flame itself contains sufficient oxygen to completely burn all combustible material, additional oxygen atoms from the tube’s lead oxide are not consumed. In this case, the glass stays clean.
To work lead glass, therefore, the flame setting must contain enough air (oxygen) to allow complete fuel combustion. To set this type of flame, adjust your torch until you achieve a gently hissing, long, dark-violet flame with a small, bright-blue cone in the center (Fig. 1). This setting is right at the point where the air cannot be increased without causing the flame pilots to be unstable or flickering, thus extinguishing the main flame within a few seconds.
I’ve seen many beginners use hand-torch flames so large that the dark-violet cones create visible side splashes of fire. When working glass with this type of flame, the bright-blue cones contact the glass surface. Because this part of the flame lacks oxygen, lead glass blackens where the flame touches. This is unnecessary because the hand-torch gives more than enough heat with a smaller flame. The flames should be adjusted until their dark violet parts are separated by approximately the diameter of tubing you’re fabricating.
When working colored glass, the same precautions should be observed. Colored glasses contain different metal oxides that may also be affected by oxygen-poor flames. This can result in irreversible stains at the heated areas. On colored tubes (particularly red, orange and yellow), you frequently see discolorations at sharp bends or splices. This discoloration usually occurs when tubes remain in hot flames for excessive time periods. This practice should be avoided because it alters the chemical and physical properties of the coloring agents in the glass. Whenever possible, try to work fast and hot.
Other glasses — like barium-strontium "lead-free" glass and classic European soda-lime glass — don’t require such precise flame adjustment.
AdvertisementStarting with your flame set correctly for lead glass, simply increase the gas to a point where the dark-violet flame brightens. This creates a hotter flame for faster work. Because these glasses contain no lead, there’s no negative effect if you touch the inner cone of your flame to the glass. Keep in mind, however, that this flame setting creates a hot spot near the front of the bright-blue cone (approximately 1/8 in. from the cone). This cone, though, is still much cooler than the rest of the flame. Remember that, with a hotter flame, the glass is more susceptible to stress cracks. Thus, the glass requires gentle pre-heating prior to working. Placing lead-free or soda-lime glass directly into a blue flame will crack the glass.
Setting the Ribbon Economizer
Setting flames on the ribbon burner is much the same as setting crossfires or hand-torches. The only problem is that most burners are equipped with "economizers" incorporating a lever and adjustable setscrews. Because I’m routinely asked how to properly set the economizer, I’ll explain the entire procedure.
The gas and air lines leading to the economizer must be equipped with stopcocks for adjusting the ribbon burner’s flame. To begin, first close the gas stopcock and open the air stopcock wide. Next, flip the lever on the economizer to the working position (where more air can be felt blowing through the burner grid). Then, partially close the air stopcock and place a lit torch directly over the grid. Open the gas valve until the flame ignites, but beware not to lean over the burner! I’ve seen several people catch their hair on fire when they didn’t anticipate the large burst of flame that sometimes occurs when gas ignites.
Adjust the flame’s width to approximately 75% of the burner’s length using the slide. Then, regulate the air and gas with stopcocks until you obtain a dark-violet flame that extends approximately 5 in. above the grid. Keep the fire’s small, bright-blue cones to a size of approximately 3/8 in. For this procedure, don’t touch the economizer, just use the external stopcocks.
When your flame is perfectly adjusted, quickly flip the economizer lever to the opposite position ("econo" or "standby"). Next, use a lighted torch to start the fire. Using a screwdriver, turn the small setscrew for the economizer’s gas inlet slowly counterclockwise until the flame lights. When it reaches a uniform height, the flame should be yellow in color and approximately 1 in. high. Next, turn the setscrew for the air inlet, adjusting the flame at the grid surface to a slightly bluish color. Then, flip the lever on the economizer quickly back to the working position, taking care not to lean over the burner.
The flame should stay lit, but if it blows out, the standby setting is admitting too much air to the mix. In this case, switch the lever quickly back to "standby." Watch to ensure that the flame stays lit. If not, you must increase the gas supply in the "standby" mode by adjusting the gas setscrew. Don’t change the setting of your stopcocks while making this adjustment. Then, repeat flipping the lever to make sure the flame stays lit.
AdvertisementNow you can change the flame’s width according to your work and use the stopcocks to readjust the working flame. The flame should now remain lit in the standby mode.
If the flame blows out when you switch back to the working mode, and your standby flame is already higher than 3 in., your air pressure may not be constant. In this case, an economizer typically incorporates a small stopcock located near a small side-tube. This is an air-bleeder valve that maintains airflow in the standby mode and prevents high pressure from building up in the airline. If your flame blows out when you switch the economizer, open this bleeder valve to release the air pressure. Otherwise, keep it closed to reduce the noise level.
Cut it, don’t break it
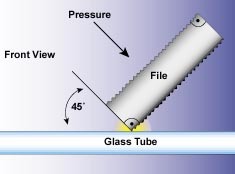
Beginners often get frustrated when cutting glass, especially large-diameter tubing. For a good, clean cut, you need a very sharp, flat file with a blade thickness of at least 1/8 in. Thinner sheet-metal files bend when the glass is scored, causing the glass to break unevenly.
When sharpening your file on a bench grinder, make sure to grind the side of the file exactly perpendicular to the working side of the file. A new file should also be lightly ground before use to expose the small teeth on its edge.
To cut a tube, tilt the file at 45? in relation to the glass surface (Fig. 2). Next, press it firmly in the direction of the arrow until you hear or feel a slight crunch. Then, quickly pull the file back, maintaining pressure as you turn the tube slightly. The scratch mark should be perpendicular to the tube. Never "saw" back and forth with the file because this always results in a bad cut. To complete the cut, just pull the tube apart with a quick, hard tug in the direction of the tube’s axis. But don’t try to break the tube as you would snap a twig in half. In my experience, tapping the tube with your file while pulling slightly is only effective for small diameters of lead glass.
When cutting large-diameter, soda-lime tubing or the curved portions of bent tubes, I prefer using an electric hot-wire cutter. This tool incorporates a pliers-type handle with a loop of resistance wire on top that’s connected to a small transformer. To use this tool, first score the glass all the way around using a tungsten-carbide knife (the same type of tool used by scientific glassblowers). Deep scoring is not necessary, just a barely visible line scratched in the glass surface. Next, place the wire loop around the tube exactly at the scored line and tighten it slightly. Switch on the electric current and wait. The wire glows red hot and, after several seconds, you’ll hear a slight cracking sound from the thermal stress created along the cut-line. This method always produces clean cuts, even in otherwise impossible situations such as cutting 1/4 in. off the end of a broken 25mm ruby-red tube.
AdvertisementTed Pirsig extolled the virtues of hot-wire cutters in "The Neon News" (winter 1991). According to Pirsig, "If you don’t have a hot-wire glass cutter, then buy, build or steal one — whatever it takes. I worked for three years without one, then built one for about $40. My health, sex life and finances improved immediately." Need I say more?
SPONSORED VIDEO
Introducing the Sign Industry Podcast
The Sign Industry Podcast is a platform for every sign person out there — from the old-timers who bent neon and hand-lettered boats to those venturing into new technologies — we want to get their stories out for everyone to hear. Come join us and listen to stories, learn tricks or techniques, and get insights of what’s to come. We are the world’s second oldest profession. The folks who started the world’s oldest profession needed a sign.
You may like


Advertisement
Subscribe

Magazine
Get the most important news
and business ideas from Signsofthetimes Magazine.
Advertisement
Most Popular
-

 Tip Sheet1 week ago
Always Brand Yourself and Wear Fewer Hats — Two of April’s Sign Tips
-

 Ask Signs of the Times3 days ago
Why Are Signs from Canva so Overloaded and Similar?
-

 Photo Gallery1 day ago
30 Snapshots of the 2024 ISA Sign Expo
-

 Real Deal1 week ago
A Woman Sign Company Owner Confronts a Sexist Wholesaler
-

 Benchmarks6 days ago
6 Sports Venue Signs Deserving a Standing Ovation
-

 Editor's Note2 weeks ago
Why We Still Need the Women in Signs Award
-

 Women in Signs1 week ago
2024 Women in Signs: Megan Bradley
-

 Photo Gallery1 week ago
21 Larry Albright Plasma Globes, Crackle Tubes and More