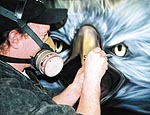
I’ve worked on many unique projects in the custom paint business — everything from airplanes to artificial legs. Nonetheless, I’ve always wanted to work on a Hummer. Since the vehicle is very rare, however, I shelved the idea — that is, until I received a call from Gary Berg, owner of Left Coast Designs (Thousand Oaks, CA). Gary asked if I would work with him on a job for a Hummer dealership that wanted an eye-catching graphic on its promotional vehicle.
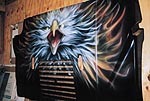
Gary thought one of my eagle treatments — particularly the eagle I did for the 7th Annual Pinhead Summit — would be just the ticket. The bird is a striking portrait of an angry, screaming American Bald Eagle. What makes this eagle look menacing is that the white plumage flaring from its head ends in a brilliant crown of fire. Gary wanted me to paint the eagle on the Hummer’s hood and blend it into a pearl-colored American flag he was installing down the sides of the vehicle.
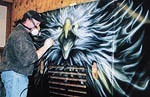
Before I arrived at his shop, Gary removed the hood, washed it and removed any wax and grease with RM 901 wax remover and cleaned off the 901 residue with Windex. Next, Gary used a gray ScotchBrite pad to give the hood’s surface "tooth," so the paint and clearcoat would stick to the metal. He then wiped the hood down with a tack rag to remove dust generated from the scuffing.
I thank Gary for inviting me to sunny Southern California to play on this project. I had a great time, and knocked another item off my "want to paint list"! We completed the rig in just a few days and have received rave reviews from everyone who has seen it. Facing the highway, the Hummer is on a ramp display, with the hood raised high. From what I hear, it is dragging people off the street to see why that bird has such an attitude. Mission accomplished!
The accompanying steps show how to create an "eagle with attitude."
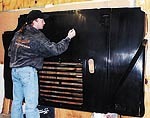
Step 1
Project a photo of the eagle panel onto the hood and lightly sketch it with a Stabilo pencil. Mark only the outer edges of the feathers, eyes, beak and inner mouth.
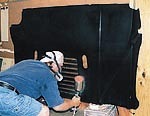
Step 2
Give the hood sketch a sealer coat of PPG Inter-Coat clear. This step locks the sketch on the hood and promotes the paint’s adhesion.Continue to build the feather patterns, as well as the details of the eyebrows, upper and lower beak and the interior of the mouth. Complete this process quickly to keep the image’s energy.
Step 3
The fun begins! Start laying in the eagle’s face with thin-mixed white PPG paint. Spray all facial features first to act as the foundation for the rest of the painting. Paint in bright highlights on the first layer to build color intensity as the mural progresses.
Step 4
Continue to build the feather patterns, as well as the details of the eyebrows, upper and lower beatk and the interior of the mouth. Complete this process quickly to keep the image’s energy.
Use only white at this stage because the following colors will be semi-transparent; white intensifies color where it’s brighter and darkens it where the color isn’t as bright. This provides a broader range of colors, and the airbrushed paiting looks more dynamic.
Step 5
Now that the eagle’s face, raised feathers and flame pattern are laid down with white, paint the face’s yellow areas. Start with the beak and eyes, then move to the tips of the raised feathers where they begin to blend into the flames.
Step 6
With transparent orange, paint some flame tips to build the color. At this point, try to establish a range of colors without getting a final color. Also paint the mouth with some transparent red.
Repeat the painting steps from the yellow up to the previous point again. Doing so makes the colors become brighter and brighter.
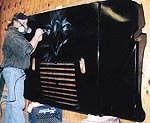
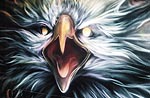
Step 7
Although this photo shows face detail, the eagle’s features are still in the fuzzy stage.
Step 8
Tighten the image by building up the darker areas, such as the pupils and outline of the outer eye. Also, darken the inside of the mouth and outline the beak. Add transparent purple to the underside of the jaw to create shadow. Repeat this process to the undersides of each brow, and the inside of the mouth and beak. Apply blue paint to the shadows to create a cool complementary shade to the brighter hot colors in the following stages.
Rebuild the white highlights on the bridge of the beak, both cheeks, eyebrows and forehead. A "see-saw technique" works well when building many layers of the same colors to achieve depth. When you clearcoat the Hummer, all the colors will intensify dramatically.
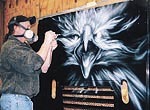
Step 9
The colors work together to give the eagle "attitude." To give the beak some life, mix a reddish-brown color using red and orange with a touch of purple and a little black. Spray the mixture on the shadow side of the beak, parts of the mouth and the perimeter of the eyes.
Step 10
Highlights bring the eagle to life. Apply a small dot of white at the one o’clock position on the eye. Then, highlight the beak’s bridge, the edges of the lower beak and the tip of the tongue.Adding fine metallic gold to the eyes makes them more lifelike. With masking film, carefully cut out the eyes, leaving the pupil covered. Add gold to the bottom edge of the eye, unmask it and re-apply a brown "glow line."
Step 11
Adding fine metallic gold to the eyes makes them more lifelike. With masking film, carefully cut out the eyes, leaving the pupil covered. Add gold to the bottom edge of the eye, unmask it and re-apply a brown "gold line."
Step 12
The painting is about 85% complete. Apply another coat of Inter-Coat clear to protect the paint. The next day, repeat the flame’s colors for added punch and begin to paint the blue pearl and stars to the flag’s front.
Equipment and Supplies
Airbrush: Iwata Eclipse, distributed by Medea Airbrush Products (Portland, OR), (503) 253-7308.
Paints, Clearcoats and Reducer: PPG Base coats and toners, PPG Inter-Coat clear and PPG DT 860 manufactured by PPG Industries (Pittsburgh, PA), (412) 434 3131.
Sandpaper: 1200-grit wet/dry sandpaper, available at most hardware stores.
Pencils: Stabilo pencils, manufactured by Stabilo (Heroldsberg, Germany), available through art-supply stores.
Wax and Silicone Remover: RM 901, available at most automotive stores.
Masking: Transparent gray masking film, manufactured by Mactac (Stow, OH), (330) 689-2290.
Knife: Exacto #11 blades, available at hardware, art and sign-supply stores.
Miscellaneous: Gray 3M ScotchBrite


 Tip Sheet1 week ago
 Photo Gallery2 days ago
 Ask Signs of the Times4 days ago
 Real Deal1 week ago
 Benchmarks6 days ago
 Editor's Note2 weeks ago
 Women in Signs1 week ago
 Photo Gallery1 week ago