Individual letters have traditionally been one of the most popular signage styles. The clean, expressive appearance of dimensional letters is still preferred by many customers, and is unparalleled in applications where dignified identity is a must. The great variety of materials used in building construction, however, can make letter installations challenging. If you’ve had the misfortune to attempt your first letter installation on a marble, granite or fluted masonry surface, it might seem that these projects are beyond your capabilities. With the proper tools and techniques, however, you’ll get "letter-perfect" results.
A matter of space
If you have children in grade school, you may be aware that the currently accepted means of enforcing classroom discipline involves assigning a private "bubble" or "space" to each child. The child is told that he should always respect his neighbor’s space (if not the actual neighbor). Although the psychological benefits of promoting such concepts seem tenuous at best, a real-world version of this idea applies to copy layouts. Each character has its own unique space, which is determined by its shape.
Two fundamental facts about letters should be noted. The first is that seven letters of the alphabet (C, G, J, O, Q, S and U) ordinarily occupy slightly larger vertical spaces than the other 19 letters. If you draw two parallel lines, one across the top and a second across the bottom of the non-curved letters on a typical sign (Fig. 1), you’ll see that these lines cut through the arcs of the rounded characters (including numerals 2, 3, 5, 6, 8, 9, 0). If you reduced these characters to a size small enough to fit between the horizontal lines, they would appear undersized compared to the rest of the copy.
A second factor is the variation in character widths. This can be a real problem if the copy is installed vertically (Fig. 2). For such installations, the letters or numbers will probably need to be custom-made to achieve a uniform appearance.
Mounting methods
Individual letters can be mounted to wall surfaces using either exposed or concealed fasteners. Exposed fasteners are more typical of amateur installations, because sign professionals are familiar with some major drawbacks. First and foremost, exposed fasteners are unsightly on the faces of the letters. Although they can be painted a matching color, ordinary screws and bolts are subject to rusting, which creates unsightly stains on the letters. Using stainless steel fasteners alleviates this problem, but still doesn’t provide a first-rate appearance. Another problem is that plastic letters can be cracked when mounting holes are drilled, or when exposed fasteners are tightened.
Most likely, you will prefer one of the three standard methods for concealed mounting. Probably the most common method is stud-mounting (Fig. 3). Threaded metal studs screw into mounting blocks attached to the backsides of the letters. The installer uses a caulking gun to fill the mounting holes in the wall with adhesive (commonly silicone), and inserts the letter studs. When the adhesive dries, the letters are securely fastened. One advantage of this method is that the letters can usually be removed without damage for installation at another location (by carefully pulling them straight out of the wall). Where the mounting surface is uneven (rough stone, corrugated metal siding, fluted masonry), stud-mounting allows the installer to adjust the letters for alignment in a uniform plane.
A second concealed mounting method employs round or square, perforated pads (commonly called "flex-pads") composed of plastic or metal. These flex-pads typically screw onto the ends of threaded studs that attach to the backsides of the letters. The installer applies an adhesive to the surface of the pads (Fig. 4) and mounts the letters to any flat, non-porous surface. The letters must be held in place with masking tape (Fig. 5) while the adhesive dries to prevent sagging. Unlike other mounting types, pad-mounted letters cannot be installed using a full-sized paper template, because they adhere directly to the wall surface. It’s necessary to use a spacing tape (available from the manufacturer) to ensure proper layout. Also, the installer must make reference marks on the wall indicating the outlines of any rounded letters for proper orientation. Although it’s possible to remove pad-mounted letters using a putty knife, this is difficult to accomplish without damage.
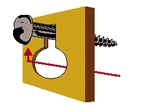
The third type of concealed mounting is the keyhole slot method (Fig. 6). The installer attaches screws to the wall according to the mounting locations indicated on a paper template and subsequently slips the letters’ rear keyhole slots over the screw heads, pushing down to lock them into position. This is the same method used to attach wall-mounted telephones. Because it’s impossible for the installer to completely tighten standard screws used to attach keyhole-type letters, a special type of fastener is used that can be tightened from the side using a wrench (Fig. 7). This ensures that the letters can’t be dislodged from their mountings, which sometimes occurs when ordinary screws are used.
Time-Saving Template Tips
To install stud-mounted and keyhole-type letters properly, you must have a full-sized paper template of the copy layout with the mounting points marked (Fig. 8). Manufacturers of dimensional letters typically provide mounting templates at additional cost for any font style or copy layout. It’s also possible to create your own template using standard brown pattern paper, but the time involved to do this may not be worthwhile?except in cases where no template is available (ie, your customer wants an existing sign moved from one location to another).
Before placing it on the wall, prepare the template to make your job easier. Most templates include horizontal centerline marks that divide the letters in half. I’ve never found these lines to be particularly helpful, because you can’t see through the paper to align the template with reference marks on the wall. I recommend using the baseline of the copy to align the template (Fig. 9). Draw this baseline on the template, using a long, metal ruler. Also use the ruler to draw a vertical reference line at the left-hand edge of the copy (where the first character begins), intersecting the baseline. Next, trim off the excess paper below the baseline with a pair of scissors. The baseline should be at the bottom edge of the template to facilitate alignment with reference marks on the wall.
Attaching paper templates to walls can be tricky, and installers need to observe certain precautions:
1) Never attempt to work outdoors with a mounting template on a rainy or windy day. It’s difficult to salvage a torn or soaked paper template.
2) Make certain that your reference line (on the wall) is parallel to the "apparent level" of the facade.
You shouldn’t rely on a bubble-type level for proper alignment of mounting templates, because the horizontal lines of some building facades may not be perfectly level. This can be caused by the foundation settling (more common with older buildings) or by improper leveling of flashings, mouldings and other types of facade trim by building contractors. Installers should always measure equal distances from a good, consistent, horizontal edge on the facade to place reference marks for template alignment (nooks and crannies in the edge can skew your reference line).
The template should be rolled up so that the leading edge (left-hand side) of the copy comes off the roll first. Because you’ll frequently be standing on a ladder to do this, it’s important to roll out only as much of the pattern as you can easily reach for taping (typically with masking tape). Lettering templates have a natural tendency to run downhill as they are unrolled. The best way to prevent this is to align a 5-6-ft. section of the template with your baseline before taping the paper to the wall. With very long templates, you should have assistance to avoid misaligning the pattern.
Though it’s possible to install a mounting template accurately when working alone, the ideal situation is to have a helper. But help isn’t always available, and it often seems that two hands aren’t enough to simultaneously align the template, hold the roll and tape the paper to the wall. One solution to this problem is to use a thumbtack or roofing nail to hold the rolled portion of the template on the wall while you align and tape the unrolled portion. This is also necessary when it’s time to move your ladder. Large paper clips are useful to prevent the roll from "telescoping" out while you’re working.
When the template is completely unrolled and taped securely to the wall, you’re ready to punch and drill the surface. If the facade surface is concrete, stucco, metal siding or any other hard, dense material, make pilot marks for your mounting holes by hammering a center punch through the pattern. Drill bits frequently "travel" when they begin cutting into hard surfaces, and your mounting points must be accurately placed to avoid misaligned letters. If the facade is composed of wood or other soft material, however, you can normally drill straight through the template without pilot marks.
Well begun is nearly done
If your template work is accurate, installing individual letters is a piece of cake. Letter manufacturers recommend leaving at least 1/8-in. clearance between the backs of the letters and the mounting surface. This allows for expansion of the plastic or metal, and restricts dirt, dust and rainwater (or ice) from accumulating behind the letters. When installing keyhole slot letters, it’s important to ensure that each letter is firmly locked down into the slots when the fasteners are tightened. Because letters like "T," "I," "Y" and "J" have single mounting points on the top or bottom, misalignment is more likely. Depending on the length of the mounting studs, it may be possible to adjust the letters somewhat after installation by bending the mounts in the desired direction. If the misalignment is too severe, however, the letter must be removed and the mounting hole(s) redrilled.
When the last letter is installed and you stand back to admire your work, it’s a safe bet that your customer will be standing by your side to check the job. This is the time when installers occasionally hear unsettling remarks like, "I think the ‘L’ is pointing a bit downhill" or "Shouldn’t that ‘J’ be a bit closer to the ‘O?’" Beware of the cock-eyed perfectionist who wants you to spend an extra two hours adjusting letters that don’t need adjustment. These problems should be infrequent, however, if you use the proper techniques.
If you install enough letters, you’ll eventually be faced with the troubling revelation that you’ve misspelled a word or a name. Maybe the template-maker was having a bad day. The inescapable fact about signs is that they’re not easily changed. This explains the consternation of the NFL groundskeeper in a popular commercial when he realizes that he omitted the "i" from the word "Chiefs" on Kansas City’s end-zone logo. I believe that the appropriate expression for such situations is "Great googly-moogly!"
Dimensional Letter Manufacturers
For a complete listing, consult Signs of the Times’s 1997 and 1998 Buyers’ Guide.
AAA Signs, St. Petersburg, FL (813) 525-3603
Admart, Danville, KY (800) 354-2102
ABC Plastic Fabricators, Inc., Pennsauken, NJ (800) 752-7849
ABC Sign Products Inc., Ft. Collins, CO (800) 248-9889
A.R.K. Ramos Architectural Signage, Oklahoma City, OK (800) 725-7266
Bacon Signs Inc., Minot, ND (800) 437-2058
Charleston Industries Inc., Elk Grove Village, IL (800) 722-0209
ESCO Mfg., Watertown, SD (800) 843-3726
Gemini Inc., Cannon Falls, MN (800) 538-8377
Grimco Inc., Fenton, MO (800) 542-9941
Howard Industries, Erie, PA (800) 458-0591
Lettermen USA Inc., Springhill, FL (800) 807-8857
Metal Arts, Div. of L&H Mfg. Co., Mandan, ND (800) 237-8069
OMC Industries, Inc., Bryan, TX (800) 488-4662
Scott Sign Systems Inc., Tallevast, FL (800) 237-9447
Signs and Labels Express, Branford, CT (800) 477-8824
Steel Art Co., Boston, MA (800) 322-2828
US Sign and Fabrication, Wilton, CT (203) 762-0200
Wagner Zip-Change Inc., Melrose Park, IL (800) 323-0744
Walbridge Corp., Oakdale, PA (800) 535-7379
World Wide Sign Systems Inc., Bonduel, WI (800) 874-3334
Wrisco Industries Inc., Palm Beach Gardens, FL (561) 626-5700


 Tip Sheet4 days ago
 Business Management2 weeks ago
 Women in Signs2 weeks ago
 Real Deal5 days ago

 Editor's Note1 week ago
 Line Time2 weeks ago
 Product Buying + Technology1 week ago