Digital Printing
Onyx
It
Published
17 years agoon

What if I’m using third-party supplies? How can I maximize my production? How can I print at full speed with different printers? Can I use PCs and Macs? What if I need to print beyond the printer’s maximum width? Can I proof from one printer and print the final on another?
What about Pantone® matching? Is there contour cutting? How will I be able to match the color?
Okay, you get the idea. A printer is only as good as its RIP. Before a printer outputs the graphics, its RIP performs the magic.
Because printer size and the amount of information being sent to the printer has mushroomed, the only way to profit is to shorten the duration of sending information – image-processing specs and the prep work – to the printer. Three Onyx packages support the print world: Onyx PosterShop®, Onyx RipCenter™ and Onyx ProductionHouse™.
This review focuses on Production-House, Onyx’s powerhouse that meets, and exceeds, requirements for RIP speed and excellent color output. Many features are also compatible with Onyx’s other two packages. When your print shop grows, Onyx provides an upgrade path.
AdvertisementProductionHouse also provides cost-effective tools to manage ink and media. Better nesting and new layout tools accommodate flatbed printers. The software includes ICC color-profile generation with proprietary color tools specifically designed for large-format inkjet printing. The wizard-driven Media Manager dramatically facilitates color calibration and profiling to match your media.
The redesigned ProductionHouse 7 installation has been streamlined. It allows you to submit a job from any PC, Mac or UNIX-based system on your network (HTTP access) with a compatible web browser.
You can remotely view the Active Jobs and Inactive Jobs, and control such jobs options as number of copies, magnification and hold. ProductionHouse also works with an extensive printer list – virtually, it becomes plug and play.
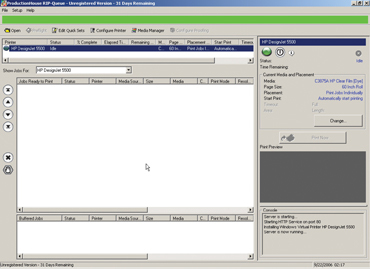
The RIP-Queue Navigation is divided into five main areas: Printer Area, Jobs Ready, Buffered Jobs, Information Area and Console (Fig. 1). Each area can be modified by right-clicking into the specific area. You can either open the image in the RIP-Queue or open the image in Pre-Flight, which allows the user to make such changes as scaling, tiling or color correction. Pre-Flight isn’t a requirement. The RIP-Queue is reserved for the image if no modifications are needed (unless there‘s a media change).
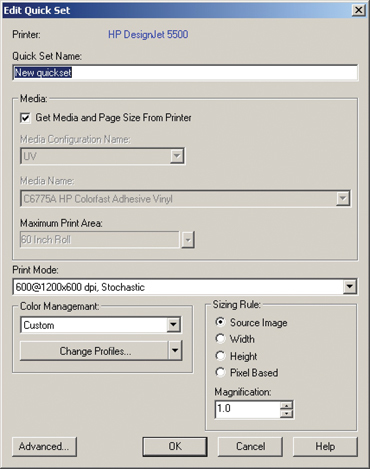
To manage jobs more efficiently, use Quick Sets and Hot Folders. The Quick Set tool allows the user to automatically apply certain settings to the job(s). Simply click Configure Printer, and it opens the dialog box (Fig. 2). Click the Quick Set dialog, then New, to open the Edit Quick Set dialog. You can input Media Type and Page Size, Resolution and Color Management, Sizing or Sizing Rule (if something doesn’t fit, this will resize it to fit).
Advertisement
The Advanced Quick Set options are reserved for such uncommon items as Color Type, Rotation, Dot Pattern, Number of Copies or other processing information, such as Process with Interpolation or Calculate the Ink Usage, which improves workflow efficiency.
The Tiling tab separates a job into two or more pieces, which is useful if you’re similarly tiling images. The Crop option sets a defined area to crop for all images. Anti-Aliasing can improve a low-resolution file, and Color Correction assigns a color-correction filter to all jobs printed with this Quick Set. This powerful feature also boosts efficiency.
Located in the Input folder, Hot Folders automatically assigns Quick Set options to a job. Because RIP-Queue automatically shares the Input folder, you can copy image files into a Hot Folder from any network system. RIP-Queue then processes and prints each image using the Quick Set properties of that Hot Folder.
Color matching can repeatedly cripple a print shop, but Production-House’s new Media Manager allows full control over your output through Color Calibration and Profiling. Calibration matches the media, ink, resolution and dot-pattern combination for your printer. Profiling establishes your target output’s density and color.
Although setup is time-consuming, ProductionHouse provides tools to shorten the process. Compared to a full day to create a profile, the New Media Manager reduces the time to two hours, a real timesaver.
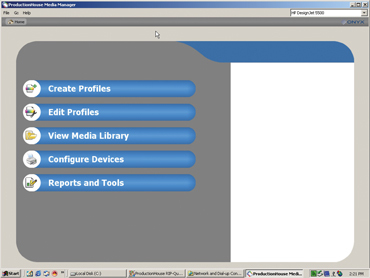
AdvertisementThe extensively redesigned New 7.0 Media Manager (Fig. 3) is totally compatible with 6.5 profiles, which means you’ll get the same colors. This new, wizard-driven application walks you through each set and includes many visuals. A new profile-grading system helps you pick the right profile for your print application.
This tool, which rates and compares the installed media profiles, eliminates guesswork. Profiles are automatically rated on color gamut, print speed, color accuracy and ink usage. A report determines how well each media will work for such print applications as CAD, fine art, signage, photographic reprodution and POP displays.
ProductionHouse 7 has designed a workflow to set up a proofing device. A proof that simulates one printer’s output on another device previews the final output before you send the job to the final device. This timesaver reveals potential errors prior to printing or showing a “press proof” to a customer.
Remember, this is a simulation; not an exact match. For proofing, you need two printers. To make a good, simulated match, the proofing printer color gamut should fall within the final output printer’s color gamut.
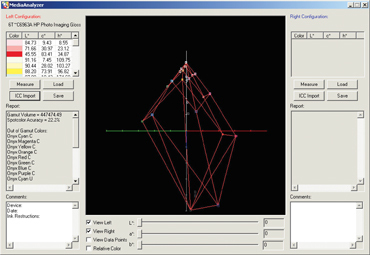
The MediaAnalyzer Tool lets you visually compare two color gamuts simultaneously. The tool contains a Left Configuration, a Right Config-uration and, in the center, a Gamut Data view. It maps a rough, wire-frame representation (Fig. 4) to see if the two printers correlate. After having double clicked the Media-Analyzer.exe, you have two choices: take a reading from the measuring device by clicking Measure, or import the information from an ICC profile by clicking ICC Import.
You can save these readings for later. A 3-D gamut data view makes it easy to determine if the color gamut of your proofing printer and the final output printer are compatible. You will view them in two colors — blue for proof and red for final output.
After having determined compatibility, choose the gamut for both printers to insure color mapping, then configure the printer. To select the desired rendering intent, first print the proof by right-clicking the highlighted job in the queue and selecting Proof. The RIP-Queue creates a new job and appends Proof to the job name for identification. RIP-Queue also places the original job on hold until the user releases it. After the proof is ready, review the results. You can again edi the original image’s color, submit another proof and continue in this manner until the desired results are achieved.
If you regularly print a proof, create a Quick Set that automatically sends a proof prior to final output printing. To insure that your proof printer is printing accurately, print verification strips at the bottom of the proof and compare them to your already printed Visual Tolerance Chart.
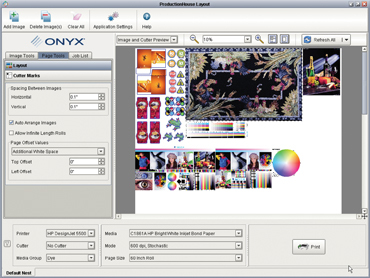
Another new tool, the Layout Front-end, facilitates superior flatbed workflow with immediate, hands-on control over multiple images of print jobs. Users visualize the flatbed table onscreen (Fig. 5) and accurately place jobs, cut marks, crop marks and barcodes. This application also includes easy size, crop, tile and color-correction tools so operators can quickly prepare jobs and set up print frames. This is different than sending individual images to Pre-Flight for nesting.
A new Variable-Data Tool lets
users add variable text, images and barcodes to mass-customize batched print jobs. Users can import data fields from database files and preview the results onscreen before printing. The Variable-Data Tool is ideal for creating batches of customized print jobs, such as signs, promotional items, advertisements and full-color labels.
If the background is the same for all images, the Onyx workflow tool processes the background image only once, so a batch run of 10 or 1,000 different prints will start printing almost immediately. This also saves significant time.
To insure you have the latest ProductionHouse 7 version, Onyx AutoUpdate, a free companion application, checks the installed version’s software settings and automatically downloads any needed updates. A new improvement, better compatibility with firewalls, insures a smoother download.
System requirements include Windows XP Pro (with the latest service pack) or 2000 Pro Server (also with the latest service pack), Intel Pentium 4 or Xeon 3GHz or higher (or Athlon 64/Opteron, 2GHz or higher), dual 80GB hard drives, 2GB RAM per CPU, 1,260 3 1,024 16-bit color and a DVD-ROM drive.
In conclusion, many reasons justify why an existing customer should upgrade to ProductionHouse 7. If your shop needs a faster RIP with many, timesaving additions, like the new profile-grading system, take a look at this product. Onyx has also streamlined the upgrade path for its current customers to get them on the color-correction bandwagon. Remember, the bottleneck is producing the prints your customers are willing to pay for. Onyx’s ProductionHouse has shown you the way. N
Onyx Graphics Inc.
6915 High Tech Dr.
Salt Lake City, UT 84047
(801) 568-9900
Fax: (801) 568-9990
www.onyxgfx.com
Company Background: With more than 16 years of experience, ONYX® Graphics Inc. is a worldwide developer and supplier of commercial printing software and workflow solutions for the large-format printing industry.
Contact: Onyx North America Sales Team, (800) 828-0723 or northamericasales@onyxgfx.com
At a Glance: Onyx’s Production-House RIP offers a universal workflow. Nesting and layout tools accommodate flatbed and large-format printers. The RIP’s time-saving additions include a new profile-grading system. The Quick Set tool allows the user to automatically apply certain settings to the job or jobs. This automates the process required before RIPing. The New 7.0 Media Manager includes a new wizard-driven application. A new profile-grading system helps you pick the right profile for your particular print application.
SPONSORED VIDEO
Introducing the Sign Industry Podcast
The Sign Industry Podcast is a platform for every sign person out there — from the old-timers who bent neon and hand-lettered boats to those venturing into new technologies — we want to get their stories out for everyone to hear. Come join us and listen to stories, learn tricks or techniques, and get insights of what’s to come. We are the world’s second oldest profession. The folks who started the world’s oldest profession needed a sign.
You may like


Advertisement
Subscribe

Magazine
Get the most important news
and business ideas from Signsofthetimes Magazine.
Advertisement
Most Popular
-

 Tip Sheet1 week ago
Always Brand Yourself and Wear Fewer Hats — Two of April’s Sign Tips
-

 Photo Gallery2 days ago
30 Snapshots of the 2024 ISA Sign Expo
-

 Ask Signs of the Times4 days ago
Why Are Signs from Canva so Overloaded and Similar?
-

 Real Deal1 week ago
A Woman Sign Company Owner Confronts a Sexist Wholesaler
-

 Benchmarks6 days ago
6 Sports Venue Signs Deserving a Standing Ovation
-

 Women in Signs1 week ago
2024 Women in Signs: Megan Bradley
-

 Photo Gallery1 week ago
21 Larry Albright Plasma Globes, Crackle Tubes and More
-

 Women in Signs1 week ago
2024 Women in Signs: Ashley Borell