June Carter Cash’s lyrics certainly apply to life and love, but also, and amazingly perhaps, to digital printing. All print-service providers have deadlines, a clock ticking, it seems, which furthers the need to reduce the time required to produce – prepare, print and cut, if necessary – a wide-format print job.
How to do this? Well, surely, by now, you’ve purchased a faster printer and more solid RIP – so, besides more coffee and faster fingers, what’s left to improve? “The finishing aspects,” ONYX says, as it proffers its PrepEdge Pro software.
PC, Mac and RIP independent
PrepEdge Pro software comprises server/client architecture, which minimizes RIP-compatibility issues. Also, it’s Mac, PC and RIP independent, which makes it workable across the board. In our tests, the software quickly proved its versatility.
An interesting twist is Onyx’s common-denominator use of Adobe’s PDF™ format in PrepEdge Pro. As a standard practice, you can open, edit and prep any PDF-formatted file your client creates and sends. No need to worry about compatibility with various revision levels, or your clients’ graphics programs, because, if their originating program can generate a Adobe, PDF-formatted file, you can print it.
Onyx’s PrepEdge Pro marketers push its ability to save you time and money. They say you’ll save 40% of work time on print-and-cut jobs and 80% of your work time on a tiling setup. Onyx also says PrepEdge Pro will save you 15% in wasted ink and media scrap.
The critical comparison begins when a customer file arrives at your shop. In our case, the general workflow is to preflight the file in Adobe Photoshop, Illustrator, CorelDRAW or other software, and then decide if we can send it directly to the printer.
Advertisement
That’s the simplistic view. In real life, the 80/20 rule reigns – 80% of the job time is in pre-production, 20% is in printing.
You know the drill
Does the file require color correction? Do we apply grommet information? Do we tile it for a vehicle graphic? Do we lay out a contour cut? These are valid, job-related questions that are followed by the realtime, job-preparation tasks. Truthfully, preproduction is where we waste most of our time.
Onyx’s PrepEdge Pro diminishes this production quagmire, which, in reality, aligns it to its marketers’ time-saving claims.
Even better, you don’t need a new RIP, nor do you need expertise in your customer’s file’s application program.
System requirements
PrepEdge Pro’s minimum system requirement is PC Windows XP or Vista. Add Pentium 4 or better hardware with 1GB of RAM and 1GB free disk space (and Ethernet), and XP professional, Vista Business or Enterprise for the remote networking capabilities.
Onyx includes separate instructions for PCs and Macs, so we found it tough to resist installing the Client segment (the PrepEdge Pro application soft¬ware) on our Mac. We did, and it worked. You’ll need Mac’s Tiger (10.4 or Leopard (10.5) OS with a PowerPC or Intel processor. The memory should be 1GB of RAM and 1GB free disk space and Ethernet availability.
Advertisement
PrepEdge software has two segments: the Print Agent and the Client. You install the Print Agent on the same system as the RIP, because it acts as a broker between the software and RIP. Once you install the disk, open the PEP_Agent folder. Note separate instructions for installing the Print Agent on the Onyx versus other RIPs, but, in either case, locate it within the same folder.
Next, install the Client, PrepEdge Pro application software; then choose your desired application system (where you want the software to run) and install it. A wizard assists this operation.
An operations brief
To open a file, click on File Menu, browse for the desired PDF file and click Open. To add files to the Open sleeve, choose Import or simply drag and drop.
A real time saver is adding grommet locations to a banner layout. You’ll see short-cut commands, or you can use the pull-down menus. To set up the grommet task, use the Document Setup and add a margin around the banner’s edges. We chose a value of 1.25 in., which created a margin for the grommet marks. Next, select the Grommet tool, and enter the physical size of the grommet and the distance you want it from the banner’s edge. Finally, set the number of total grommets for both the length and width of the banner. Click Okay, and it’s done. No more manually measuring and positioning the marks.
It took us longer to write this explanation than to perform the task.
Creating a contour cut around a bitmapped image, and editing the cut paths, is another time saver. This, as golfers say, is the real “money shot.” To do this, open the PDF, and select the entire image. Under Tool Bar, click on the Find Contour icon, then click within the bounding box of the image. This will outline the image. It becomes the cut line. If the line needs refining, choose the Vectorizing tool (better known as the Path tool) to adjust the nodes.
Advertisement
Additionally, PrepEdge easily changes spot colors. Open the image and ensure it’s ungrouped. Open the Color List, which, as a default shows, is the Pantone™ library. Next, double click on the color name and then drag-and-drop the color square onto the image portion you want to change.
Vehicle wraps
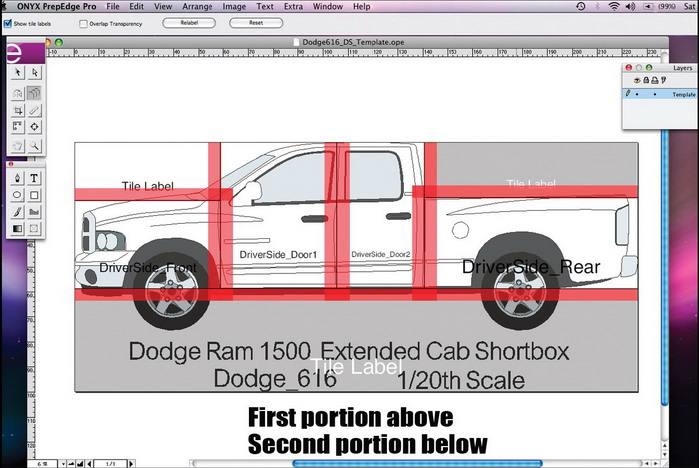
For vehicle wraps, PrepEdge Pro features tools that create the tiles and cut files. It also creates an installa¬tion guide for the wrapper. Onyx’s tutorial file provides an example.
First, load the vehicle template (not included), and scale it to the appropriate size. Make this a template layer. Select the Super-Tile tool from the toolbar, and drag the lines in from the bottom, top and sides, for the hood lines, doors and other devices. Here, you can assign overlaps and make contour adjustments. Next, turn off all portions of the non-printable tiles. You can save this template in your database for future use.
Next, import the image file, and create a new layer. Resize to the actual vehicle size, and maneuver the image around to fit the template. The template can either be visible or not (click on the “Eye” icon to make the layer invisible).
Once the file is complete, send it to the Print Queue (it goes as a separate file). To assist the vehicle wrapper, you can label all the wrap sections. More installation help is provided by the Guide, which you can print. It comprises an overview of the job and each panel’s labels.
Other features include Edit, which allows your client to make one last change. And, PrepEdge Pro recognizes the importance of white-ink printers, but it’s only available for Onyx RIP users.
Conclusion
If you are looking to save ramp-up time, study PrepEdge Pro software. It’s a unique product that automates production. It uses a PDF editor, which makes the software compatible with all, related software applications. Your prepress operators no longer need to be experts in application software – with a few simple clicks, they can be saving time and money.
Key Information
Onyx
6915 South High Tech Dr.
Salt Lake City, UT 84047
(801) 568-9900
www.onyxgfx.com
Contact: Kelli Ramirez, communications director
(530) 346-2146
kelli.ramirez@onyxgfx.com
Company Profile: ONYX helps you improve your bottom-line results by reducing printing costs and increasing productivity. Onyx develops and markets commercial-printing software and solutions for the digital, color-printing marketplace. By combining color science, image processing and print-production knowledge, Onyx delivers powerful, reliable printing-workflow solutions. The company’s products include ProductionHouse®, PosterShop®, RIPCenter®, GamaPrint Pro®, GamaPrint SE® and PrepEdge Pro®.
At a Glance: PrepEdge Pro, which works on both PCs and Macs, will save time and money in digital-print finishing operations. Its features include an automatic, grommet-location system, as well as one to create contour-cut paths around bitmapped images. You can also easily change spot colors (using a Pantone™ library reference), and, for vehicle wraps, PrepEdge Pro features tools that create the tiles and cut files. It also creates an installation guide for the wrapper. The best news? Onyx’s common denominator use of Adobe’s PDF™ format in PrepEdge Pro allows you to open, edit and prep any PDF-formatted file your client creates and sends.


 Tip Sheet1 week ago
 Ask Signs of the Times3 days ago
 Photo Gallery1 day ago
 Real Deal1 week ago
 Benchmarks6 days ago
 Editor's Note2 weeks ago
 Women in Signs1 week ago
 Photo Gallery1 week ago