There’s something to be said for a slow strip tease. But when it comes to removing vinyl graphics, quicker is definitely better. Many trial-and-error tactics have been used to get the job done, and results can certainly be mixed. The factor common to every approach is applying heat, but steam heat is one of the easiest and most consistent methods to use.
Many heat techniques, in the form of propane torches, electric guns and various chemicals, have been used to remove applied graphics, but I’ve found the Special Graphics Stripper Aide, by AmeriVap Systems, Atlanta, is one of the safest, cleanest and most environmentally sound approaches available. Unlike other processes, this steamer unit emits no toxic chemicals, and there are no open flames to scorch surfaces or blister paint.
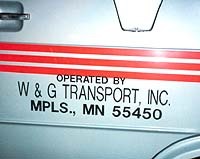
What follows is a step-by-step guide to a typical removal project. In this example, lettering and lower stripes (Fig. 1), as well as two sets of vehicle identification numbers must be removed from a commercial van.
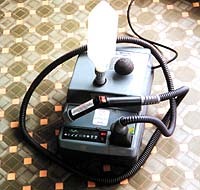
To tackle any project, of course, you must have the proper tools. The most important tool is the steamer. The 30-pound Stripper Aide, which requires only 115 volts and a 15-amp circuit to operate, comes complete with a flexible hose, a standard nozzle and a non-spill filler bottle (Fig. 2). Remember to use water only in the filler bottle.
At the end of the nozzle are various accessories that must be attached (Fig. 3). A small, round disc with an inserted sponge o-ring protects the substrate during the graphic-removal process. Unfortunately, the sponge o-ring does not wear very well and often needs to be replaced. As such, I prefer to cut off the end of a flexible radiator hose and, using a radiator clamp, attach it to the outside diameter of the disc.
Also pictured is a plumber’s plunger without a wooden handle. Plungers come in various sizes and can be attached to the steamer’s nozzle by cutting an "X" in the recess area where the wooden handle was originally attached.
Getting to work
When you’re ready to begin, turn on the steamer and let it warm up for about 10 minutes. The green lights will clearly indicate when it’s ready to go. The unit converts ordinary water to 94-percent dry vapor at almost 300 degrees Fahrenheit. By the time the vapor reaches the surface, the heat has diminished to 200 degrees, a temperature that will quickly and easily soften the vinyl and adhesive, and break the bond to the substrate.
Knowing the physical makeup of the graphics you are removing is important. The UV-resistant, digitally-printed graphics of today are very durable and no longer use many of the solvent-based ink processes. As far as consistency is concerned, thicker films are easier; they are stronger and will not break or tear easily. Thinner films tend to crack or even melt when too much heat is applied. It is very difficult to achieve a consistent, uniform temperature using a propane torch or a heat gun, but the steamer makes this task easy. When the steam is applied, the vinyl is rejuvenated and more pliable, and thus easier to remove.
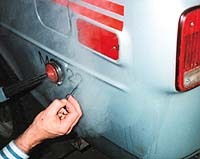
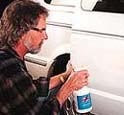
With all this in mind, and with the green light on the steamer signaling "go," it’s time to begin. First, test the steamer on a non-visible surface, such as the wheel well, to make sure you won’t damage the vehicle’s paint. If there are no problems, you’re ready to start the removal. Remember: Good technique is essential. It’s best to begin on one corner of a given graphic. Hold the end of the nozzle, with the proper attachments, to the corner for about five seconds. Use your finger, a pin or a plastic putty knife to lift the corner of the film and adhesive away from the surface. Grasp the lifted piece with one hand while simultaneously moving the end of the nozzle back and forth with the other (Fig. 4).
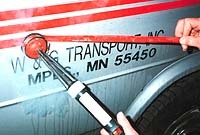
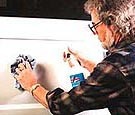
As more and more vinyl begins to come loose, make sure you pull at a low angle; less than 45 degrees is best (Fig. 5). In doing so, you will prevent adhesive from remaining on the surface. During removal, you will see that the adhesive usually becomes stringy. You can save a lot of time by making the adhesive stay with the film as you remove it. Experiment to see what it takes to achieve this, then stick with the process. Continuity is important. To eliminate most adhesive residue, try to do all the removal in one sitting.
Despite the strength of your technique, you may find that some residue remains. This is due to the wax and degreaser solvents often used to prepare a surface prior to the graphic application. What do you use to get rid of this stuff? More of the same. Fill a squeeze bottle or trigger-type spray bottle with the wax or degreaser of your choice. Again, test your surface to make sure you won’t damage the paint. Then spray on the residue. Let the solvent penetrate for a minute or two, then wipe down with a squeegee, followed by a clean cloth or lint-free paper towel.
By now, the removal project should be at an end, and the surface should be clear and clean.
Adhesive Remover Can Resolve Sticky Situations
Like most things, the best method for removing vinyl graphics is often a matter of opinion. Factor in variables, such as time, size and scale, and various theories abound. But no matter what kind of steps you take, you’re probably going to wind up with residue. According to Roger Bailey of Rapid Tac Inc., Merlin, OR, the most effective tool against sticky substrates is a chemical adhesive remover, such as Rapid Remover


 Tip Sheet3 days ago
 Business Management1 week ago
 Women in Signs2 weeks ago
 Real Deal4 days ago
 Editor's Note1 week ago
 Line Time2 weeks ago
 Product Buying + Technology1 week ago
 Women in Signs4 days ago