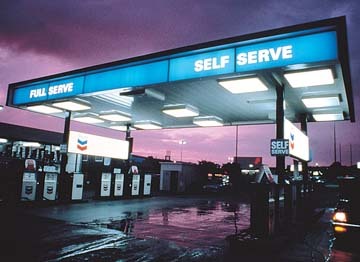
Most people don’t like the spotlight, where warts are prominently displayed. The same philosophy applies to translucent vinyl. When the lights are turned on, inconsistencies in color and film gauge appear. This month, I’ll cover translucent-film selection, design and application options.
Cast or calendered
Translucent-vinyl applications aren’t limited to backlit, building signage. Other uses include taxi-top signage, mall and airport-terminal advertising, menuboards and canopy fascias.
Consider these points when deciding whether to use cast or calendered translucent films:
• What’s the application? For less demanding applications, such as menuboards and directional signs, a calendered translucent vinyl suffices. For long-term, outdoor applications, I would choose cast films.
• What are the durability requirements?
Advertisement
• What are your customer’s expectations?
• What is the budget for the job?
User preference dictates the choice between lower-cost, calendered vinyl versus a premium, cast film. For most applications, you can’t go wrong with cast vinyl.
However, that doesn’t preclude calendered-film usage. Newer generation, calendered, translucent films feature such improvements as color consistency and gauge control. Also, some calendered films offer five-year durability.
Because calendered films cost less than cast, they’ve become the film of choice for a wide range of backlit signage. If you use a calendered vinyl, buy one designed for the job. Although calendered films are translucent, not all of them are suitable for backlit signage. Lesser calendered films may look fine during the day, but inconsistencies in color and film gauge readily appear when the sign box lights up.
I’m not saying calendered films are a bad choice for backlit applications. Better varieties have standardized thicknesses. Light-transmission discrepancies cause film-gauge variations, which appear when illuminated.
Advertisement
If color consistency deviates, film can exhibit blotches when illuminated. Plasticizers in cheaper calendered films can migrate to the film surface. If you screenprint or digitally print the film, plasticizing oils inhibit good ink adhesion.
In most cases, an overlaminate should protect the print. Inks tend to be fragile, and overlaminates neutralize such hazards as UV light, air pollution and bird droppings.
"Translucent films must be able to withstand high temperatures," Chuck Bules, Arlon’s (Santa Ana, CA) technical services manager, said. "On a hot summer day, temperatures inside a light box can easily exceed 150° F. When subjected to baking heat, cheaper calendered films can shrink and crack."
Thermoforming
Thermoforming poses a challenge for translucent films because exposing vinyl to high heat for a prolonged time can damage the film.
"In the thermoforming process, not only is the vinyl subjected to high heat, but it’s also stretched in every direction," Bules said. "The film must have extensive elongation and still retain its color. That’s some trick. Color distortion, gels, streaks and pinholes are unacceptable in backlit applications."
Advertisement
In addition to high-temperature durability, translucent films require a weedable adhesive when large film sections are applied to plastic sheet, then cut and weeded. Cutting vinyl that’s been applied to a plastic sign face can damage the substrate. Avoid overcuts, which will widen and show up under light. To aid weeding, warm the vinyl slightly with a heat gun. This will soften the adhesive and allow easier removal.
Translucent vinyl can be applied either to the plastic sheet’s first or second surface. During decoration, the vinyl film shouldn’t touch the mold to prevent vinyl damage.
Because vinyl may be applied to heavily plasticized, flexible-face and awning material, the adhesive must also withstand the plasticizing oil. "Worm tracking," a common vinyl failure on awnings, occurs after the plasticizer softens the adhesive. As the vinyl expands and contracts on the substrate, tiny tunnels form underneath the film.
Matching
Because backlit graphics encounter myriad environmental stresses, all components must be compatible. Components include the vinyl, substrate, ink system and overlaminate. Your distributor can help you select the right components. Also, make sure wet applications don’t discolor the adhesive.
For short-term, promotional graphics, consider how easily the film can be removed. Calendered films are usually easier to remove than cast films. Because of its high tensile strength, a calendered film peels from the substrate in large sections, if not in one piece.
Design considerations
Prior to the design stage, conduct an onsite survey. Pay careful attention to any building obstructions that would cause installation problems. Also, take plenty of pictures.
In my opinion, signs with dark backgrounds are much more readable than signs with white backgrounds. Avoid using thin letters against a white background or outline. When a sign is illuminated, the light tends to bleed around the letters’ edges and make copy more difficult to read. Colors should be viewed in all conditions.
Non-vertical awning surfaces can’t display any upper graphics, and suffer twice the UV-light intensity. Vinyl applied to horizontal surfaces fade first. In northern climates, snow accumulation can create vinyl edge lifting.
Translucent vinyls are engineered for acrylic, polycarbonate and flexible-face materials and glass. In most cases, either the sign cabinet or awning is backlit. For this reason, color consistency is critical, especially when one film sheet overlaps another.
Distance between fluorescent lighting and the sign face is also critical. If the lighting is too close to the graphics, hot spots can appear. I once made the mistake of substituting a flat face for a pan-formed face. What a gaffe — the lamps behind the face were too visible. If the face is extended a couple of inches, pan-formed, plastic signs reduce the likelihood of hot spots. Also, pan-formed faces are stronger than flat sheets.
Using a diffuser film on the face’s second surface also disperses light and prevents hot spots from washing out the image. Diffuser films are rated on the amount of light transmitted thought the film. Today’s films provide 30 to 70% light transmission. Remember, the diffuser film can darken the image slightly.
Light-enhancement films, when applied inside a sign cabinet, reflect light off the surface and distribute uniform light, which also minimizes hot-spot occurrences.
Vinyl application
Even if a plastic sheet includes protective masking, clean the sign face before applying the graphics. Before cleaning any substrate with a solvent or detergent, carefully read the manufacturer’s instructions. For most plastic-sheet applications, the most reliable cleaning method is detergent and water. Solvents subject plastic sheets to chemical stress, and can cause cracking.
If you’re decorating a polycarbonate sheet, remember that this plastic absorbs air humidity — it’s "hygroscopic." As the plastic outgases moisture, it can cause bubbling on any applied-vinyl graphics.
As a rule of thumb, polycarbonate sheets should be dry before decoration. To check for outgasing and ensure vinyl-ready material, apply a piece of vinyl to a polycarbonate sample, and bake it in an oven at 150° F for a day. If bubbling occurs underneath the film, re-dry the sheet.
Some professional decal installers only apply vinyl dry. In most cases, I agree that dry application is preferable. However, applying a translucent vinyl to a plastic sign face is the exception to the rule, because the sign face tends to attract vinyl like a magnet. For this reason, I believe wet applications serve such jobs better.
You can make your own application fluid by mixing 1/2 teaspoon of a dishwashing detergent, 1/2 teaspoon of isopropyl alcohol and 20 oz. of water. I prefer using a commercial application fluid, such as Rapid Tac Inc.’s Rapidtac, Window Juice or Splash.
Use the minimum amount to accomplish the task. Lightly mist the surface with the fluid; an excess can create unwanted residue. If the liner gets wet, the silicon layer can flake off and contaminate the adhesive. When the sign is illuminated, these areas appear as dark blotches.
If you make your own concoction, don’t use dishwashing liquid that contains moisturizing lotions, which contaminate the vinyl’s adhesive and create failure.
When applying graphics, start in the center. Apply enough squeegee pressure to force any application fluid from under the vinyl, and always use overlapping strokes. After removing the application tape, re-squeegee the entire graphic using a squeegee covered with a low-friction sleeve. This protects the vinyl from scratches.
When working with translucent films, avoid seams if you can. When translucent films overlap, the seam will be noticeable when the sign box is illuminated. Of course, overlaps aren’t always avoidable, but keep them to a minimum. Seams generally shouldn’t exceed 1/16 in. Abutting films can shrink and leave a noticeable gap when the sign is lit.
The film’s light and color transmission can vary from roll to roll — sometimes, even within a single roll. Therefore, overlap films from the same roll or lot number. Even then, color variations and inconsistencies can occur within the same roll. For this reason, if a film needs to be seamed, take the time to match colors to ensure consistent appearance.
Special thanks go to Chuck Bules, Arlon’s (Santa Ana, CA) technical services manager, and Brenda Thomas, FDC Graphic Films’ (South Bend, IN) marketing director, for their assistance in preparing this month’s column.


 Big Survey1 week ago
 Big Survey2 weeks ago
 Photo Gallery7 days ago
 News1 week ago
 Heidi Tillmanns1 day ago
 Editor's Note3 days ago
 News6 days ago
 News3 days ago