I love the daily operations of the sign business. I can’t recall a day when the tasks at hand bored me. I recently completed two very different vehicle-graphics jobs, each offering unique and enjoyable challenges. For the first job, I applied lettering for a race car with a modified four-cylinder engine that races on dirt tracks in the Minneapolis area. It had new body work placed on it, and the car was in need of some new numbers and sponsors.
Over the years, I’ve developed a reputation for creating unusual or different projects. Thus, I had to create something that would give each car its own personality. Sometimes, striving to be unique can be a real challenge if you typically work in a hurry, but nonetheless, I love the opportunity.
Having worked on several hundred race cars over the years, I’ve developed some techniques that allow me to work quickly, yet still deliver a unique product. For these cars, I used some special touches with the numbering to make them unique.
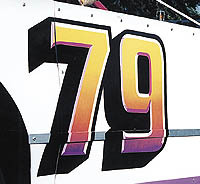
Here’s how to proceed. Cut a black outline and shadow with EasySign 32 software using MACtac 8300 series vinyl, then cut the numbers using Mactac yellow vinyl. Before weeding the vinyl airbrush the numbers with |2067|’s Frog Juice Squashed Frog Red spraypaint, then Frog Juice Pollywog Purple.
To do this, start at the bottom and tilt the can of red spraypaint back towards the bottom of the numbers. This allows you to create a soft blend or mist about halfway up the number. Allow this to tack up for about three minutes. If pressed for time, a hair dryer will speed up the process.
Once dry, starting from the bottom, spray the purple paint about a quarter of the way up the numeral and heat with a hair dryer. Then, apply a small amount of Rapidtac to a thick paper towel and wipe the excess spray from the numbers.
Advertisement
Brush work
Having airbrushed the numbers, begin applying effects with Deka water-based paints and a #5 Nocturna synthetic brush. Paint a chiseled edge on the numbers using three different colors. The #5 brush produces a 1/2-in. chisel around the edges, creating a more dimensional letter.
Start with purple, the darkest color, at the bottom side of the numeral. Mix in some white, and then paint the lavender on the left side of the numeral. Accent this with light yellow paint on the tops and right side of the number. This provides an effect similar to the sunshine on the upper right portion of the number.
Using a hair-dryer, speed-dry the paint. Then, clearcoat the numbers, allowing them to dry for roughly 10-15 minutes. If the weather is cooperative, leave the vehicle outside to expedite drying time. Afterwards, mask with Transferite 1510, a clear, medium-tack premask, by applying the masking to the black outline shadow, thus transferring the numbers to the car.
It takes approximately 20 minutes to add the airbrush blends and chiseled edge to the numbers. These effects give the numbers more impact, one the driver appreciates more than the impact from a rival car.
Exploring the Yukon
Advertisement
The Yukon XL is a new vehicle, and this was my first opportunity to work on one. One prominent characteristic about many new vehicles is that they have compound curves, which make pinstriping more of a challenge. The best way to begin laying them out is with 1/8-in. striping tape.
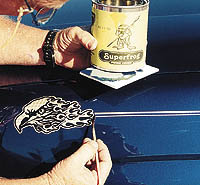
Before doing this, I printed two eagles’ heads, and applied one to the left side and one to the right of the vehicle. Apply the eagle’s heads this early because they are a central reference point when masking. To optimize weatherability, apply two coats of clearcoat.
Starting from the eagles on the driver’s side, lay the guide tape. Start on the driver’s side because if you’re right-handed; for southpaws, start on the passenger’s side. Next, lay your guide tape down the side of the vehicle, then step back to examine. If it looks acceptable, proceed. If it looks unacceptable, remove the tape and replace it until you feel comfortable with its appearance. Three-in.-wide tape worked well on this vehicle.
Continue taping around the back, but before taping the passenger’s side, measure all key reference points on the driver’s side and transfer these measurements to the passenger side with a Stabilo. Continue applying your guide tape, hitting all the reference points.
Once the guide tape is in place, pat the tape with a flat hand all around the vehicle. But don’t rub the tape, or it will roll, altering the alignment. Having patted the tape, firmly run your hand over it to press it down. Align printable |2438| stripe next to the guide tape, patting as you go. Once applied, rub your hand over the stripe lightly, then repeat. Now you can remove the guide tape.
At this point, trim the Signgold back about 1/16 in. from all seams and door jams using an X-acto with a new blade. You can also slit the gold at the seams and wrap it to the inside of the doors. But if you do this, clean the inside of the doorjams first, or you will have an irate customer back in your shop within days.
Advertisement
Finally, we use a #3 gray quill brush to clearcoat the tips of the striping to prevent peelback when customers wash their cars.
For an experienced vehicle-graphics artist, this entire process will take nearly an hour.


 Tip Sheet1 week ago
 Photo Gallery2 days ago
 Ask Signs of the Times4 days ago
 Real Deal1 week ago
 Benchmarks6 days ago
 Editor's Note2 weeks ago
 Women in Signs1 week ago
 Photo Gallery1 week ago