In the past, large corporations that wanted to mark their fleets of trucks were the only customers for full vehicle wraps. Typically, screenprinters created these graphics in very large quantities. Digital printing’s image quality has greatly improved, and, coupled with lower printer prices, this equipment has become much more attractive to smaller print shops.
As digital technology became more popular, large fleet companies and screenprinters began to see the benefit of creating shorter production runs that could be locally or regionally customized. This eventually evolved to wrapping smaller trucks and, now, vehicles. Vehicle wraps are now used in place of expensive, custom paint jobs. In addition to being less costly than paint, vinyl can be removed when an ad campaign concludes or when the vehicle’s lease expires.
I’ll outline the process to install a full vehicle wrap and offer tips on how to provide your customer with a high-quality wrap.
Selecting material
The finished product is only as good as its components. This begins with choosing the right vinyl for the job. Because full wraps are expected to look and perform like paint, choose a material with similar characteristics.
Due to its manufacturing process, thin (approximately 2 mil) cast film offers excellent durability and conformability characteristics. Its thin gauge gives the product the "paint like" finish many customers seek. When properly applied, these films generally last five years, which makes cast film ideal for full vehicle wraps.
Advertisement
If your customer is more concerned about price, and doesn’t need such durability, use economical vehicle-wrap media available from various vinyl manufacturers. Remember, these are generally calendered films that offer performance characteristics different from cast films. For example, you can expect some tenting (material lifting) in the vehicle’s deep crevices. These films can provide good-looking graphics for up to one year at an economical price.
Before you apply
Before applying any graphic, clean your substrate. The vehicle must be thoroughly cleaned to ensure proper adhesion without failure. Most material manufacturers have posted or linked technical bulletins on their websites, and their technical-support departments provide detailed information for substrate preparation. Always follow your material manufacturers’ recommendations.
First, remove all dirt and grime with a commercial detergent and water. My vehicle was covered with dirt and salt, courtesy of Cleveland’s winter weather. To ensure the vehicle (a Pontiac Grand Prix) was clean, I took it to a car wash to remove as much dirt, salt and road grime as possible. If you use a car wash, make sure the vehicle is completely dry before applying the graphics. This may require allowing the vehicle to dry indoors overnight before applying any vinyl.
To remove grease, oil, wax or other contaminants, wipe the substrate with a solvent, such as Prep-Solor Xylol®. I perform a final cleaning with isopropyl alcohol (IPA) to make sure that no oily residue from the other solvents remains. Before using any solvent on a vehicle, test it in an inconspicuous area to ensure the solvent won’t damage the vehicle’s paint.
When cleaning the vehicle with IPA, I recommend using two lint-free towels. One towel should be soaked with IPA, which loosens and removes contaminants (dust, dirt, wax, etc.). Use the second, dry towel to wipe away the excess IPA before it evaporates.
Advertisement
Pay special attention to the vehicle’s cracks and crevices, where contaminants generally accumulate. To get into these narrow areas, I recommend wrapping an IPA-soaked towel around a squeegee. $image2
All about preparation
After cleaning, preparation is the most important step for successful vehicle wraps. Determine which pieces go where and how you’ll begin. Remember, after you take off the liner (backing paper), you have only one chance to get it right. Today’s material allows some repositioning, but this is generally intended only for a small area and to avoid removing an entire panel.
Before I apply my first piece, I tape the graphics into position. This enables me to verify all pieces, check graphic positioning and make necessary adjustments before actually applying the vinyl. Once we’ve positioned the graphics and determined where to start, it’s time to begin graphic application. I worked with Rob Ivers, a vehicle-graphics professional, who trains installers on proper technique.
Must-have tools
Temperature greatly impacts vinyl adhesion. Vinyl manufacturers generally work in a temperature range of 50° to 90° F — 70° to 80° F is optimal. Whenever possible, apply graphics indoors, which creates a controlled environment.
Advertisement
Monitor both the ambient and surface temperature — both can impact your application. Higher temperatures will make the film soft and more pliable (which can be nice if you’re an experienced installer).
However, the high temperature also makes the adhesive more aggressive, which can lead to pre-tack (where the film adheres to the substrate prematurely) and increased stretching if you try to reposition the film. Lower temperatures, on the other hand, will make the film more rigid and reduce adhesive tack.
You will need a few basic tools to apply graphics. They are:
• a tape measure for positioning,
• an air-release tool for removing air bubbles,
• masking tape for positioning,
• a squeegee for applying the graphic,
• a razor-knife to trim away excess vinyl, and
• a heat gun or propane torch to loosen the vinyl on complicated applications.
Now, it’s time to apply the graphic. Applying a full wrap greatly differs from cut graphics. First, no application tape (premask) is used. These graphics were printed on cast film and laminated with a gloss-finish, cast overlaminate. Unless you’re near the top of the recommended temperature range, this construction has enough integrity to apply without stretching. A premask frequently requires removing strips of material to conform around vehicle contours.
It’s possible to apply these large graphics alone, but it’s much easier if a second set of hands helps with positioning.
Seeing it through
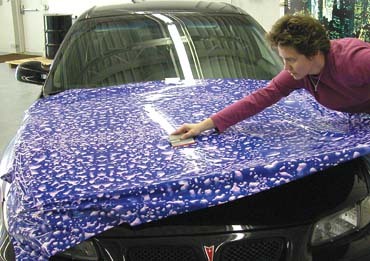
We started our wrap with the hood, positioned the graphic and taped it into place. Because the Pontiac’s hood isn’t perfectly flat, we couldn’t start at the top and work our way down. In this case, it was easier to start near the center and work our way up, and then downward. I’ve also found that keeping the squeegee at a lower angle, and taking my time, helps prevent wrinkles.
As I applied vinyl into curved areas, we began to see some small wrinkles. Keeping the squeegee at a sharp angle smoothed these out. If the wrinkles get too deep to negotiate, use heat to relax the film and smooth the wrinkles. Let the film cool before starting again (this will prevent excess stretching). Apply gradually in small strips until it’s finished.
After applying the hood graphic, trim the film before progressing to the next piece. When trimming graphics, be careful to avoid cutting the paint.
For this piece, we trimmed the material flush with the hood’s edge. Don’t leave excess film to wrap around the hood’s edge — this could pose an adhesion obstacle and be a potential failure point.
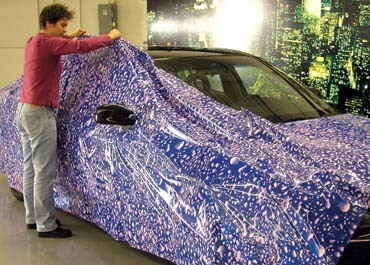
Next, we applied the passenger panel. We opted to install one, long, horizontal panel, which helped eliminate graphic seams. This was possible because the 60-in.-wide material was taller than the vehicle.
We removed the entire liner and continually repositioned the material during the application process. In high temperatures, the process risks pre-tack and stretching the film.
Once the graphic was in position, we removed the liner and lightly tacked the film to the car. We positioned the film to distribute it evenly on the surface.
Once your film is in place, make the first squeegee stroke along the length of the car. I like to apply the lower portion of the panel first, then work on the upper portion.
When I reached the wheel wells, I trimmed out excess material, which helped relieve excess tension and facilitated material handling. I followed a similar procedure when working on the upper panel in the hood and trunk areas, where there’s excess film.
As we neared the bumpers, we manipulated the film to avoid wrinkles. We used heat to relax the film and work it into the contours. Remember, take your time and don’t overheat or overstretch the film.
Finally, we trimmed the material around the moldings and door panels. Even though the film may look good in these areas during installation, excessive stretching may have occurred. Trimming the vinyl in these areas will prevent any tenting. Also, look for any air bubbles you may have missed while squeegeeing the material into place. Our material’s embossed adhesive allowed us to simply use a thumb or squeegee to remove air bubbles.
Applying full vehicle wraps may not be for everyone. This skill requires lots of patience, time and practice. Embossed adhesives used in vinyls make applying graphics much easier. Because vehicle graphics continue to be a growing market, this is definitely a worthwhile skill.
For more information on applying vehicle graphics, you can visit |2109| online at www.averygraphics.com or Rob Ivers’ website, www.robivers.com, to learn more about his onsite-application training. Avery Dennison Graphics Division


 Tip Sheet1 week ago
 Ask Signs of the Times2 days ago
 Real Deal1 week ago
 Benchmarks5 days ago
 Editor's Note2 weeks ago
 Women in Signs1 week ago
 Product Buying + Technology2 weeks ago
 Photo Gallery6 days ago