One afternoon, I was finishing an interior-graphics installation at a convenience store when a passerby unfurled an annoying barrage of questions and comments.
Feeling a little put off, I gave her a brusque reply that abruptly ended the conversation and sent her on her way. Under less-hurried circumstances, I could have politely and patiently explained what I’m going to cover in this month’s column: selecting rigid plastics and applying vinyl to these surfaces.
Plastics basics
You probably have a good idea of what plastics are. Signmakers use them daily to create backlit signs, photo-mounting POP displays and yard signs. Standard materials I’ll review for this article include acrylic, polycarbonate, styrene, corrugated polyethylene, formed polyvinyl chloride (PVC) sheet and fiber-reinforced plastic.
These commonplace substrates have some remarkable characteristics. Many plastics can weather extreme heat and cold, as well as the degrading effects of UV light and the stresses of gale-force winds. One might not guess that acrylic’s optical clarity equals or surpasses glass, but it’s true.
Plastics can be classified as "high polymers." These very complex materials comprise mega-molecules called polymers — chains of much smaller, building-block molecules called monomers.
Advertisement
Plastics divide into two subcategories: thermoplastics and thermosets. Thermoplastics are solid plastics that become malleable with heat. PVC, acrylonitrile butadiene styrene (ABS), polyethylene (PE), polycarbonate (PC) and acrylic are thermoplastics commonly used in the sign industry.
Thermoplastics are relatively easy to fabricate and decorate; plastics manufacturers generally offer detailed instructions and suggested techniques. These booklets address equipment recommendations for saws, drills, blades, routers and bits required for fabrication.
Conversely, thermosets are liquids that solidify when heated. Unlike a thermoplastic, once a thermoset cures, it can’t be reheated and reformed. Typical thermosets include polyester, epoxy and polyurethane.
Acrylic
Acrylic remains the mainstay product for backlit sign faces. Popular brand names, such as DuPont’s (Wilmington, DE) Lucite® and Atofina Chemicals (Philadelphia) Plexiglas®, are household words. Acrylic suits many applications because it’s clear, resistant to chemicals and weatherable under virtually all conditions. Compared to polycarbonate and flexible-face material, it’s also an economical alternative.Dupont Graphic Arts
Manufacturing acrylics entails two common methods: casting and extrusion. To mold a plastic sheet, the cell-casting process involves pouring liquid, acrylic resin between two pieces of glass separated by a gasket. The gasket’s thickness — which can have a diameter up to 5 in. — determines the cast sheet’s thickness. Cell casting produces an enhanced product, but the time-consuming process adds to the sheet’s cost.
Advertisement
A more cost-effective way to manufacture cast acrylic is continuous casting. During this process, liquid plastic is poured between twin, polished, stainless-steel belts. A spacer cord that divides the belts governs sheet thickness. The sheet is heated and cooled on the casting line to control the curing process.
The more common and cost-effective, acrylic-manufacturing method is extrusion, or calendering. During extrusion, plastic pellets are heated, and the molten plastic is forced through a slotted die, which governs sheet thickness. This sheet is then run between rollers, which polish the plastic’s surface. An extrusion variation, the "continuously manufactured" process involves extruding the sheet through a die, then calendering between rollers, which output the molten sheet at the required thickness.
Don’t stress out
The extrusion process imparts mechanical stress, or orientation, into the sheet. Most of this stress flows toward the "machine direction," which determines which way the shrinkage will shift.
Cell-cast acrylic also has an orientation, but it’s bi-axial. This means the stress occurs across the length and width of the sheet, and shrinkage occurs evenly on the acrylic’s surface.
Extruded- and cast-acrylic sheets appear to be identical. However, there’s one major difference: Extruded acrylic is more sensitive to grooves and cracks, and thus more prone to breakage.
Advertisement
Be careful when working with acrylic and other plastics. Cutting, drilling, gluing, painting and solvent cleaners subject the sheet to myriad mechanical and chemical stresses. One stress factor may not fracture a sheet of material, but these pressures accumulate. Such stress-causing problems and materials build internally, until the plastic reaches its breaking point.
Annealing plastic sheet after fabrication can alleviate some stress-related buildup. This involves heating the sheets in a recirculating oven. A rule of thumb is to heat the sheet for one hour per each millimeter of its thickness, at 175° F. However, be certain to check the manufacturer’s product bulletins for recommended time and temperature.
Stress caused by cutting a plastic sheet can be eliminated by scraping and smoothing rough edges with a notch tool, which plastics distributors offer. After scraping, pass a propane flame under its edges to polish the plastic.
Brown kraft paper or polyethylene masking typically encases both sides of a plastic sheet. When you’re fabricating a plastic sheet, don’t remove the masking — it will protect the sheet from hot plastic chips that can fuse to its surface.
Sometimes, masking can be difficult to remove, especially if it’s been atop the sheet for a long time. Some sheet manufacturers recommend removing masking by rolling it around a wooden dowel rod. Heating the sheet for 60 seconds at 350°F can expedite paper-mask removal. Soaking the paper with a solvent can also help.
If any adhesive has transferred onto the sheet after mask removal, it can usually be cleaned with a soft rag moistened with isopropyl alcohol. Removing paper masking may generate a static charge in the sheet, and static attracts dirt. To neutralize sheet static, wipe the surface with a damp, lint-free rag.
Thermoforming
Extruded acrylic’s lower forming temperature makes it easier to thermoform. Because lower forming temperatures translate into shorter cycle times, this speeds production.
Thermoforming encompasses preheating a plastic sheet, and then forming it with a vacuum against a mold. If vinyl adorns the sheet, problems can occur if high temperatures assault the substrate for long periods of time. Vinyl manufacturers — such as 3M (St. Paul, MN), Arlon (Santa Ana, CA) and Avery Graphics (Painesville, OH), recommend temperatures less than 380°F for less than eight minutes. High heat can degrade the adhesive’s performance and change the film’s gloss level and color.3M Industrial Adhesives & Tapes Div., Arlon
Thermoforming sheets without sufficient preheating can also create vinyl problems. Insufficient heating causes excessive mechanical stress for the film, resulting in cracking or discoloration.
When using vinyl graphics on a plastic sheet that will be thermoformed, apply the graphics to the surface opposite the side encountering the mold to prevent damage. When using a male mold, apply vinyl to the plastic’s first surface; when using a female mold, decorate the sheet’s second surface.
Vinyl applications
When fabricating backlit signs, vinyl can be applied to the sheet’s first or second surface. When decorating a backlit signface, overlap seams, rather than butting panels together. All films shrink; when this happens, butt joints will separate and expose a thin line of substrate.
If joining multiple panels of the same color of film is required, ensure that the colors match to prevent a noticeable shift. At the least, make sure all films come from the same roll or lot number.
For second-surface, clear-plastic applications, cover the applied graphic with a diffuser film. The film scatters the light from the lamps, which produces an even appearance under illumination, without any "hotspots."
When you overlap one film layer over another, edge bridging can occur. This is especially obvious when graphics are applied to the second surface, but bridging usually vanishes during adhesive outflow.
If one layer of vinyl film must register over another, I suggest using marks in the graphics’ corners to aid alignment.
Wet applications
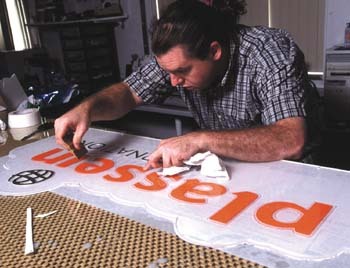
When you apply vinyl graphics to acrylic and other plastic sign substrates, I advise a wet application. I know this contradicts most of what I’ve written about application fluid, but acrylic applications are challenging, because film and plastic attract each other. For such jobs, just one disastrous application made me believe in application fluid.
Being frugal, I’ve tried mixing my own application fluid. I added 1/2 teaspoon of Joy dishwashing liquid and 1/2 teaspoon of isopropyl alcohol to a quart of water. This concoction works in a pinch, but it’s inferior to commercial-grade application fluid, which I now use whenever necessary.
However, wet applications can be problematic when installing large graphics; the fluid tends to cover everything, including the film’s release liner, which must stay dry. Application fluid can cause the release liner’s siliconized layer to flake off and contaminate the adhesive, which creates noticeable spots on an illuminated sign.


 Tip Sheet1 week ago
 Photo Gallery2 days ago
 Ask Signs of the Times4 days ago
 Real Deal1 week ago
 Benchmarks6 days ago
 Women in Signs1 week ago
 Photo Gallery1 week ago
 Women in Signs1 week ago