I own thousands of pieces of art — clip art. Because I am the licensee of such, I have unlimited art resources at my beck and call. Surprised? Well don’t be — you do, too!
In the vinyl-graphics craft, often we must put our own spin or interpretation on art, as past artists have. Computer software clip art renders images into a usable, or plottable, form. We need line art that directs our cutting-plotter tools along vectors — combinations of straight lines and smooth arcs — to render a recognizable copy of the original. But what if the original takes on another form? What if hours of pouring through mammoth collections of licensed software fails to produce the perfectly usable, vectorized piece of client-acceptable artwork? Then we just make it ourselves!
Separating positive from negative
Posterization, or rendering vector artwork from color photos or halftone images, separates positive from negative art elements. Combinations of light and dark allow the eye to distinguish an image and plot it on our visual net until memory recognizes what the image represents. Positive- and negative-space combinations allow us to instantly recognize letters and give meaning to the resulting words. The positive elements are the letters themselves — in this case black, printed shapes. The negative elements are white spaces around the letters that keep the positive shapes from merging together into one indistinguishable lump.
Steps to posterization
You could use sophisticated computer software to posterize, or you could follow the steps that follow and learn to posterize on your own:
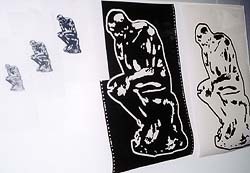
1) Use photos, magazine or catalog illustrations; halftone images from a huge, inexpensive clipart collection or images printed from Websites. In this case, I printed Rodin’s "The Thinker".
2) Trim away the confusing background.
3) Place the halftone or color image on an enlarging copier that has contrast controls.
4) Set the copier on light contrast and enlarge the image. Repeat. This should start to separate the light and dark zones.
5) Use correction fluid, white pencils, black pens and Sharpie markers to lighten the highlights or negative space, and darken the shadows or positive space. Don’t be concerned with exacting detail. Just separate dark from light.
6) Scan your production. Use normal sharpening or scanner-default settings.
7) Ungroup the image in your composing software. Delete the smallest shapes by dragging a selection box around quadrants of the image. Deselect the bigger images and hit the delete button.
8) Clean out excessive edit nodes or points and straighten lines or smooth curves. Or, you can quickly digitize new lines around shapes with your screen pencil or drawing tool and then delete the ragged pattern.
9) If you are cutting the image from a light-colored vinyl, you will probably need to outline the image by selecting the outside line of the image and running your outline function. Otherwise, highlights appear dark and shadows light, confusing the eye. The graphic I produced here for a window application was best-rendered in white vinyl with an outside border.
Efficiency satisfies clients
Over the years, I have used this technique many times to create artwork for my clients. The technique often is done in a matter of minutes, and the client will be impressed by your craftsmanship and commitment to satisfaction.
If this still seems like too much work, you could issue the standard, "We must have camera-ready artwork or we cannot do this for you." However, understand that your clients may go elsewhere until they locate a vinyl-graphics practitioner who is not graphically challenged or restricted by inadequate, licensed clip-art collections. So enjoy your new freedom!
Look on the Negative Side of Things
The following tips from the book, Mastering Layout, by Mike Stevens, exemplify the ways in which to utilize negative space.


 Tip Sheet1 week ago
 Photo Gallery3 days ago
 Ask Signs of the Times5 days ago
 Real Deal2 weeks ago
 Benchmarks1 week ago

 Women in Signs2 weeks ago
 Women in Signs1 week ago