The Creative Color (Burnsville, MN) team recently developed a unique vehicle-wrap concept for a longstanding client, Wild Bill’s Sports Saloon (www.wildbillssportssaloon.com). This western-themed, sports bar and grill offers such tasty grub as burgers, ribs, flatbread pizzas and wings at affordable prices.
Wild Bill’s provides a cozy, saloon atmosphere. Aged-pine boards line interior walls; pitched-tin awnings protrude over booths, and a beautiful bottle display behind the bar dates back to the frontier era. It operates three Minneapolis locations — Apple Valley, Maple Grove and Blaine – but had a primary goal of boosting catering sales at its Maple Grove location.
Over the past few years, we’ve created an original logo, fabricated LED-lit channel letters, printed menus and created interior graphics for Wild Bill’s owner. We were excited to further brand their business with distinctive mobile advertising.
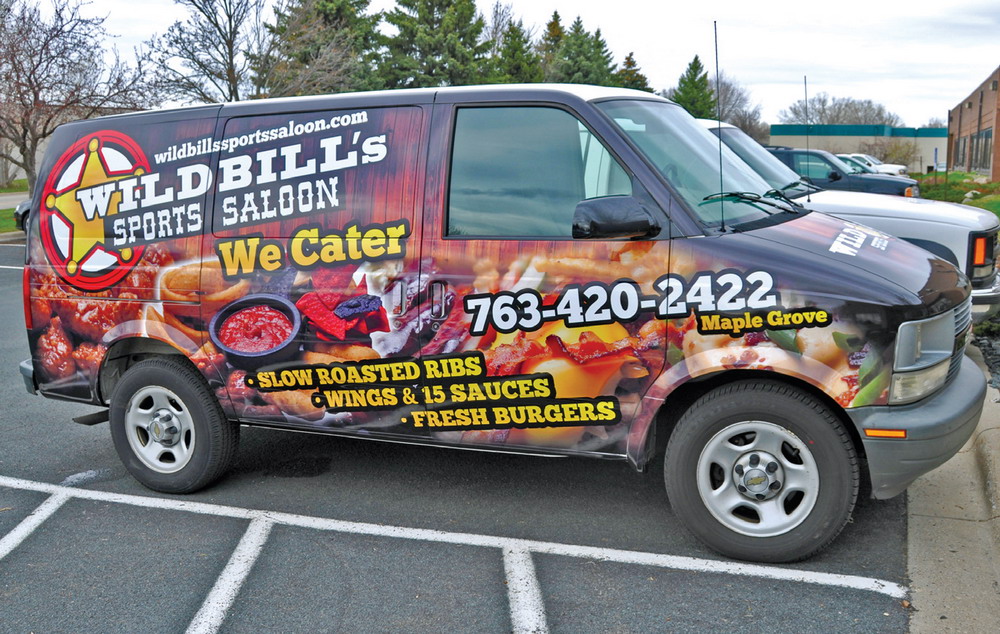
Last year, we collectively discussed doing a full vehicle wrap on one of Wild Bills catering vehicles. When a business owner has never purchased a full vehicle wrap, the widespread exposure it will provide — especially for a restaurant — can be difficult for them to grasp. We proposed a high-impact, full wrap that depicts Wild Bill’s fare so viewers would get hungry at first sight. The customer offered some beautiful food photography, and we went to work.
Mouth-watering design
The client delivered a 2005 Chevy Astro Van for us to wrap. Its straightforward design was relatively simply to wrap, and we enjoyed working on a vehicle with a few nicks and scratches. A full wrap would make this van look brand-new again!
Using Adobe Photoshop and Illustrator CS5, I began creating a collage design. The large Wild Bill’s logo became the focal point, with crisp images rounding out the scene. Working with high-resolution photos of onion rings, ribs and fresh burgers with bacon made me hungry!
I designed the full wrap to fade to black edges on the top and sides, which effectively blend all elements together. I maintained consistency with the background’s “vintage” wood feel, and maximized the logo’s impact by scaling it across the vehicle’s sides. It was a time-consuming, seven-hour process to integrate the images, text, logo and background, but the end result’s pop made it more than worthwhile.
Advertisement
Shop talk
We printed color samples to ensure accurate Pantone® colors would match all previous work for the client. We made subtle color adjustments and slightly edited image contrast to make them really “pop”! Specifically, we bumped the color contrast on every food item to make them more appealing. Buffalo wings, chips and salsa particularly needed more graphic pop. We also adjusted the “We Cater” line to a brighter, orange and yellow fade.
Once we’d completed all color testing, we began printing the approximately 275-sq.-ft. wrap on our Mimaki JV3 -160SP solvent-inkjet printer. We printed the wrap at 720 x 720-dpi resolution in 16-pass mode. Some might consider this overkill for a vehicle wrap, but we pride ourselves on delivering crisp images. We processed the wrap with Onyx Graphics’ PosterShop 6.5 RIP.
The wrap comprises four panels per side, plus two in the rear and a large panel for the hood. The side panels measured 4 ft. 2 in. wide x 5 ft. tall; the rear pieces span 2 ft. 8 in. x 5 ft., and the hood wrap measures 3 x 5 ft. We produced the wrap on 3M’s Controltac 180Cv3-10 air-release vinyl in tandem with 3M 8518 glossy overlaminate, We can create a top-notch, ultra-vibrant image that stands the test of time, even in Minnesota!
To create the desired effect during application, we bled the colors on our printer and installed the panels with a 1-in. overlap.
We applied the topcoat on our Seal 600S laminator using 3M’s 8518 glossy laminate. Before lamination, we gave the print 24 hours to outgas to maximize durability.
Making it stick
Advertisement
We handle installation in our 2,000-sq.-ft. bay. First, we meticulously prepped the wrap by hand with XIM’s GON-2O water-based cleaner and isopropyl alcohol. To create strong adhesion, we applied 3M’s Primer 94 to a few metal and plastic surfaces. A few emblems were removed (“Astro” and “Chevrolet,” for example), and we pulled out the rear tail lights prior to installation.
To ensure a good finish, we set the graphics in place using homemade magnetic pucks along one side. Once installers had laid out everything on the vehicle, our team of 3M-certified installers began application.
The team applied all media using felt-tipped, 3M Gold nylon squeegees. To make graphics more pliable around concaved edges and surfaces, a propane torch is always necessary. We trimmed all excess material with X-Acto knives and very steady hands.
Installers applied graphics using the hinge method. It provides a clean, flowing look – not to mention a breathing room for the installation team. They applied 6 in. of media to the top edge of the vehicle, and then slowly pulled away the film’s backing as they worked their way down. They stretched and heated the film when necessary on concave areas.
We left sufficient bleed on the panels, which allowed the graphics to completely cover the top and bottom of the concave surfaces. The design’s black fade simplified edge installation because it alleviated the need to 100% accurately line up the panels from the edges.
Each installer worked from the rear forward and applied one sheet at a time. They carefully cut around the keyholes, door handles and windows. We installed the front fender panels last on each side. We heated up the panels and stretched the film across the top of the concaved fender, and achieved a flawless application. Once the rear and sides were installed, our team moved onto the front hood and applied one large panel from top to bottom.
After application, the crew reheated the wrapped surface with blow torches to remove any squeegee scratches left on the laminate. The heat re-shrinks the laminate and creates a flawless, glossy finish.
To add flair to an already great design, our team had some fun on the fly. They took waste film with the wood grain background and applied it to the Chevrolet bowtie emblem on the van’s front. Once the emblem was covered, they applied scrap from waste black material to the front grille, which covered its dull, grey finish.
Advertisement
The wrapping process required 6-8 hours, but we can honestly say it was fun from beginning to end. We couldn’t believe the response the wrap received from neighboring businesses when we pulled the vehicle around to our front lot. Onlookers asked about the project, as well as the restaurant and its locations.
It’s always rewarding to execute a project that turns heads. This helps us realize why we entered this industry; to build relationships and give clients all they deserve!
Equipment and Materials
Laminator: Seal 600S 60-in., dual-function laminator, from Neschen Americas (Elkridge, MD), (800) 257-7325 or www.neschenamericas.com
Media: Controltac 180-CV3 repositionable media with Comply v3 air-release technology, from 3M Commercial Graphics (St. Paul, MN), (800) 374-6722; www.3m.com; 8518 glossy overlaminate, from 3M Commercial Graphics
Printer: JV3-160SP solvent-ink printer, from Mimaki USA (Suwanee, GA), (888) 530-4021 or www.mimakiusa.com
Software: Adobe Creative Suite, from Adobe Corp. (San Jose, CA), (408) 536-6000 or www.adobe.com
Tools: Felt-tipped, nylon squeegees, from 3M Commercial Graphics; hot-air dryer; X-Acto knives, propane torch, available from hardware and home-improvement stores.
About Creative Color
Creative Color, Inc. is a full-service graphic-design and digital-print studio located just outside the Twin Cities in Burnsville, MN. Over the past decade, owners Jeff Volino and Brent Luther have specialized in printed advertising solutions for diverse customers.
Luther said, “We really love to mix the media at our fingertips. By making use of our large-format printing capabilities with both solvent and UV inks, as well as vinyl plotting and CNC routing, we can create large wall murals, custom signs and vehicle wraps, vibrant banners and tradeshow displays.”
For more information about the company, visit www.creativecolorstudio.com


 Tip Sheet2 weeks ago
 Photo Gallery4 days ago
 Ask Signs of the Times6 days ago
 Real Deal2 weeks ago
 Paula Fargo1 day ago
 Benchmarks1 week ago
 Photo Gallery1 day ago
 Women in Signs2 weeks ago