Rob Ivers owns Rob Ivers Inc. (Raymore, MO), a vinyl-graphics training company. He’s taught vinyl-graphics installation since 1993.
Applying vinyl over standard trailer or box-truck rivets is relatively easy. Although there are many rivet types and sizes, standard rivets are characteristically small with smooth tops. However, some varieties that cause more headaches.
In this article, I’ll describe techniques for applying vinyl graphics over standard rivets and screws. Using these techniques, you can achieve excellent installations where vinyl conforms to the rivets; air pockets or bubbles don’t exist; and the adhesive adheres fully to the surface. Most importantly, the vinyl can bond with the surface for years.
A good beginning
I’ve installed vinyl over rivets for more than 30 years. I’ve tried every possible technique and tool and perfected my techniques through experimentation; the Professional Decal Application Assn. and most, if not all, vinyl manufacturers endorse them. These first traditional methods will work for any vinyl graphics installed over standard rivets. The second method, which utilizes two great tools, is applicable to digitally printed jobs protected by a vinyl overlaminate. Understanding and mastering both will help your business.
Advertisement
Cleaning will be discussed in greater detail in a future article. Remember, the surface must be cleaned properly and completely dry. Moisture will collect behind the rivets on a damp vehicle. Fluid behind rivets must be removed by heating the rivet heads and surrounding area with a propane torch until all fluid evaporates. Additionally, the vinyl must be applied dry without the use of application fluids or wetting agents.
Tried and true
The following process will work for any type of vinyl graphic intended for use over rivets: die-cut, computer cut, screenprinted, digitally printed, with or without air egress. Personally, I only use cast vinyl. With the exception digitally printed graphics with a vinyl overlaminate, all must be premasked, including applications coated with a liquid laminate.
To position the graphic, hold it in place with masking tape and make some reference marks (positioning will be another future article topic). Squeegee in the same direction as the graphic’s smaller dimension. If the graphic is 4 ft. wide x 8 ft. tall, squeegee horizontally. If the opposite, squeegee vertically.
Advertisement
Remove the liner paper where you plan to begin. Remove a little liner at a time as you squeegee, not all at once. The graphic must be taut. Squeegee from the middle out in both directions, and keep the squeegee low and flat — almost parallel to the surface. Use firm pressure and overlap each squeegee stroke by 1 to 2 in. to push out all the air.
When you squeegee over rivets, line up the squeegee’s center with the rivets. This allows the squeegee to smooth the vinyl around the rivet on both sides while pushing out air. Avoid applying over only part of the rivet; a second squeegee press may lead to wrinkles. With a little practice, you’ll achieve the desired result — a small, round air pocket around each rivet.
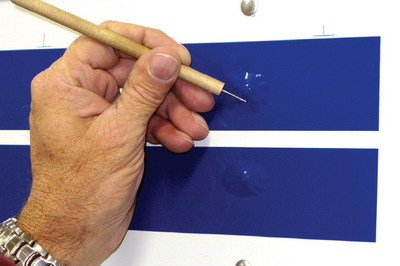
After you apply vinyl, remove the premask. Use an air-release tool (a small, needle-tipped device) to poke one small hole underneath each rivet where it meets the surface. Using a rivet brush, move in a circular motion. Begin outside the loose vinyl and spiral towards the rivet. One or two revolutions should expel most of the air. We call this step “cold brushing,” because no heat is used.
Next, use a propane torch or a heat gun (most professionals prefer torches), to slightly warm the loose vinyl and brush again. Too much heat will damage loose vinyl. If it becomes too hot, let it cool before brushing. Repeat the heating and brushing (usually three or four passes are necessary) until all of the air is gone, and the vinyl appears painted on.
Advertisement
With each repetition, use a little more heat. Once most of the air is out, center the brush on top of the rivet and brush firmly in very small, tight circles. After completing a row of rivets, heat each rivet one more time without brushing to ensure they stay tight. Once you’ve ensured all the air is out, you can apply substantial heat without damaging the vinyl.
Tool time
Both tools I’m about to discuss are designed for use only with 3MTM film products with the Comply air-egress feature. GForce Products LLC introduced a new foam-roller tool, the RollePro, in 2007. Dustin Owens designed the tool to make vinyl applications over rivets faster and easier. Dustin and I have converted many who didn’t like the tool with a quick tutorial.
To use the tool successfully, leave an open channel for the air to escape, and use heavy heat and a light touch. Loose vinyl cools quickly, so only heat and apply to two or three rivets at a time. Heat the vinyl to approximately 180° F. That’s just before the vinyl starts to melt or burn. Try some practice vinyl first; learn to heat it as hot as possible without burning it.
Some vinyl installers struggle with squeegeeing the vinyl with an air channel over a rivet row. Or, they have difficulty changing old habits. Instead of squeegees, I’ll implement another tool — 3M’s Power Grip Rapid Roller CPA-2.
Let’s say, for instance, I’m installing a full box-truck wrap. Starting at the top, I tack the graphic and remove the liner. I verify the positioning and make the graphic taut by lightly tacking a few perimeter spots. On subsequent panels, I tack critical design match points to ensure perfect registration on that edge, and then pull it taut and tack it on the graphic’s opposite side. I determine where the rivet rows are and roll in between them with the CPA-2 vertically with firm pressure. It’s easy to leave an open channel; the tool applies enough pressure to discharge air while letting me work quickly.
Starting in the middle of a rivet row, I heat the loose vinyl with a torch and use the RollePro to roll over the rivets. The RollePro pushes out the air, applies the vinyl, and conforms it to the rivets — all in one quick motion. I don’t need to poke holes, nor do I get scratches that commonly occur with a rivet brush. I roll half the rivets up and the other half down. Then, I cut and tuck the vinyl over any trailer-panel seams, and I’m done.
This technique lets me do a better job — no holes, no scratching and better registration. The higher degree of heat ensures better applications over rivets. If I used that much heat with a rivet brush, it would damage the vinyl.
For applications over rivets, I recommend these tools. Spend a little time mastering tools and techniques that can help your productivity, and I guarantee you’ll be completing high-quality work in half the time.


 News4 days ago
 Projects2 weeks ago
 News2 weeks ago
 How To1 week ago
 Real Deal4 days ago
 Editor's Note5 days ago

 Product Buying + Technology6 days ago