Rob Ivers owns Rob Ivers Inc. (Raymore, MO), a vehicle-graphics company. He’s installed vinyl since 1978 and taught vinyl-graphics installation since 1993.
Installed graphics frequently need to be trimmed – for various reasons. Consider signage, for instance. If a design extends to the edge(s), the fabricator typically produces a graphic slighter largely than the panel and trims along the perimeter.
Vehicle graphics provide another prime example. Door edges must be cut so the doors can open, and emblems, door handles, hinges, lights and other components present even more challenging trims. Most edge trims are simple to execute well; others can be tricky. Precise trimming around complex shapes can prove very difficult.
I’ve trimmed and cut quite a bit of vinyl in 31 years. The right tool for the job is always critical, but it’s even more important to understand the precise positioning of the angle of the beveled cutting edge in relation to the graphic and the surface. Poor trimming can ruin an otherwise perfect installation. This article will focus on the importance of honing your trimming skills, different techniques and the assortment of cutting tools available.
Tool time
Advertisement
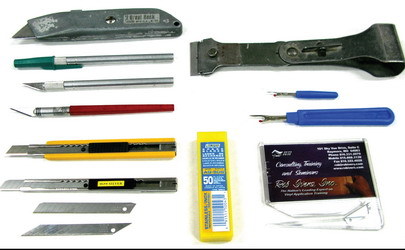
I have quite a few tools in my arsenal (see photo above). Because I use up to six Olfa blades for just one vehicle wrap, I buy 50-count packs of replacement blades. For a great bargain on these, go to www.44tools.com. I prefer stainless-steel Olfa knives with stainless-steel blades. The blade’s flat surface is wider than a pointed tool, which makes it easier to maintain a consistent angle while cutting against long edges. The snap-off blades facilitate starting each new cut with a fresh, sharp blade.
When each cut is made with an identical, sharp blade, consistency is easily achieved — no adjustment is necessary for blade condition. Each blade has 13, snap-off segments. When purchased in the 50-pack, each segment costs 2.5 cents.
Many signshops prefer X-Acto® knives. They trim curved and round shapes, such as keyholes, very well. Besides that, I find them problematic. The pointed end wears out very quickly; changing the blade is time-consuming, and blades are expensive at 15 to 25 cents each. Here’s a tip: Ballpoint pen caps make an inexpensive, protective blade cover.
I choose utility or sheetrock knives to trim vinyl along panel seams on trailers and box trucks. They’re much sturdier than Olfas or X-Actos. Again, changing blades is time-consuming and expensive, but, with this type of trimming, they don’t need frequent replacement.
My toolbox also contains a Zippy letter opener, a seam ripper and a razor scraper. I use the Zippy to trim away liner paper. I complete the task one-handed with no danger of cutting the surface; only the plastic guard touches. A seam ripper, a helpful tool that can be purchased in any sewing department or fabric store, slits the backing paper of many graphics without harming them.
Lay the graphic upside-down on a table. Use the sharp tip of the tool to slightly separate the liner from the graphic where you want to make the slit. Insert the ball end of the seam ripper between the paper and the graphic.
Advertisement
Lift up on the tool as you push it across, which neatly slits just the liner. When you’re ready for the application, fold the slit paper to expose a small amount of adhesive exactly where you want to make your first squeegee stroke. The paper’s fold will hold the adhesive away from the surface, which allows you to slide the graphic into position. Once it’s aligned, you can quickly squeegee the exposed adhesive to anchor the graphic in position. Then, you remove as much of the liner as is appropriate, and squeegee the remainder of the graphic.
Use razor scrapers as a last resort for vinyl or adhesive removal. However, should one become necessary, try Snap-On and Mac Tools scrapers – they’re virtually indestructible. They allow you to adjust the angle by bending the swivel arm, and they cost less than $10.
With years of experience and a steady hand, you can place one of the beveled cutting edges flat and parallel against the surface and glide along the surface, skimming away the vinyl or adhesive. I never do this unless absolutely necessary, and I always wet the surface to provide lubrication. Practicing on a client’s Mercedes is not recommended.
The right technique
Advertisement
All trim jobs require good vinyl adhesion before cutting. This prevents the vinyl from slipping and moving while you are cutting. Apply pressure to the edges, using a squeegee, thumb or finger, to ensure the vinyl is well sealed.
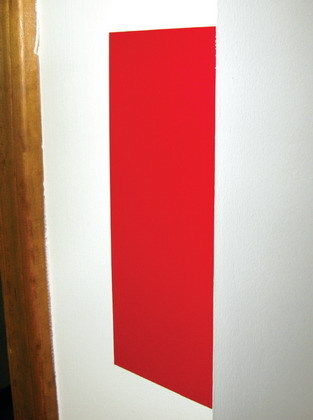
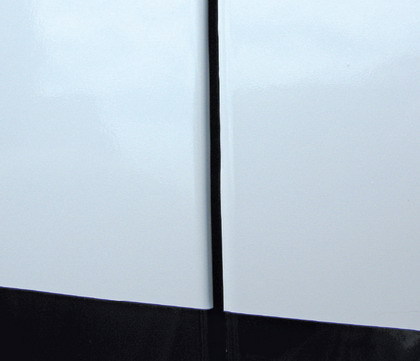
Three general types of trimming should be mastered: cutting exactly to an edge with zero overhang, cutting along an edge with a slight overhang, and cutting directly on a surface. Real-world examples of cutting exactly to an edge include trailer-panel seams, exposed glass edges with no rubber trim or moldings, and rigid sign edges.
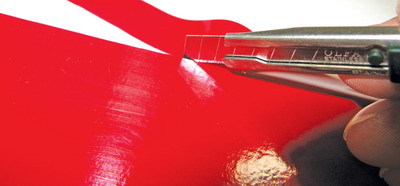
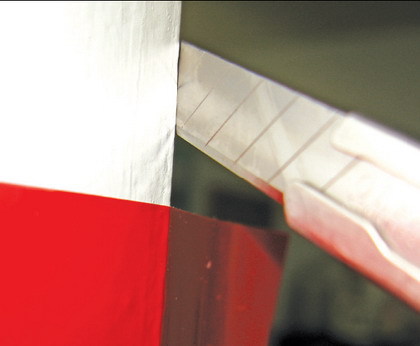
Make these trims by angling the knife until the beveled cutting edge is parallel to and flush with the surface edge. Use this trimming technique when even a slight overhang would be detrimental aesthetically or lead to edge lifting.
Trim with a slight overhang when cutting the surface is totally unacceptable. Two examples come to mind — cutting the paint on a client’s vehicle while trimming body edges; doors, hoods, gas filler doors, provides one. The outside corner of a sheetrock wall, where a wall mural might end, becomes another. Although the principle is simple, proper execution of the technique requires precision and practice.
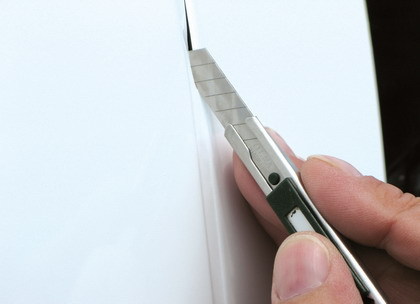
Lay the blade’s flat side (not the beveled cutting edge) flush with the surface and glide along the edge as you make the cut. The beveled cutting edge never touches the surface, so you can’t cut it. The cutting takes place a very slight distance away — half the blade’s thickness. Then, adhere the slightly overhanging loose vinyl with your thumb, finger or squeegee.
For rounded and soft edges, such as the outside corners of a sheetrock wall, I place the flat edge of my blade flush against the corner with my knife at a 45° angle to the corner.
Vehicle-body edges provide either a flat surface or a 90° return to the car’s interior. Generally, I trim flat edges with a slight overhang, but not the 90° returns; I wrap the vinyl around them. A flat edge that occurs within a complex curve serves as an exception. To prevent lifting, I wrap vinyl that’s been formed and stretched underneath.
For flat vehicle edges, glide the flat side of the blade (not the beveled cutting edge) perpendicular to and flush with the edge. Don’t forget to push the edge down tight.
Try to avoid the third type — direct surface trimming. Too often, the cut penetrates the vinyl and damages the surface. Common-sense design and production planning often eliminate the need for such potentially destructive trimming. However, most installers find it inevitable eventually. A common example is when a printed graphic applied to a vehicle side overlaps with one applied to the rear.
Here’s my advice: Practice applying vinyl to a rigid surface, such as an aluminum sign blank or Plexiglas® acrylic sheet. Use the same types of vinyl you normally encounter: laminated digital prints, unlaminated cast and calendared vinyl, etc. Start with a fresh blade and trim off small slivers repetitively.
Keep practicing until you can make clean cuts without damaging the surface. Then, practice some more until it becomes second nature. Only then should you attempt direct cutting on a client’s job. As a reference point, I can tell you cutting 2-mil, cast vinyl, cleanly and perfectly with a new Olfa blade requires zero inward pressure. For a digital print that comprises a 2-mil vinyl with a 2-mil overlaminate, use very minimal, inward pressure.
These techniques rely on precise blade placement and angles that require practice and a steady hand. You’ll be rewarded with better-looking, longer-lasting jobs!


 Paula Fargo2 weeks ago
 Real Deal1 week ago
 Photo Gallery2 weeks ago
 Projects1 week ago
 Business Management1 week ago

 News1 week ago
 Dale Salamacha5 days ago