Have you ever wondered how to grow your business? I offer two suggestions that go hand in hand. First, deliver a perfect job every time to every customer. This will ensure you a steady stream of repeat business and referrals. Second, price your work responsibly – this means providing good value for your customers. This makes them happy and you a reasonable profit for your skills and efforts.
Here’s some good and bad news. The good news: I’m going to share some tips and techniques that will help you deliver perfect (or near-perfect) graphic installations. The bad news: I’m still learning to price responsibly. As a consolation prize, I’ll instead provide my methodology for graphic removals.
The road to recovery
First, I wish to make a disclaimer. I work almost exclusively with cast vinyl. The methods I use are proven to work with cast products, but may not work with some calendared media.
Everyone makes mistakes. Learning how to recover or repair helps avoid replacement, which saves time and money. The most common recovery method requires removing an improperly placed graphic and aligning all or part of it to fix such squeegee errors as bubbles or wrinkles.
Advertisement
The best removal technique depends on such factors as vinyl type, graphic type and temperature. With cast vinyl, snap the graphic quickly and lightly. Calendared vinyl typically requires slow, steady pulls.
Temperature plays a big role as well; very hot conditions may render recovery techniques useless. Cold temperatures may allow easy removal, but often at the expense of tearing the graphic. With so many variables and combinations, it’s impossible to discuss them all. Instead, let’s look at strategies that help determine your best solution.
Quick fixes
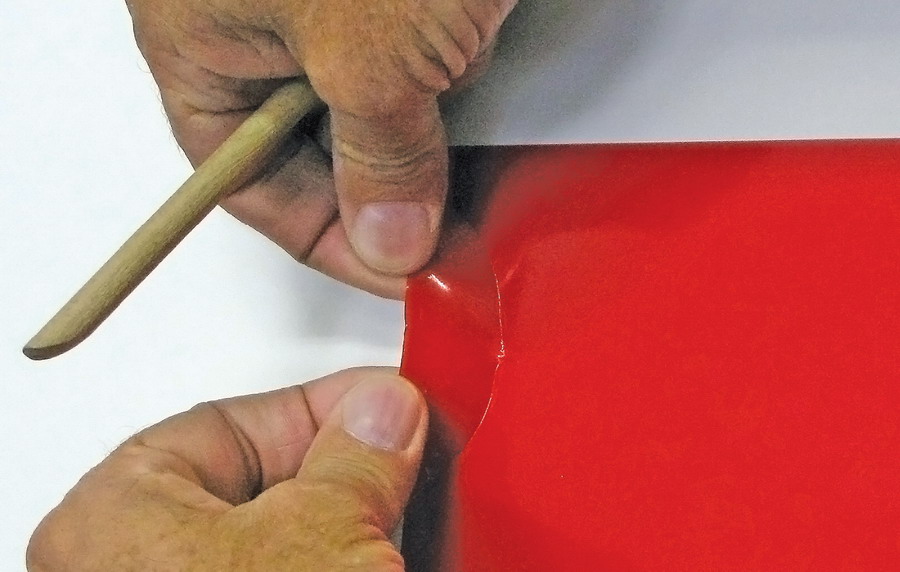
With any graphic, it’s imperative you discover errors immediately. Once the entire graphic is applied, but especially with cut graphics, replacement may be the only option. In optimum installation temperatures — 60 to 80° F — a quick, light snap should fix the problem when using cast vinyl. If the graphic comprises cut letters or shapes, only partially applied letters or shapes will have much chance of being saved.
In this temperature range, partially applied solid shapes and printed graphics usually snap off easily without damaging the graphic. Cooler temps require less snap because of lower adhesion energy. A lighter snap reduces the possibility of tearing. Warmer temps require more energetic snapping. For calendared-vinyl repair, solid shapes may snap up easily, but my experience suggests a slow, non-stretching pull yields better results.
Advertisement
I’ve learned not to hesitate when removing vinyl in warmer conditions. A few seconds of delay may make the difference between a successful recovery and a costly replacement. The way I see it, if the graphic is already lost if I can’t fix it, I have nothing to lose.
When repairing wrinkles, reaction time is critical. If you feel the vinyl wrinkling while you squeegee, a quick slight snap for cast vinyl, or a slow pull for calendared, just past the problem area, should suffice. Squeegee more carefully, with more pressure, the second time. This works well for most wrinkles.
If the vinyl was badly damaged, it may need repair, which I will cover in the next section. If you don’t pay attention and discover wrinkles only after application, recovery isn’t an option. Repair may work, but requires more time and effort.
Repair calls
Cast vinyl’s “memory” feature can yield some truly amazing repairs. A little heat can trigger the media’s return to its original shape and condition. The vinyl must be loose, of course, not installed. Make sure your hands are clean; touch the adhesive as little as possible.
Advertisement
Pull the vinyl off, with heat if necessary, past the area to be repaired. The vinyl will stretch; to avoid tears, remove a larger area than what actually needs repair. For instance, if you’re repairing a wrinkle on or near an edge that extends 1 in. into the vinyl’s surface, loosen a ¾-in. area along the edge on both sides of the wrinkle.
Once the damaged area is loose, use heat to remove the stretching and previous damage. Start with the heat directed at the applied vinyl and gently move it toward the loose vinyl. Keep the heat moving, and watch the loose vinyl for movement. Once it starts to react to the heat, stop heating, or at least reduce it.
The vinyl will continue to react to the heat for a short time after you stop applying it — a delayed reaction, if you will. If you leave the heat on it long enough to remove all damage with heat directly applied, the continued effects may cause the vinyl to burn.
Remember, you can always add more heat, but you can’t take it back. Once the vinyl is smooth and flat, let it cool completely. After it cools, carefully re-squeegee to complete the repair.
If your best effort to recover or repair the graphic proves unsuccessful, replace it. Avoid the temptation to leave it and hope the customer doesn’t notice. The damage to your reputation and self-esteem far outweighs the cost of any graphic.
Removal tips
Although removing vinyl usually isn’t bad, adhesive-residue elimination may prove a nightmare. There are many vinyl and adhesive-removal products and tools on the market. I’ve tried several over the years that have proven unsuccessful. A magic formula may exist, but I haven’t found it. I use heat to remove vinyl, and ZEP Orange Gel degreaser or Xylol to remove the adhesive. My goal is to remove the vinyl without leaving adhesive.
Most repositionable or removable films remove easily with heat and leave no adhesive. Permanent and (especially) reflective films are known for leaving glue residue on the surface. I believe, in the majority of cases, if you knew each vinyl’s magic temperature, and could maintain that temperature constantly, almost every media would remove cleanly. If you apply too little heat, the vinyl tears frequently; too much heat causes the entire adhesive to stick.
On warm surfaces, I start pulling with no heat to test the vinyl’s response. Although the vinyl may come off, it’s usually quicker with heat. So I start warming the vinyl up gradually until I find the magic temperature. I control the heat source’s distance from the vinyl, how fast I move it and how many passes I make. Once I find the right combination, I try to duplicate my actions. Vinyl becomes harder to remove when heated multiple times. Determine how much you can remove before it cools, and heat only that much each time.
The angle you pull can mean the difference between no adhesive sticking and residue everywhere. Keep the vinyl low and flat (less than a 15° angle). For example, when starting at the bottom of the graphic, pull down instead of out or up.
If the vinyl is old and cracked, try one of the chemical-removal formulae available, or you may have to resort to scraping the graphic off. When that happens, I explain to customers that I’d really like to help them, but I’m just too busy. Call me chicken, but I lost enough money, skin and brain cells in my younger days. Keep this in mind when choosing what products you offer. Most people forget to include removal cost when pricing jobs, but they create a very real cost. Virtually every installed graphic must be removed sometime by someone. Better to sell products that remove cleanly with heat. Who knows? You may be the one stuck with removing them.


 Tip Sheet1 week ago
 Photo Gallery3 days ago
 Ask Signs of the Times5 days ago
 Real Deal2 weeks ago
 Benchmarks1 week ago
 Photo Gallery6 hours ago
 Women in Signs2 weeks ago
 Women in Signs1 week ago