Vehicles + Vinyl
The Right Way to Do it Wet
Jim chronicles when and how to perform wet vinyl applications.
Published
18 years agoon

During recent travels to meets and shops, I’ve spoken with several signmakers who’ve posed questions and problems relating to wet vinyl applications. Although I’ve never been a big advocate of wet applications, I realize that many graphics professionals prefer them. Thus, I’d like to offer a few tips to help you perform them more effectively.
Five easy pieces (of advice)
If you can install vinyl dry, never use application fluid. Wet applications should only be used as a last resort. When I learned how to install fleet markings, I applied everything dry. If you’ve perfected your technique, and you’re using vinyl with a forgiving adhesive system, then dry applications are the faster way to go.
As part of my indoctrination, my instructor warned me not to use application fluid to apply vinyl to surfaces with rivets, or reflective sheeting to unpainted metal surfaces, because application fluid collects underneath rivet heads, creating a residue that later seeps out and causes vinyl to tent and eventually crack. Fluid under trailer-panel seams can also cause edge lifting.
Using application fluid to install graphics with a metallization layer, such as reflective sheeting, can cause delamination of the face-stock’s adhesive and accelerate galvanic corrosion. When two dissimilar metals — such as aluminum in reflective sheeting and the skin of an unpainted, stainless-steel tanker truck — come in contact, the reaction generates an electric current. Electrical particles (ions) flow from the reflective material’s metallized layer into the steel.
During an electrical reaction, one becomes the donor metal, while the other becomes the acceptor metal. As the aluminum in the reflective sheeting loses ions, it corrodes and blackens. By acting as a conductor between the metals, application fluid can facilitate the electric flow of ions, which leads to corrosion.
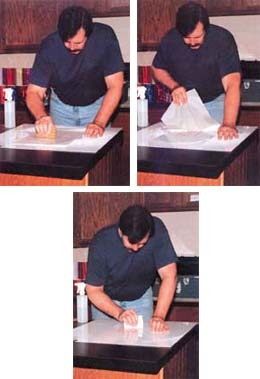
AdvertisementSecond, always use application fluid to adhere vinyl to an acrylic sign face. Here, an application fluid is required because the vinyl’s adhesive wants to grab onto the plastic surface. $image1
I once tried to install vinyl via dry application to a plastic sign face. The result: a graphic with a zillion tiny bubbles. Although all these bubbles eventually "exhaled" and disappeared after three days of summer heat, I learned the correct way to apply vinyl graphics to a flat plastic surface: Use a commercial application fluid.
Note that I recommend a "commercial" product, which leads to my third piece of advice. Years ago, I told signmakers they could make their own concoction by mixing 20 oz. of water with 1/2 tsp. of a dishwashing liquid and 1/2 tsp. of isopropyl alcohol.
At that time, I believed application fluid was that simple. I was wrong. In doing a side-by-side test of my mixture vs. the real stuff, I learned that commercial fluids work better because they promote faster vinyl adhesion to the substrate.
Some application fluids cost as much as $25 a gallon, which prompts some signmakers to "extend" their supply of the mixture by adding water. Remember, if you dilute your application fluid, you’ll dilute the adhesion-promoting characteristics.
Commercial application fluids are worth the investment because the formulations’ quality and consistency yield consistent results. Some popular products on the market today include Rapid Tac, Rapid Tac II, Splash, Actiontac, Window Juice, Quick Stick and Position Perfect.
AdvertisementDon’t waste your time trying to duplicate these products, because you’ll never achieve the same consistency. Dishwashing liquid and similar soaps contain additives such as surfactants, emulsifiers, moisturizers and perfumes, all of which are detrimental to an adhesive. Surfactants, for example, help cleaners break dirt’s bond with the substrate. They have the same effect on adhesives, causing bonding failure and edge lifting.
An application fluid aids installations if you’re applying a vinyl with an aggressive adhesive system. The application fluid helps float the graphic onto the surface, to prevent pre-adhesion (the vinyl sticking before you want it to). Application fluid also allows an installer to easily reposition the graphics without distortion.
My first wet-application attempt occurred 20 years ago, while in-stalling "prototype" window graphics for a chain of hardware stores in Louisville, KY. The hot, sunny weather caused the vinyl’s adhesive to stick to the glass prematurely.
These conditions warranted using an application fluid. Weeks earlier, our sales vice president had recommended using Windex® glass cleaner as an application fluid, so we gave it a try. After the installation, as we said good-bye to the chain’s general manager, I looked over my shoulder at the windows. To my dismay, all the graphics had slid down the glass. Luckily, because this was a prototype, we’d produced twice as much material as we needed. The temperature had cooled considerably by this time, and we dry-installed the graphics.
So, my fourth tip is: Never use glass cleaner as an application fluid. Some glass cleaners contain silicone, ammonia and other additives that can impair adhesion (Windex isn’t even recommended for preparing the application surface).
My final point: Disregard technical advice from your VP of sales. If you want technical information, talk to a technical service person.
AdvertisementStep-by-step instructions
* Cleanliness is next to godliness. Before any application, clean the substrate thoroughly with a commercial, non-abrasive cleaner. A final cleaning with isopropyl alcohol is generally recommended. When wiping a surface clean, use a lint-free rag or paper towel (see ST, September 2001, page 64).
* When performing wet applications — or any application — select a low-tack application tape. Generally, I recommend using a lower-tack tape for large lettering and graphics, and a high-tack tape for smaller lettering and finer detail. In choosing the right application tape, my advice is, "Test, don’t guess."
* When using application fluids, less is usually more. Lightly mist the substrate with application fluid, using the least amount necessary to accomplish the job. Don’t spray the adhesive side of the vinyl graphics and application tape. This often causes the graphics to prematurely release from the tape, resulting in installation mishaps.
Many signmakers use much more fluid than is needed. At one signshop, the installer used so much application fluid that he wore rubber boots so his feet wouldn’t get wet. Using that much application fluid is ridiculous.
* Use a hard, nylon squeegee with firm pressure and overlapping strokes, starting in the center and working outward to force out the fluid from underneath the graphics. Remember, you’re applying a pressure-sensitive film. It’s called "pressure-sensitive" for a reason, so apply some pressure.
* After a few minutes, remove the application tape by carefully pulling it 180° against itself. To expedite the process when using paper tapes, spray the tape’s backside with application fluid. The fluid will penetrate the paper and soften the adhesive, allowing the tape to release more quickly.
Using too much application fluid, and failing to remove the application tape promptly, can cause the adhesive to delaminate from the tape. Cleaning this residual adhesive can be annoying and time-consuming.
* After removing the application tape, mop up the residue with a paper towel.
* After the application tape is removed, use a squeegee covered with a low-friction sleeve and squeegee the entire graphic again. The low-friction sleeve prevents the squeegee from scratching the bare vinyl. This step prevents edge lifting and ensures good adhesion.

SPONSORED VIDEO
Introducing the Sign Industry Podcast
The Sign Industry Podcast is a platform for every sign person out there — from the old-timers who bent neon and hand-lettered boats to those venturing into new technologies — we want to get their stories out for everyone to hear. Come join us and listen to stories, learn tricks or techniques, and get insights of what’s to come. We are the world’s second oldest profession. The folks who started the world’s oldest profession needed a sign.
You may like

Orbus Celebrates Earth Day With Recycling Achievements

American Sign Museum Names New Executive Director

3 Things Print Pros Must Do to Build Stronger Relationships in the Interiors Market
Subscribe

Bulletins
Get the most important news and business ideas from Signs of the Times magazine's news bulletin.
Most Popular
-

 Tip Sheet1 week ago
Always Brand Yourself and Wear Fewer Hats — Two of April’s Sign Tips
-

 Photo Gallery2 days ago
30 Snapshots of the 2024 ISA Sign Expo
-

 Ask Signs of the Times4 days ago
Why Are Signs from Canva so Overloaded and Similar?
-

 Real Deal2 weeks ago
A Woman Sign Company Owner Confronts a Sexist Wholesaler
-

 Benchmarks1 week ago
6 Sports Venue Signs Deserving a Standing Ovation
-

 Women in Signs2 weeks ago
2024 Women in Signs: Megan Bradley
-

 Photo Gallery1 week ago
21 Larry Albright Plasma Globes, Crackle Tubes and More
-

 Women in Signs1 week ago
2024 Women in Signs: Ashley Borell


