Dirk Moebes is CEO of Digital Designware.
Vehicle templates aren’t new. Their longevity underscores their popularity with vehicle-graphics professionals. They offer design, presentation and installation benefits.
For many years, 2-D templates were the norm, but recently, 3-D templates have emerged and have proven to be excellent presentation tools. Whether used simply for vehicle lettering, graphic applications, or partial or full wraps, vehicle templates provide an excellent reference for optimum positioning of the completed wrap-design work. Regardless of whether you use 2-D or 3-D templates, preliminary steps for successful use all relate to the original graphics creation and layout (in 2-D).
I’ve compiled some concise, yet very useful, steps one should follow when incorporating these templates into your vehicle- graphics workflow.
1. When you first open the vehicle template in your sign- or wrap-design software (for example, Cadlink’s SignLab, Adobe Illustrator or PhotoShop, or CorelDraw), remember all vehicle templates are scaled to a certain size (such as 1:20). You need to scale the template to the required percentage (1:20 scale equals 2,000%) to get it to the vehicle’s actual size.
2. Ungroup the template so you can work with each of the vehicle’s four or five views. Take a few quick measurements from the actual vehicle to ensure your customer has provided correct vehicle information. Measure the back window and any large, complex curves. Double-check your measurements before you design and print.
3. Now, you’ll begin the design process. Change the vehicle paint color and add text and graphics. When working with large-format, background graphics, remember these tips:
• Final output resolution should range from 75-120 dpi, depending on the vehicle and the customer’s requests.
• Test your images to see when the images are scaled to the proper percentage; make sure they don’t drop below 75 dpi.
Advertisement
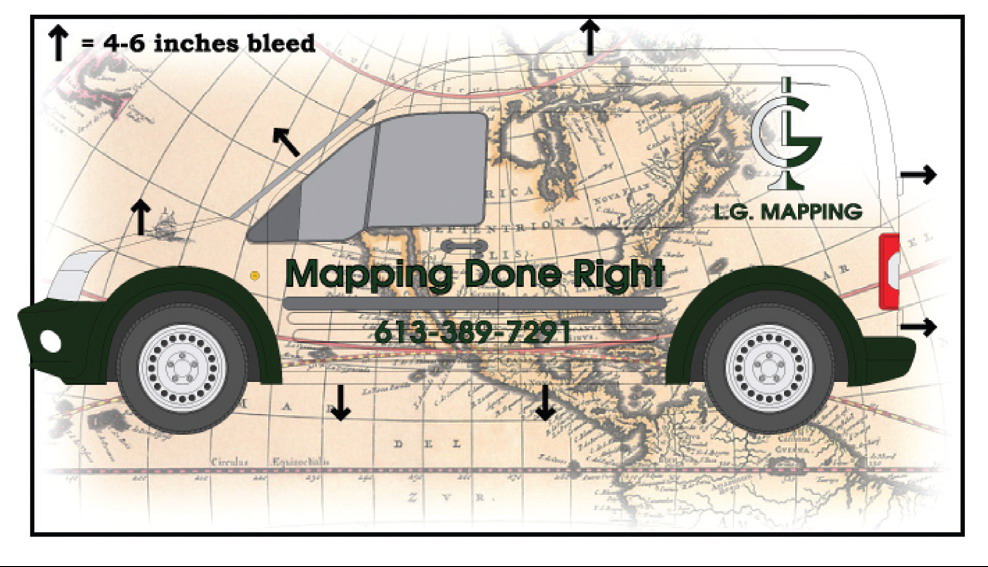
4. Always allow for a 4- to 6-in. bleed of extra vinyl on all wrap edges. This allows you to wrap around corners, into wheel wells, onto roofs, and around any complex curves.
5. Properly clip masks or paths. This step is important for the production of a working file and a presentation
file for your customers. First, create your graphic with recommended bleed on all edges. This is easily done by creating a box around one template view. The box is now what your graphic will fit into, and what you’ll use as the clipping masks/paths. Clip the created box around the template to the template outline. Present the clipped image of exactly what the vehicle will look like to the customer. Once they approve it, you can then unclip or unmask the graphic back to the working, printable file. Simply hide your vehicle template, and then print the graphics layer.
6. When printing complete wraps, print the wrap in vertical panels. Your printer will determine the panel size. You will need to print with a 1-in. overlap between panels. Always laminate the graphics for greater longevity.
7. To fabricate perforated window graphics, follow your normal wrap procedure. Cut out the window, then print the graphics and install them on the window. Window graphics also require lamination.
8. Installers should create an 8½ x 11-in. print of each template view. This allows the installer to see exactly where the graphics correspond on the actual vehicle.
Following these helpful steps will make vehicle-template usage an indispensible tool for your vehicle-graphics design, presentation and installation process.
Advertisement


 Tip Sheet1 week ago
 Photo Gallery3 days ago
 Ask Signs of the Times5 days ago
 Real Deal2 weeks ago
 Benchmarks1 week ago
 Paula Fargo15 hours ago
 Photo Gallery15 hours ago
 Women in Signs2 weeks ago