Signature Signs (Safety Harbor, FL) was co-founded in 1975 by Mark Dinkel, who still serves as company president. Previously known as Creative Wood Graphics, Inc., the company has a long reputation for producing quality deep-blasted, routed and carved wood products, plus ceramic tile, marble and stone signs. The company name changed to Signature Signs in 1994, because we used less wood products. Before joining the company in 1989, I owned an advertising agency and I contracted with Creative for sign work.
Recently, the developers of Saddlebrook Village West, a local single-family residential community, asked us to create an entry monument sign. For this job’s design and material choices, we worked with Clark Durfee, the structural contractor. We’ve worked with Clark on previous projects, and have had success.
Preparations
Immediately after a sale, we meet with affiliated contractors to coordinate any shared work. In this case, because the sign mounts onto a block wall, I met with the masonry contractor to discuss details. The wall has architectural foam coping, caps and finials; the mason also added stucco and cultured stone as finishing touches. The wall has architectural foam coping, caps and finials; the mason also added stucco and cultured stone as finishing touches.
To create the 9-ft. 6-in. x 3-ft. panels, I purchased a 10 x 4-ft. sheet of 1 1/2 in., 15-lb. |2334| Sign Foam™ high-density urethane (HDU). With the large size, I could avoid joining two smaller size pieces. Plan about twenty minutes per side for sanding, priming and finish-sanding the primer. Be sure to clean the surface thoroughly before applying the rubber maskant; I used a #111 rubber stencil. Sign Arts Products
In a fashion similar to preparing airbrush frisket, spray-glue the pattern paper and lay it aside to air-dry until tacky. Next, carefully place it over the maskant and from the center out squeegee in all directions. Use light strokes at first. Now, with a very sharp X-acto knife, hand-cut your pattern. Either sharpen or replace the blade often. (Use a cutting plotter equipped for cutting rubber maskant as an alternative.) Weed the sandblasted areas.
Advertisement
Our design calls for a 3/4-in. urethane leaf, cut and applied on the base panel. As with the base preparation, trace the design onto a rubber mask and cut the pattern. This ensures an accurate fit when you install the carved leaf onto the sandblasted panel.
Down in the pits
Once you’ve applied the maskant to the base material, hand roll the entire surface to further bond the adhesive. Now, move the panel into the sandblasting pit.
Here, we use Black Beauty sand with a 30/65 grit because I like the way it textures the material. I chose the sand based on the look I am trying to achieve for each design
In all cases, the blast depth varies, but the general range is 3/8 to 1/2-in. deep. Depth adds visibility, especially for night viewing. Be patient — you cannot rush sandblasting. A consistent pattern and motion is necessary, as well as low pressure and ample "pit time." Per panel, allow about one hour for blasting, at about 80 psi.
Use a Dremel tool and 200-grit sandpaper to carve the leaf. Be careful not to change the base shape, because it must fit into the main panel. Alter it and you’ll change the background. After you’ve carved and sanded the leaf, give it two coats of primer and apply a smooth coat of imitation gold paint as your first undercoating for the goldleaf. Let this dry and apply a coat of LUCO Slow® Size. Once sized and tacky, begin gilding. I used 23kt glass goldleaf, draping it over the sides and carved areas of the leaf.
Advertisement
After blasting, clear the main panel thoroughly and apply two coats of satin-finish exterior latex paint before removing the rubber stencil, but remove the stencil while the second coat is wet. This reduces latex buildup around the pattern’s edges.
All in the details
To enhance the panel’s appearance in the masonry-wall inset, apply a second-layer border, which brings the overall sign thickness to three inches. This lifts the sign edges to a point above the rock surface and makes them dominant over the brick. Enhance the extra border by routing the edges with a combination of roman ogee and radius bits, then sand, prime and paint with three coats of semi-gloss latex. Next, attach the 21/2-in. wood screws (non-showing) with the PL400 adhesive, installed through the back of the base panel.
Our design called for a convex letter face, which catches and reflects light; it also gives the letters a smoother appearance. Be sure the letters have a smooth edge and rounded (instead of sharp) inside corners. Applying an epoxy mix to the letters gives the letters a soft edge, especially after gilding. Level the panel and pour the epoxy until it flows to the letters’ edge. You’ll see a "cupping" action take place and a round edge appear. Allow this to dry for two days; you’ll want to cover it to keep the bugs out. $image2
Finishing touches
Once dry, brush slow sizing onto the letters. The slow sizing enhances the brilliance of the goldleaf. Wait about 12 hours before gilding. Glass leaf, by the way, is heavier than conventional leaf, so take extra care. Using a very soft, sable-hair brush, pull the gold onto the surface. Afterwards, polish it with cotton. Once done, clean the panel and go after the necessary touch-ups. Now bring in the previously carved and finished leaf and attach it with clear silicone adhesive.
Advertisement
Before installing the sign, be sure the contractor has finished the wall. You don’t want your beautiful sign in place, for instance, when he does his final acid wash. Also, expect to find some overlapping stone or mortar that may need to be chipped away.
To install, coat the back of the panel with clear silicone and position it on the wall. Secure it with 3-in. tap-con screws, recessed flush with the surface. A flush-mount screw, once painted, is less obvious. Finally, the landscaping company does its finish work, and the result is an attractive community entrance-and a happy client.


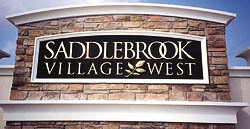


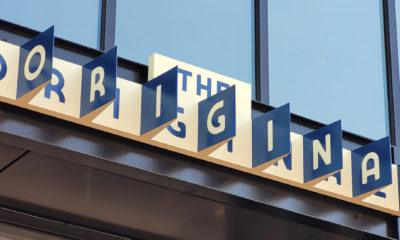


 Photo Gallery7 days ago
 Ask Signs of the Times1 week ago
 Paula Fargo4 days ago
 Real Deal1 day ago
 Benchmarks2 weeks ago
 Photo Gallery4 days ago
 Women in Signs1 week ago
 Women in Signs1 week ago