Mark Fair is proprietor of Mark Fair Signs (Montgomery, AL) and Flying Biscuit Sign Co.
There’s a lot of interest in vintage-style signs. Maybe, as we move into an increasingly computerized, automated and digital world, nostalgia for a simpler time makes people appreciate signage with an aged appearance.
Between my regular signshop and Flying Biscuit Sign Co., a side venture dedicated to traditional-style signage, I produce approximately 150 antique-style signs every year. I’ve learned several techniques from veteran signmakers Dennis Gerathy (the owner of Colonial Signshop in Redford, MI) and Mike Meyer, owner of Mazeppa, MN’s Mike Meyer Signpainter. Through experimentation, I developed more of my own. I appreciate ST’s invitation to describe my antique-sign process.
Pressure and time
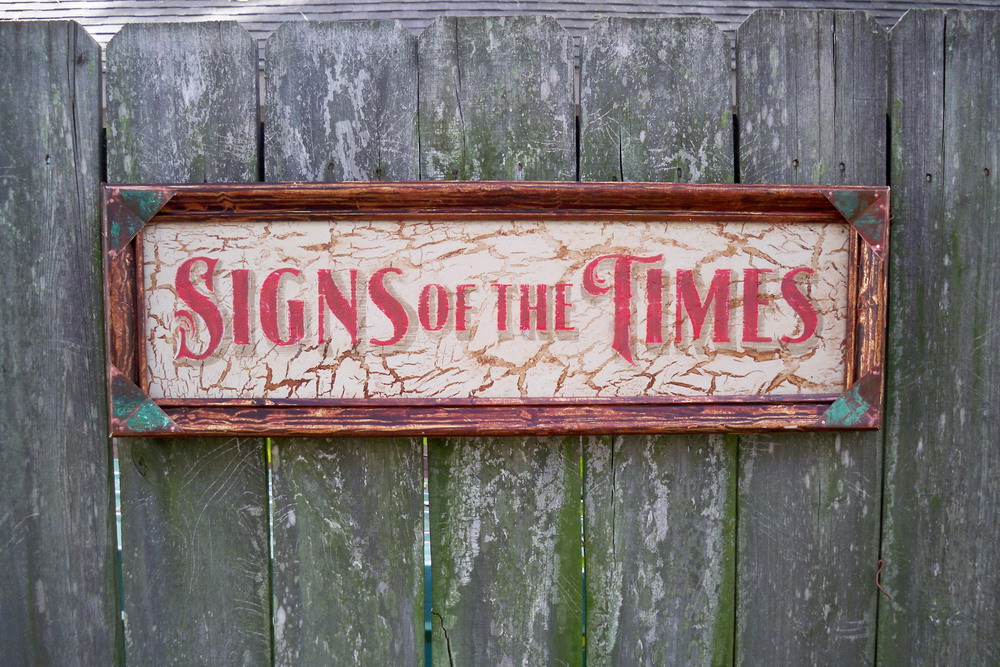
First, I cut a ½-in.-thick plywood slab to shape. I cut it wide enough to allow for a 1.25-in.-wide, trim moulding to frame the sign. I applied the base color with acrylic housepaint and a 2-in.-wide Purdy housepainting brush.
Then, I lettered the sign with acrylic housepaint and a water-based paint brush from Mack Brush Co. For this project, I selected the font “Signmaker”, which was designed by Dave Correll, founder of Brushwork Signs (Fairbault, MN), from www.letterheadfonts.com. For this job, I used a computer mask for the letters, and handlettered the drop shadow. I plotter-cut the mask using Avery paintmask media and a Graphtec cutting plotter.
Next, I created some stress (not for my wife, for the panel). I started the aging process with a vibrating sander, and applied plenty of pressure. How long you sand the surface depends on how much material you want to strip away, and how distressed you want the lettering to look. For this job, which I consider typical, I sanded the surface for 10 minutes. I applied Elmer’s School Glue straight from the bottle and used it very liberally. It will apply milky, but will dry clear.
Advertisement
I waited 45 minutes to allow the Elmer’s glue to set up slightly, but not completely dry. I brushed on an acrylic, satin-finish clearcoat. Like the glue, it will apply milky, but will dry clear. I applied the clear quickly so my brush wouldn’t pick up the glue. I used it more heavily in open areas. Remember: the longer you wait to apply the clear, the smaller the cracks will be. After the clear application, I let the sign sit over-night so it will crackle and dry completely.
Creating definition
The next day, it was time to define the cracks using a tube of artists’ acrylic scumble glaze. I made a scumble bag – which works like a pounce bag for creating patterns, only without the charcoal – by assembling pieces of old towels and filling the bag with paper towels. I apply artists’ acrylic directly from the tube into the scumble bag. I rubbed the color into the cracks with the bag and, and after appli-cation, used a slightly damp cloth to wipe off excess color. Wipe the excess away quickly to reduce the amount of color rubbed away. The residual color accentuates the cracks.
Next, I created a faux wood grain and molded the frame. The late, great “Shep” Sheppard showed me how to quickly simulate wood grain. First, I applied a can of metallic-gold spraypaint to the frame. After it dried, I scuffed the gold paint with a 3M ScotchBrite™ scouring pad to create tooth. Next, I thinned burnt-sienna artists’ acrylic paint with water and brushed it on the moulding. Then, I used a plastic grocery bag to apply the acrylic/water mixture to create a stipple finish with an irregular pattern. I let the stippled coating dry.
Next, I spread on a slightly thinned, burnt-sienna, tube acrylic coating with the 2-in.-wide, housepainting brush. To create the appearance of wood grain, I used a special tool. You can buy a wood-grain tool at any paint store, but I made my own by cutting notches in the rubber blade of a windshield squeegee. Wiggle the tool as you pull it across the frame. Basically, you’re removing the burnt-sienna acrylic to expose the undercoat, which simulates a natural woodgrain.
After having situated the panel within the grained moulding, I applied copper gussets in each corner. The copper oxidizes pretty quickly, which creates a natural patina that perfects the aged look.
But, remember, just because this is the process I’ve used, doesn’t mean you can’t experiment and try your own aging techniques. Try different methods to create a look that appeals to you. And, most of all, have fun!
Advertisement
(Editor’s Note: For other sign-aging tips, check out September 2002’s Letterhead News column, “Hurting Those You Love” [see page 40], where Jeremy Vicoli, Francisco Vargas and the late Rick Glawson offer panel-distressing techniques). To read other related articles on this topic, visit Signweb’s Fabrication & Installation Channel.
Equipment and Materials
Brushes: Two-in.-wide, Purdy housepainting brushes, available at paint and home-improvement stores; lettering brushes, from Mack Brush Co. (Jonesville, MI), (517) 849-9272 or www.mackbrush.com
Coatings: Richard’s (Rockledge, FL; www.richardspaint.com) acrylic housepaint, available from John Lee Paint (Montgomery, AL), (334) 277-9650 or www.johnleepaint.com; tube artists’ acrylics, available from art- and paint-supply stores; satin varnish, from Complementary Coatings Corp. (Montvale, NJ), (800) 225-5554 or www.coronadopaint.com
Mask: Paint mask, from Avery Graphics & Reflective-Products Div. (Painesville, OH), (800) 282-8379 or www.averygraphics.com; cutting plotter, from Graphtec America (Irvine, CA), (800) 854-8385 or www.graphtecamerica.com
Substrate: Half-in.-thick, plywood and trim moulding, available from hardware or home-improvement stores
Tools: Circulating saw, orbital sander and medium-grit sandpaper, available from hardware or home-improvement stores
Advertisement
Misc.: Plastic bags, spray bottle, plastic bags
More About Mark
Mark Fair began his signmaking career nearly 40 years ago as a billboard painter. In 1986, he founded his own Montgomery, AL-based sign company, and developed a reputation for creating creative, effective signage. His repertoire includes handpainted lettering and pictorials; gilded graphics; CAD signage; logo design, and web-page development.
“No matter what the media – radio, TV, print, online – well-designed signage is the most cost-effective form of advertising,” he said.
For more information, visit www.markfair.com.


 Tip Sheet2 weeks ago
 Photo Gallery3 days ago
 Ask Signs of the Times5 days ago
 Real Deal2 weeks ago
 Paula Fargo21 hours ago
 Benchmarks1 week ago
 Photo Gallery21 hours ago
 Women in Signs2 weeks ago