Although routers and engravers are used to fabricate dimensional signs, they aren’t a sign-maker’s only option for dimensional sign work. Abrasive blasting is an equally popular fabrication method.
Abrasive blasting uses high-pressure spraying (blasting) of an abrasive onto a partially masked substrate. As the sand is sprayed onto the substrate, it erodes away any unmasked areas of the substrate. Areas that remain masked are protected from the erosion process and remain dimensionally higher than the eroded, blasted areas. Because sand is often the abrasive of choice within the sign trade, the abrasive-blasting process is commonly referred to as "sandblasting," regardless of the actual abrasive used. We’ll thus use this terminology in this article as well.
To blast (in-house) or not to blast
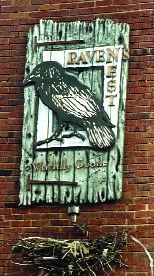
It’s true that sandblasted effects add richness to signs — a richness for which you can command a higher dollar. But you certainly don’t want to purchase blasting equipment, only to have it remain idle from lack of workload. So, when entering this market, first try outsourcing ("subbing out") the blasting work.
Doing so should not be difficult. You’ll likely find signshops in your area already set up for sandblasting. Or, you could choose an industrial sandblasting house. (Industrial sandblasting houses, by the way, are typically set up to propel abrasives at 650 cubic feet/minute [cfm]; a signshop seldom uses more than 150 cfm. Work that would take a signshop hours, takes a professional sandblaster only minutes.)
Of course, you can outsource more than just the blasting itself. Depending on what company you use, you can also sub out none, some or all of your substrate lamination, priming and finishing.
Once you’ve had success selling outsourced sandblasted signage, you can perhaps justify purchasing blasting equipment and performing the fabrication yourself. When making your purchasing decision, here are some issues — both con and pro — you should consider:
1) Does the amount of sandblasting work you do justify the equipment expense, the cost of equipment maintenance, and the use of signshop space for blasting? Also, does your work volume justify the expense of installing the Occupational Safety and Health Administration (OSHA)-compliant ventilation system needed to sandblast?
Remember, not all wood or high-density urethane (HDU) signs you fabricate will be — or should be — sandblasted. Blasting, after all, creates texture. For signs mounted high above a building, and seen only by viewers driving by at 50 mph, a sandblasted texture is unnecessary because the sign’s dimension will not be noticed. In such situations, paint effects, dropshadows, etc., are more appropriate applications.
2) By outsourcing work to an industrial sandblaster, are your specific production needs being met? According to sandblast-specialist Jack Williamson’s 46-page Sandblasted Wood Sign Construction manual, "The amount of business received from sign-makers represents a very small portion of a [industrial] sandblaster’s revenue. They normally see the requirements of a signshop as being picayunish and a general pain in the butt."
Williamson’s manual also reports that you can expect an average sandblast company to ruin approximately 2% of your signs. By blasting in-house you can control the quality and depth of your cut, incorporate specialized blasting effects like stage sandblasting or blasting with a Grain Fraim faux-grain device (manufactured by Signs of the Times, Delavan, WI (414) 728-4499) and have ultimate control over your sign-production schedule.
Sandblasting Equipment
Once you determine that you have the volume, finances and necessary shop space for an in-house blasting operation, you’ll need the following equipment:
A pot. At the heart of all sandblasting is the "pot" — the vessel that holds and discharges the sand. Pots range between $350-1500, with a typical initial investment of $400-500.
There are two types of pots: siphon systems and pressure-pot systems. According to Becki Nelson, sales manager for PhotoBrasive Systems, a Duluth, MN-based a supplier of photo-resist products and blasting equipment, says that a siphon system use the same principle as conventional paint-spraying equipment. Sand is stored in the pot, sucked up (siphoned) through a connecting hose, mixed with air in the nozzle and projected onto the object being blasted. Slower than the pressure-pot system, the siphon system requires a large volume of air to draw the abrasive materials from the hopper (or bottom) of the cabinet.
In contrast, in the pressure-pot system, air not only flows through the sand-delivery hose; it’s actually introduced into the sand pot itself. This air helps "push" the sand through the hose which is more efficient (up to 4x faster than the siphoning system), and more expensive.
Pot size is also an important consideration. The bigger the pot, the more abrasive it can store. If you buy too small a pot, you’ll have to frequently stop blasting and refill the media, thus slowing production.
Also consider purchasing a pot with a water separator — a device that filters out all condensed humidity from your incoming line. Humidity can be detrimental when blasting because it can cause clumping, resulting in an irregular spurting action of the abrasives out of the nozzle. Also, humidity can cause your sandblasting system to clog.
Finally, Nelson says a dust blow-off gun for your pot is an option worth looking into, as it removes all excess abrasives from your sandblasted object. A blow-off gun is especially useful when blasting with aluminum oxide, an abrasive that causes a lot of static.
An air source. Regardless of your pot type, you’ll need an air compressor. Consider both the volume of air it can disperse (measured in cubic feet per minute [cfm]) and the pressure at which the air is being dispersed (measured in pounds per square inch [psi]). At minimum, your compressor should be able to handle 90 cfm at 100 psi. Portable compressors typically offer 5-25 cfm, which is inadequate for sandblasting signs.
You’ll also need nozzles, replacement gaskets which are available whereever you choose to purchase your compressor.
Compressors come in both gasoline- and electric-powered models. Gasoline-type compressors are less expensive than electric machines, but require additional set-up time.
Sign-makers have different opinions about where and how to purchase compressor equipment. To save money, some buy used compressors from local rental companies. The primary disadvantage in doing so is the fact that the equipment has already had abrasives traveling at high speed through its parts; it’s thus already endured a fair amount of wear and tear.
Protection. Protection should include a protective air-conditioned hood and gloves. Some pot starter-kits include this equipment. You can, however, purchase it separately.
To air-condition the hood (which provides you safe, filtered air to breathe), you’ll need a second compressor, separate from your blasting air source. Don’t split the air supply from your primary pot compressor; doing so could be dangerous. If you’re using a gasoline-powered primary compressor, for example, the air from it may be contaminated with carbon monoxide.
Abrasives. There are many types of abrasives available. What you use depends on the substrate on which you’re working and the effect you’re trying to achieve.
Blast area. When you blast in the open, abrasive and substrate particles enter the air. This is messy — and hazardous. Because of these hazards you’re somewhat limited insofar as where you blast. Basically, you have three options: a cabinet sandblaster, your backyard or a sandblasting booth.
- A cabinet sandblaster is basically a large box with a window in front and two holes with built-in gloves. You place your project in the cabinet, insert your hands into the gloves, look through the window at your project, and blast away. Cabinet sandblasters keep the bulk of your sandblast mess contained. However, the size of substrate you can blast is obviously limited by the size of your cabinet. Some cabinets are open-ended to combat this size problem, but you’re still limited by the cabinet’s height.
- By sandblasting outdoors, you’re not limited with regard to project size. Plus, you can also use your sandblasting equipment to work on non-sign projects (removing rust from yard furniture, etc.) You’re most definitely limited though by Environmental Protection Agency (EPA) regulations. Thoroughly research outdoor sandblasting restrictions in your area before setting up a backyard operation.
- Before building a sandblasting booth, research OSHA ventilation standard 1910.94. Basically, a "booth" is just a room for sandblasting. A good compromise between the other options, a booth allows you to sandblast signs of all sizes, while keeping your mess self-contained.
Substrate Selection
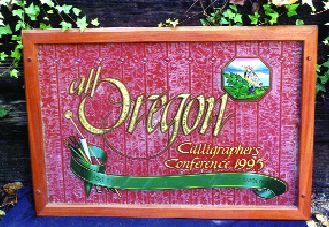
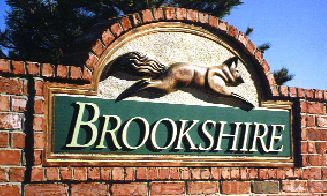
As with any sign, substrate selection is an important consideration. When you sandblast, the texture and/or flowing grain you’re creating becomes an integral and dominant part of the sign’s appearance. The grain can enhance simple design elements or compete with a complex and intricate layout. Plan accordingly; choose a substrate that — when blasted — will yield the texture you seek.
When blasting wood, use boards that have less than a 12% moisture content. Wet wood blasts poorly, weakens glue joints and allows the wood’s internal chemicals to leech through the sign’s finish. Look for wood that’s knot- and stress-free to limit dimensional distortion. Also, wood with a high density is difficult to blast, but is more durable than wood with a low density.
Commonly used wood substrates for sign work are:
Redwood (17-lb. density): Environmental concerns have made commercial redwood panels increasingly scarce and expensive. Two types of redwood exist: coastal redwood and inland redwood. Inland redwood, harvested from naturally fallen trees, is less likely than coastal wood to exhibit harsh ridges (fins); thus, it allows deeper blasting and facilitates background painting.
Western red cedar (19-lb. density): Like redwood, this wood is dimensionally stable and weather-resistant. Its texture falls between coastal and inland redwood. Balsa (10-lb. density): Although it’s a very porous wood, this material takes longer to blast than redwood.
Mahogany (35-lb. density): This material takes longer to blast than even balsa and yields a very flat effect. For outdoor use, it must be fully sealed and painted.
Once you’ve selected narrow, quality planks from the substrate of your choice, butcher-block-laminate (glue) them together. Gluing planks together (as opposed to a single, wide panel of wood) yields a stronger sign that’s less apt to warp in the long run. When laminating, make sure that each board fits well with its neighbor. Use plenty of type 2 or 3 glue in the joints and clamp the boards together until dry. Once they are dry, chip the dry glue that’s seeped out of the cracks. (Check with your adhesive manufacturer for more specific lamination advice.)
Stone materials are blasted in much the same way as wood. Metal abrasives work best for such applications though; use them at 100 psi. When blasting tile, remember that you need only etch off the glazing; you don’t need to deep blast.
Glass is perhaps the "trickiest" substrate to blast because — unlike all others — it is actually blasted in reverse. That is, you blast the back side of the glass — not the front. Even though you’re blasting the back surface though, it’s still a good idea to completely mask the front. Doing so protects the glass from scratches. More fabrication hints: Use a rubber mask on glass if you’re creating a deep blast; a 4-mil vinyl or sandblast mask is suitable for light blasting work.
High-density urethane, although durable, is very easy to blast — not surprising, since it’s also extremely easy to hand-carve. Sometimes sign-makers complain that its blasted pieces, which are full of static, make a mess, but because of its ease-of-use, the material is fast gaining popularity as a substrate.
Abrasive personalities
Common abrasive choices include:
- Silica sand is the most widely used abrasive, and — at approximately 3-5


 Big Survey2 weeks ago
 Photo Gallery1 week ago
 News1 week ago
 News5 days ago
 Heidi Tillmanns4 days ago
 Editor's Note6 days ago
 Dale Salamacha2 days ago
 News1 week ago