At this writing, ST Publications has successfully concluded the ImageWorld 1999 tradeshow in Mexico City. For the second consecutive year, Latin American signmakers flocked to the Mexican capitol’s World Trade Center to investigate everything new and exciting in the world of signs. During our madcap week in the one of the world’s largest cities, we were pleased to learn that the prosperity experienced by sign professionals in the United States is also in full bloom south of the border.
As the sign business bolsters its worldwide reputation as a first-rate opportunity, the enthusiasm of newcomers provides an important shot in the arm. Because information is the driving force behind this current expansion, there’s no such thing as a foolish question. That’s why, in addition to covering more complex aspects of the sign industry, ST continues to focus on fundamentals. This month, I address some common sign-installation questions fielded at tradeshows and received here on SignWeb.
How do sign builders create structural designs for pole-mounted signs?
All freestanding signs must be properly engineered for safe installations. For outdoor signs, this requires designing sign cabinets, supporting poles, structural connections and concrete foundations to withstand wind pressure and other environmental conditions. Although computers greatly facilitate sign-engineering calculations, widely varying soil conditions, wind-exposure factors and signage specifications dictate that engineers follow a formal, disciplined procedure for each proposed sign structure.
Sign companies can outsource structural design work to professional engineers or develop in-house engineering capabilities. Because many municipal authorities require drawings for freestanding signs to be signed and stamped by professional engineers, an engineer must either design the proposed sign structure, or review and approve a structural design produced by others. "Engineering Sign Structures" by Benjamin Jones, PE, provides valuable insights for sign professionals interested in designing construction plans for freestanding signs. This textbook discusses detailed engineering procedures for all types of sign structures, including a chapter on computer-aided engineering.
What is the most cost-effective design for sign footers?
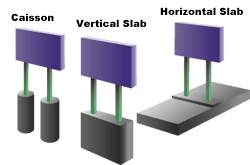
There are three basic sign footer designs (Fig. 1). Caisson-type footers require the least amount of concrete, but the excavation may be more costly.
Earth augers are not readily available for hire in many areas. Also, hiring an auger to drill only one or two holes can be expensive because operators may charge a full daily rate regardless of the project’s size. Additionally, an auger is not equipped to load the soil it extracts from drilled holes. Thus, if you’re working on a paved surface, you must shovel up the soil and remove it from the site. These factors make auger-drilled sign foundations impractical for many projects.
Vertical slabs are the most widely used and practical design for sign footers. The shape of this footer conforms to the digging stroke of a backhoe machine. In some vertical-slab designs, the long dimension of the slab parallels the plane of the sign cabinet, but in other designs, it’s perpendicular (Fig. 2).
Because backhoes are towed on trailers behind dump trucks, the contractor can remove all soil from the job site. The cost to hire a backhoe operator with a dump truck for a two- or three-hour job may be less than the daily rate to hire an auger machine.
For any given freestanding sign structure, the horizontal-slab footer requires considerably more concrete to provide equivalent structural strength. But this shallow design might be necessary when installers encounter subsurface rock, groundwater or other obstructions. Sign companies should include language in their project contracts that allows for additional expenses necessary to install this type of footer.
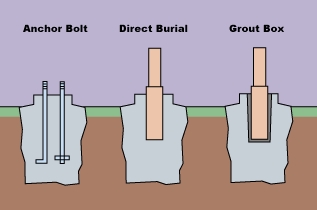
The method by which a sign pole or column attaches to its concrete footer (Fig. 3) also affects project cost and efficiency. Anchor-bolt footers are the most practical of three basic types because they facilitate removal of the sign structure and adaptation of existing foundations for replacement signs. Anchor bolts also permit precise leveling of the pole(s) by adjusting the leveling nuts beneath the pole’s base plate (Fig. 4).
While anchor-bolt footers allow the pole(s) to be erected after the concrete is fully cured, poles that are directly embedded must be held plumb while the concrete hardens. When erecting large, embedded-pole signs, this requires a crane or a fabricated, temporary support structure to hold the pole in place at least for 24 hours. If a crane is used, the installer must leave equipment at the job site overnight. Because concrete footers should cure for at least two weeks (preferably 28 days) before erecting the sign, the installer must return to the job site to retrieve his crane for use on other projects. This wastes time and creates job-scheduling problems. Even if a temporary support structure is fabricated to brace the pole, additional labor time and materials are required.
What is the most reliable method for fastening a flush wall sign to a building?
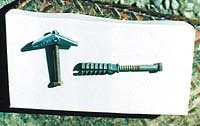
Lag bolts and toggle bolts (Fig. 5) are among the most commonly used fasteners for installing signs of substantial weight on exterior wall surfaces. These bolts are suitable for both wood-framed and masonry walls.
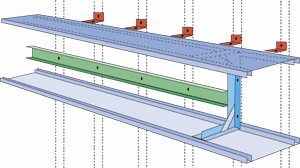
Although larger in diameter and considerably stronger than wood screws, lag bolts incorporate the same type of threads. When inserted into vertical lumber studs to a depth of approximately 3 in. (for maximum strength), lag bolts are extremely sturdy fasteners. For heavy electric signs (more than 500 lbs.), it’s important to distribute the sign’s weight across as many studs as possible (Fig. 6). Except when installing lightweight signs (100 lbs. or less), the building’s external siding material (typically wood siding, plywood, stucco-board or metal siding) should never be used as the sole support for a sign.
Lag bolts are also used in combination with expanding lead shields to fasten signs to masonry walls. The installer uses an electric hammer-drill and a masonry bit to drill holes of the proper diameter for inserting the lead shields (the proper hole-size is indicated on the outside of the lead shield). Mounting holes should not be drilled too large in diameter or the lead shields can pull out of the wall under stress. Additionally, soft materials like wood chips or electrical tape should not be used to "fill-in" around the lead shield if the hole is too large. In this case, relocate the sign’s mounting bracket and drill another hole of the proper size, or use a larger lead shield and lag bolt.
Toggle bolts may be used as secondary fasteners on framed walls (Fig. 6) or hollow concrete-block walls. The hinged "butterfly nut" collapses, enabling the installer to push the toggle bolt through the drilled hole. The nut springs open on the inside of the wall surface, allowing the bolt to be securely tightened.
Although self-drilling concrete screws are available, I don’t recommend them for installing heavy, wall-mounted signs. The gripping reliability of these screws varies significantly, depending on the type of masonry and the screw-driving technique used by the installer. Hence, it’s not uncommon for these screws to eventually loosen or pull out.
What tips can sign builders use to make their products easier to install?
In general, the fewer field alterations required by the installer, the greater the probability that a given sign will be properly installed. One problem that frequently frustrates installers of flat wall signs is the inevitable variation between the positions of the sign’s mounting brackets and the building’s internal studs (Fig. 6).
Traditionally, electric signs have been factory equipped with small, angle-shaped wall irons on the exterior of the cabinet or vertical mounting braces inside the cabinet. Neither of these designs provides the positioning flexibility that installers need to ensure sturdy installations on buildings of frame construction.
By using longer lengths of steel angle for exterior mounting brackets, or by incorporating horizontal, steel or aluminum channels inside the cabinet, the sign builder gives the installer the option of drilling the mounting holes to match the positions of the wall’s internal supports. This is particularly valuable in cases where access to the rear of the mounting surface is difficult or impossible.
Quality sign construction requires that designers and builders recognize the challenges faced by sign installers and service mechanics. By being aware of the equipment and hardware requirements for various types of installations, sign manufacturers can have a positive impact on project quality, which ultimately determines customer satisfaction.


 Big Survey2 weeks ago
 Photo Gallery1 week ago
 News2 weeks ago
 News6 days ago
 Heidi Tillmanns4 days ago
 Dale Salamacha2 days ago
 Editor's Note7 days ago
 News1 week ago