Francis S. Lestingi operates Signs of Gold (Williamsville, NY) with his son, Stephen.
EQUIPMENT AND MATERIALS
Adhesive: Bondaflex 100 GP silicone, from Bondaflex Technologies (Clifton, NJ), (800) 641-0234 or www.bondaflex.com
Coatings: Jay Cooke’s Sign Primer, available from Wensco (Belmont, MI), (800) 253-1569 or www.wensco.com; bulletin enamels, from TJ Ronan (The Bronx, NY), (800) 247-6626 or www.ronanpaints.com
Gilding: White kaolin, USP powder, from such vendors as Sigma-Aldrich (St. Louis), (800) 325-3010 or www.sigmaaldrich.com; Lefranc Charbonnel slow size, from Lefranc & Bourgeois (René, France), www.lefranc-bourgeois.com; 23.75k goldleaf, from Sepp Leaf (NYC), (800) 971-7377 or www.seppleaf.com, and Mannetti goldleaf, available from Letterhead Sign Supply (Petaluma, CA), (800) 531-3359 or www.letterheadsignsupply.com
HDU: Corafoam® 15-lb., ¾- and 1.5-in.-thick HDU, from Duna USA (Baytown, TX), (281) 383-3862 or www.dunagroup.com/usa
Printer: LaserJet 2200d desktop printer, from HP (Palo Alto, CA), www.hp.com
Software: Adobe Illustrator software, from Adobe Inc. (San Jose, CA), www.adobe.com; Mac Pro computer, from Apple (Cupertino, CA), www.apple.com
Tools: Self-drilling, exterior, 3- and 1 5/8-in. screws, from hardware and building-supply stores; butcher paper, from Dick Blick Art Supplies (Highland Park, IL), (800) 828-4548 or www.dickblick.com; 16-lb. vellum, from Clearprint Paper Co. (Leeds, MA), (800) 628-1910 or www.clearprint.com; silicon-carbide sandpaper, from Direct Abrasives USA (Forest Lake, MN), (800) 680-4862 or www.directabrasivesusa.com; chisels (sweep numbers 1-9) from such purveyors as Pfeil Tools (Langenthal, Switzerland), www.pfeiltools.com; files, available from hardware and building supplies; cordless saber saw with straight- and scroll-cut blades, from Bosch (Farmington Hills, MI), (917) 421-7209 or www.bosch.us
So, you don’t have a multi-thousand-dollar CNC flatbed router, yet you want to produce individual, 3-D, prismatic letters. Not to worry. You can produce beautiful 3-D HDU letters entirely by hand with items you undoubtedly already have in your shop or studio. Here’s how we do it.
Tiling time
First, on a Mac Pro computer, we produce the design using Adobe® Illustrator® software. We then “tile-print” the entire series “flopped” (flipped over) on 8.5 x 11-in. sheets of vellum tracing paper using an HP black-and-white laser printer. Next, we transfer the design images to the pre-gridded HDU panel. Because the laser printer deposits carbon particles on the vellum, we can transfer the carbon images to the HDU using a heat pen. Using a penciled grid on the HDU and numbered “tiles,” we can transfer the entire design in an economical, space-saving manner.
Flopping the prints during the printing phase produces legible letters during the transfer phase. To cut out the letters, we (my son, Stephen, and I) employ a Bosch cordless saber saw. Not having to tangle with a power cord really facilitates the milling, but be sure to have enough extra batteries to ensure continuous operation. You only need two blades: a fine tooth for straight cuts, and a scroll blade for tight curves.
Through the prism
After the letters are cut out, the next step is prismatic carving. Here you will need an assortment of chisels with sweeps ranging from 1 to 9, some aggressive files, and sandpaper. If our gilded individual letters are going to be installed on a light background surface, we typically add an outline in black to increase the contrast with the gold. The outline is usually 3/4-in.-thick HDU, whereas the letters themselves are 1.5 in. thick.
To ensure proper coating adhesion, it’s important to finesse the edges. Paint won’t adhere properly on sharp, 90? edges. I suggest easing the edges with a file, which is followed by applying sandpaper with progressively finer grits. To create the letters’ prismatic profiles, we start by carving with gouges. After this roughing-out step, we use a file to smooth out the carving marks.
We follow this with sandpaper. We start with 80-grit paper, and gradually work up to 220 grit, which will eventually produce a smooth, attractive, prismatic surface. Finally, we carve on the letters’ reverse sides. A “valley” carved on this obverse side accepts the adhesive silicone, which we apply later to secure the letter to the outline. Doing this will obviate leakage of the silicone onto the outline.
To expedite installing individual letters, we then prepare a well-spaced template by laying out the outlines on “butcher paper”, either by eye or by plotter. If you don’t have a plotter, “tile-print” on 8.5 x 11-in. sheets and tape them together.
To drill and to coat
First, we draw a pencil outline of the letter on its outline. Then, we select four equally spaced locations on the outline, and drill pilot holes through the HDU. We drill through the paper template and into a piece of corrugated cardboard that’s been placed underneath the template. Then, we use a red marker to identify holes in the template with little crosses.
Now, we drive 3-in. screws into the pilot holes, which will serve as studs in the installation process. We apply adhesive silicone to the valleys, and further secure the letter to the outline from behind with 15/8-in. screws. We number each letter consecutively in addition, and number the template to verify letters are installed in their proper sequence.
After generating the template, the next step is the coating process. We start by thrice priming each letter’s background with Jay Cooke’s primer. We follow the priming with two top coats of high-gloss Ronan enamel paint. We always use black as our final coat because of our sizing technique for gilding. To prepare the letters for sizing, we dust them with kaolin powder, whose particles are approximately 2,000 times finer than talcum. It makes the black letters look gray.
When we apply the uncontaminated size with a lettering quill to assure sharp, crisp edges, the size is quite visible, contrasting clearly against the kaolin. We never adulterate the size with yellow paint or any other foreign body. Because the kaolin particles are so infinitesimally small, we are assured of applying virtually pure size, which ultimately produces a more brilliant gild. We gild each letter with 23.75K loose leaf using a gilder’s tip brush. When all of the letters are meticulously gilded, we are ready to install.
Advertisement
The big finish
Depending on the site’s location, we use a scissor lift, an articulating lift, or ladders to install a sign. We attach the paper template to the wall with duct tape, and tap in pilot holes. We follow this by drilling holes approximately twice the diameter of the studs’ screws. After removing the paper template, we apply adhesive silicone into each hole, as well as on the outline’s back. We’re always careful never to touch gilded surfaces; an outline really helps in this regard.
It’s invariably rewarding to have a happy customer pose in front of new handcrafted, gilded letters fabricated by individuals, not machines. But, wait, there’s more! In addition to the smooth (flat) prismatic profile, we’ve also achieved two other profile effects with different carving techniques.
We call the first “rough-hewn” carving. By carving “randomly” with a No. 2 or 3 sweep gouge, we produce an effect that captures more reflected light and creates a more dazzling gilded surface. The second technique is called “concave carving.” It captures more reflected light, but more subtly. Light can reflect from the valleys of the concave cut, as well as from the peaks. In this case, the carving with a No. 2 sweep gouge must be smooth and uniform, rather than random.
More About Francis
After an academic career as a physics, chemistry, math and theology instructor, Francis returned to his love of the lettering arts and started Signs of Gold Inc. with his son, Stephen, in 1994. Today he serves on the Board of Trustees of the Society of Gilders. Each year, he joins the group in their pro-bono project restoring Hurricane Katrina-affected historic churches in New Orleans. Lestingi has earned first-, second-and third-place awards in ST’s Sign Contest, and nine first-place awards from the United States Sign Council sign-design competition. Lestingi has also designed three calligraphic fonts, Pierre, Calileo and Verdi, which are available through www.LetterheadFonts.com, and two other digital typefaces, FranHand and Stefano, which are offered on www.MyFonts.com. For more information about his shop, visit www.signsofgold.com.
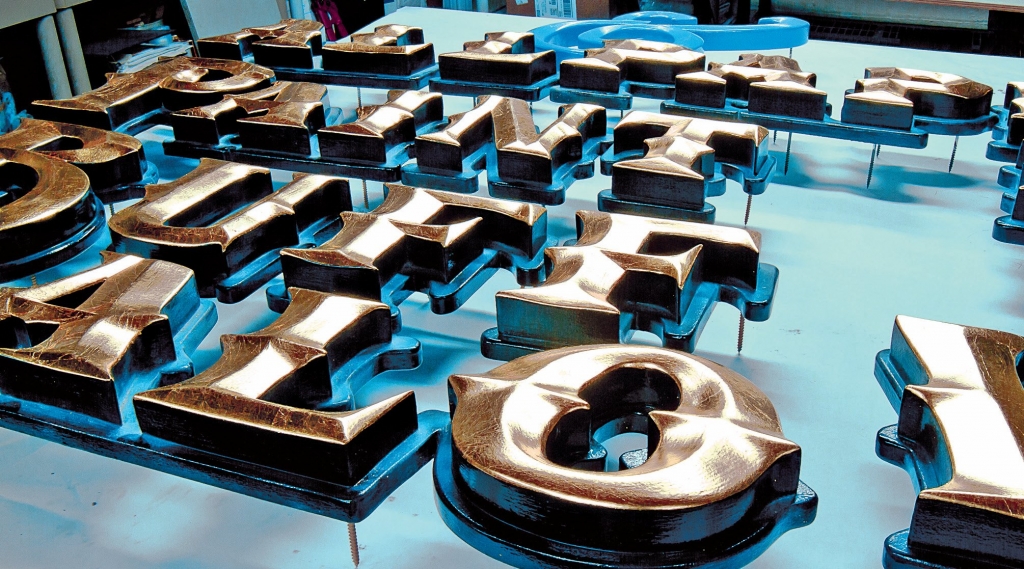


 Photo Gallery1 week ago
 Ask Signs of the Times2 weeks ago
 Paula Fargo1 week ago
 Real Deal5 days ago
 Photo Gallery1 week ago
 Women in Signs2 weeks ago
 Women in Signs2 weeks ago
 Projects5 days ago