Digital Printing
Wireless Networking in the Signshop
Surfing from the sofa
Published
18 years agoon
Editor’s Note: The Morrisons deviate from their typical product review to discuss the ins and outs of wireless networking. Recently, the duo set up a Wireless Access Point to their network.
Our shop is located at our ranch in Northern California. Although we have no employees, we constantly use five systems and a notebook computer. We typically use the notebook for field photography and image conversion. This configuration may sound excessive, but today, multiple signshop systems are rather common. In most cases, the systems are networked together using Ethernet connections and Category 5 cabling, which can transfer data at speeds of 10Mbit up to 1Gbit per second. The most common connection, the 100BaseT standard, transfers data at 100Mbit per second. This very conveniently transfers large files from system to system; unfortunately, such convenience comes with a price.
While 100BaseT equipment is very inexpensive, it still requires "hard wiring" to connect the systems, which can get quite messy. Plus, we don’t have a cable drop. Sure, we really need one, but the prospect of running a wire up the ceiling, through the attic, down the side wall, and then running a buried cable, seems like too much work to access drawings, e-mail, notes, etc. The notebook would be a great resource if we could install the cable drop. Heck, it would also be nice to access the Internet from our sofa while watching a ball game. But we were really seeking a way to network computers over the air, not wires.
This month, we’ll discuss some of the ins and outs of setting up a Wireless Access Point to your network. This can save time and money on shop wiring, and allow your salespeople to connect to the network without having to cable-in. There are some "gotchas" involved, but we hope we can help you avoid some of our mistakes.
A hotspot in the old shop
Setting up a wireless connection offers three viable options. One, an older technology called IrDA, uses infrared light to transmit and receive data short-range. Another option is a new technology called Bluetooth, which is used in new digital cameras peer-to-peer. The third option is the fairly new 802.11 wireless Ethernet standard — a true network solution.
Our existing systems are physically connected via cables, hubs and switches. The devices and cabling are compatible with the Ethernet protocol, as defined by the IEEE. The standard, 802.3, defines numerous characteristics of how the various devices connect, find each other and recover from errors. We can run several different communication protocols over the network, so we can access services on the systems. We use TCP/IP, the most common, current protocol. The problem was how to tap into the Ethernet/TCP/IP network without using wires.
We discovered the solution some years ago with 802.11. A method for wireless networking, 802.11 defines two distinct modes. In the Adhoc mode, two devices with 802.11 interface cards can communicate in a peer-to-peer mode. If you only have a single workstation and a laptop, this could work. You can exchange information between the two systems, but you can’t access any other devices in a network.
So what about performance? Keep in mind, we want to transfer large files at a reasonable speed and surf the Internet. There are three versions of 802.11, differentiated by the letters "a," "b" and "g." The most common, the 802.11b, uses a 2.4MHz radio band and can transmit at speeds up to 11Mbit per second. This isn’t too bad — a 10BaseT Ethernet connection is 10Mbit per second. However, it’s 10 times slower than 100BaseT. Thus, if your existing network is 100BaseT, the 10Mbit speed will seem awfully slow.
The remaining two standards, "a" and "g", can transmit data at 54Mbit per second. This is very acceptable and approximately half the speed of a 100BaseT network. The "g" standard is compatible with 802.11b devices. So, if you have "b" devices, they’ll work fine with a "g" Access Point or vice versa (however, a "g" card will communicate at the lower speed). The "a" standard uses a 5.2GHz radio band, which can be a big deal. Cordless phones, garage-door openers and other devices use a 2.4GHz band. Furthermore, a microwave oven can interfere with "b" and "g" devices.
On the whole, we discovered that "b" devices are plentiful and inexpensive; "g" devices are approximately 25% more expensive than "b" devices; and "a" devices are the least plentiful and most expensive.
We selected 802.11g. Because "b" and "g" devices are easier to find, we believed we’d have more available options for future expansions. At least one manufacturer offers a 108Mbit interface and router; however, we decided against this option — it only worked at a high speed using the company’s supplied cards.
Building the network
At this point, we took baby steps. Primarily, we wanted our laptop to participate in our local area network (LAN) anywhere within the shop. We needed a card to go into the laptop and somehow tap into either our switch or hub. After researching our options, we learned we could set up a wireless connection in two different ways. If we only had two systems, it would be very simple. We could purchase two interface cards and set them up in an adhoc network. However, most shops desire more flexibility.
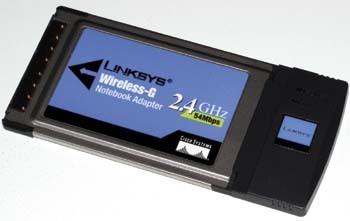
Because we really wanted to use our entire network, we purchased a Wireless PC card for the laptop and a Wireless Access Point. In wireless terminology, this is the infrastructure connection. The laptop card is simply another network interface card that fits into a laptop’s PC card slot; you install the supplied driver and configure the TCP/IP settings just like you would with a typical network card. We use Windows XP Home, whose Wireless Zero Configuration built-in feature will seek out wireless networks, detect them and give you the opportunity to connect to the network. If you’re not running XP, the device manufacturer should supply the proper software to work with the network.
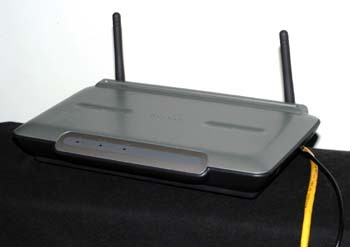
Next, we connected the Access Point. This device acts as a bridge between the wired and wireless world. If you decide to set up a similar network, we caution you to look for "Access Point" on the box. Some devices interface broadband (cable, DSL) connections to a wireless network and devices called bridges. These devices have different purposes, but may or may not allow you to set up the interface necessary to connect to your network.
The Access Point we purchased handles both 802.11b and 802.11g connections. It’s a fairly small device, with two antennas and several LED indicators. The back includes a connection for the external power supply and an Ethernet connection socket.
The documentation indicated that the device’s IP address was 192.168.2.254. This is important because we needed to know how to access it before we could configure it. Luckily, we use 192.168.2 as the network number for our LAN. We could temporarily change the IP address of one of the systems to the network address (192.168.2.5) if we used a different network address. After we plugged the Access Point into our hub, we could see the link light indicator blink, indicating the device was online.
Configuration was a snap. The documentation indicated that the setup page was accessed from a web browser. We simply launched Internet Explorer, entered 192.168.2.254 (the device’s address) into the address bar and hit the "Enter" key. The setup page instantly appeared. From here, we encountered numerous settings that we could change. For example, wireless networks "announce" themselves to clients. A name, called a Service Set Identifier (SSID), identifies the wireless network to a client. However, we just wanted to get connected, so we took all the defaults.
We had already installed the PC card in the laptop and fired it up. Within a few minutes, an icon popped up in the system tray, indicating a new network was discovered. By double clicking on this icon, we could connect. Then we performed our first test.
Built in to all versions of Windows (and most other TCP/IP-enabled systems) is a utility called Ping, which allows you to verify whether a device is active and answering requests. From the laptop, we brought up a command prompt (DOS window) and entered "Ping 192.168.2.254." The result showed that we could see the access point. Next, we pinged a different computer in the network with an IP address of 192.168.2.2. Again, we were successful. It looked like we were up and running. However, nothing is as simple as it seems.
Troubleshooting
We lost connection to the network as we moved around the house, office and out to the shop. Plus, we didn’t have a way to tap off of our dial-up Internet connection from the laptop. We found that reasonable proximity to the access point gave us really good speed and a solid connection. The device was adjacent to the hub in the office, where we have a lot of computer equipment. We decided to move the Access Point to a switch we had set up in a centrally located area. Because we have a simple network with no internal routers, we plugged the device into the switch. This made network connection much faster and more solid in most parts of the house. We found only a few dead areas.
Next, we set up an Internet connection. We could copy to and from our networked systems, and even print to networked printers, but we still wanted to "sofa surf." If you have a Windows 2000 or Windows XP system, Internet Connection Sharing is built in. Just bring up the properties of the network connection you use to the Internet and click on the "Advanced" tab. We didn’t use this method because we would’ve had to change the IP addresses on all of our networked systems and devices.
Instead, we used proxy software, which lets the system with the Internet connection represent other users as a single user. It records the requests and where to send the result pages. A proxy package costs approximately $60, or you might find some freeware downloads. We installed a freebie package called iProxy (www.analogx.com). It only allowed two simultaneous connections, but it let us keep our existing infrastructure.
According to ST Media Group’s Information Technologies (IT) director, Lance Hart, instead of proxy software, you could use a Cable/DSL router with a built-in, wireless Access Point. This option is more expensive, but it will accomplish the same purpose and provide additional benefits. Further, it will secure your network by placing your computers behind a firewall, making them more difficult for intruders to access.
Once loaded, configuration was easy. We opened up all of the typical web services (HTTP, Mail, FTP, etc.) and just used the default port, 6588, as a connection across our LAN and wireless network. The software executes in the background on the host system; you simply fire up the connection.
Next, we launched a web browser on one of the networked systems and configured the connection settings. Just select "Internet Options" from the menu bar and click on the "Connections" tab. Now click on the LAN "Settings" button, and a new menu appears.
Use a proxy server checkbox and supply the address of the proxy system (in our case, 192.168.2.2) and the port number to use, 6588. If you want all of the other services, like FTP, to use the same connection, click the "Advance" button and plug in the devices. Finally, click "Okay" on all of the open menus and voila! You’re surfing from the sofa.
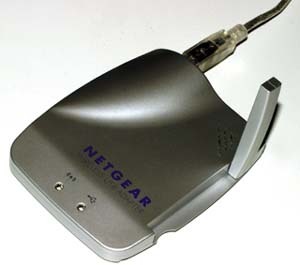
We achieved all of our goals, but we still wanted better connection speed and reliability. We stumbled onto a solution when we decided to get a wireless adapter for one of our desktop systems. There are several alternatives. You can purchase PCI (Peripheral Component Interconnect) cards that you install in your system. This is the least expensive solution, but it requires cracking the case. Another solution is a USB-based network connection. These nifty little devices require an OS that supports USB — Windows NT systems won’t work. For high speed, the system must support USB 2. The USB 1 systems will work with 802.11b.
We chose a device that uses a standard USB cable. It’s small and light, and it gets its power from the system. The device has a small antenna and two indicator lights. We installed it on the laptop for the heck of it. Then we simply installed the driver, plugged in the device and configured the IP address we wanted to use.
The network speed seemed much faster and very reliable. The device connected to the network as soon as we booted up. The PC card required a few minutes. Moving about the house, we never lost connection and could consistently maintain a 24- to 48Mbit transfer rate.
The dead spots disappeared. We unscientifically concluded that the antenna makes a noticeable difference. While it’s external to the laptop, it functions so well that we’ll probably return the PC card and get another USB interface.
You’ve probably seen numerous reports about individuals who troll for unprotected wireless networks. According to Hart, this is called "War Driving," and it’s not limited by distance from your house or business. Wireless networks can be accessed from miles away with homemade, low-tech hardware, such as a modified coffee can being used as a directional antenna. Thus, the goal is to protect your network as best as you can.
To do so, always run your Access Point with the highest level of Wired Equivalent Privacy (WEP) available — this will be 128-bit or 256-bit encrytption for new hardware. Also, changing your Access Point’s SSID doesn’t accomplish anything unless you also turn off the SSID broadcast.
Conclusion
Our quest for a wireless network is complete. In the future, we’ll enable other devices. For example, wireless print servers may be a great addition when we test printers and vinyl cutters. We’ve also found signal repeaters that can extend our network range and probably boost performance out to our shop.
There are devices to interface MPEG devices to send music and video over the air. We also found devices that connected two wired networks together via a wireless link. These bridges could solve distance and labor issues if you need to connect an office to a workshop or warehouse.
Our total outlay was less than $300, including an $80 card we’ll probably return. Expect to pay $100 for an Access Point and $60 to $80 for an 802.11g interface.
Going Wireless?

SPONSORED VIDEO
Introducing the Sign Industry Podcast
The Sign Industry Podcast is a platform for every sign person out there — from the old-timers who bent neon and hand-lettered boats to those venturing into new technologies — we want to get their stories out for everyone to hear. Come join us and listen to stories, learn tricks or techniques, and get insights of what’s to come. We are the world’s second oldest profession. The folks who started the world’s oldest profession needed a sign.
You may like


Advertisement
Subscribe

Magazine
Get the most important news
and business ideas from Signsofthetimes Magazine.
Advertisement
Most Popular
-

 Photo Gallery4 days ago
30 Snapshots of the 2024 ISA Sign Expo
-

 Tip Sheet2 weeks ago
Always Brand Yourself and Wear Fewer Hats — Two of April’s Sign Tips
-

 Ask Signs of the Times6 days ago
Why Are Signs from Canva so Overloaded and Similar?
-

 Paula Fargo2 days ago
5 Reasons to Sell a Sign Company Plus 6 Options
-

 Real Deal2 weeks ago
A Woman Sign Company Owner Confronts a Sexist Wholesaler
-

 Benchmarks1 week ago
6 Sports Venue Signs Deserving a Standing Ovation
-

 Photo Gallery2 days ago
21 Larry Albright Plasma Globes, Crackle Tubes and More
-

 Women in Signs2 weeks ago
2024 Women in Signs: Megan Bradley