GHI Sign Service (Canaan, CT) subcontracted me to create a sign for Bear Care Centers, a childcare facility in Great Barrington, MA. The customer supplied the artwork, and GHI supplied the substrate — 18-lb. Sign Arts Products Corp.’s SignFoam high-density urethane (HDU), cut and layered to meet my specs. Joined with adhesive, the double layer of HDU could include dimensional elements that would come to the foreground.
A shop in order
Before carving, it’s important to organize your workspace. I installed a 30 x 48 x 3/4-in. plywood work surface at a 20° angle atop my 3-ft.-tall workbench. I added a 1 x 2-in. pine strip to prevent substrate movement. I also used a rubberized cloth underneath the SignFoam to prevent it from sliding.
Lighting is also important. I used a 4-ft. fluorescent light as a fill light, as well a 100-watt bulb mounted a foot above my work surface. I laid my tools on a towel so they wouldn’t move around and nick each other, and wore a bicycle glove on my right hand to prevent blisters on my palm while still allowing me to touch my tools. HDU is abrasive to the skin, so I also kept a piece of towel under the heel of my left hand.
Gimme three steps
This work is called a pierced relief carving, meaning there is no background and I just sculpt the figures. Essentially, relief carving is the repetition of three steps:
Advertisement
Outlining the design elements with a stop cut;
"Setting the ground," or separating the background from the foreground;
Sculpting the form.
I began by transferring lines from the paper pattern using carbon paper. I did this because pounce powder can be easily smudged or rubbed away completely. I then carved the design’s major elements before moving onto smaller individual portions.
If extreme detail is needed, repeating the steps once each aspect has been completed is a good idea. This sequence places emphasis on the form of the carving. Remember, the form is the sum total of all details. If the form is correct, the details will stand out. Resist the temptation to begin carving detail until the form is complete.
When looking at the major elements of this design, I determined there was only one area that sets behind the rest; Mama Bear’s body, bottom and ears. All other aspects would show up in the foreground. By sawing this area away before gluing it, I didn’t have to carve it away. Going back to the basic steps, I’ve done this by making a stop cut and setting the ground.
Making the cuts
Using a No. 9, 15mm gouge, I placed stop cuts on the other designs. I made this cut along the outside edge, with the element to be left and completed with a 1/2 – 3/4-in. cut into an area that would be in the background.
Humorist Sam Ewing once said, "It’s not the hours that you put in your work that counts, it’s the work that you put in your hours." With this in mind, I tried to plan ahead and manage my time so that you don’t spend a great deal of time picking up and putting down tools.
Advertisement
Having completed my work with my No. 9, 15mm gouge, I commenced with my No. 7, 25mm gouge. I began by setting the ground and beginning to sculpt a small form. Don’t think of "the ground" as merely being parallel with the nearest surface element; it may slant, taper or curve. The design’s form is the determining factor. I carved the baby bear’s body by working from the prior stop cut and carving a slanting curve.
Next, I gouged waste material from Mama Bear’s head. This was a great spot to observe the progression of cuts that quickly cut away waste and begin to form the round head.
Cutting corners
The first thing you learn about carving is that it’s easy to carve corners. Therefore, if you always carve corners, carving is easy. Observing a progression of five cuts, the first three cuts removed most waste material and brought me to the top radius of the curve. The fourth and fifth cuts completed the basic form.
To carve the chips made by carving corners, I kept both gouge corners above the surface. If you drop a corner under the foam, you’re in trouble because the material won’t crack or give. The cuts should be done in a series along the edge being formed. If each cut is overlapped, you will continuously be carving corners. The bears’ heads start to take shape, with mom’s arms and legs beginning to taper back to and under her body. $image2
A bear’s fine points
Advertisement
I used a No. 9, 15mm gouge again to deepen cuts around the baby’s head, body and legs. This was vital because I didn’t cut deeply enough the first time.
I returned to my No. 7, 15mm gouge to start rounding her shoulder and continue to rough out both bears’ legs. Most of the work completed at this stage was focused on the lower portion of the bears, because at a 32-in. height, it’s uncomfortable to reach the upper area. When the bottom half was completed, I repositioned the bears and completed the top half.
After about three hours, progress was visible, with the bodies’ surfaces becoming smoother. I began using a No. 3, 25mm gouge because it has a more shallow curve than the No. 9. This gouge removed high points so I could begin to apply the final texture.
Two hours later, the lower half was almost complete. This portion is shown below with only the heads needing shaping and texturing. The detailing of the eyes, nose, mouth, ears and stitching were finished with a No. 9, 5mm gouge.
On to hibernation
The sign required just nine hours of total carving time, with only four tools used. Four inches deep, the sign’s actual size is 32 in. x 21 in.
In summary, it’s important to work in large areas at one time, keeping tool changes at a minimum. Also, I made sure all tools were sharpened properly before beginning, so that no touch-ups were needed during the carving. In keeping with Ewing’s maxim, this results in more work done per hour.
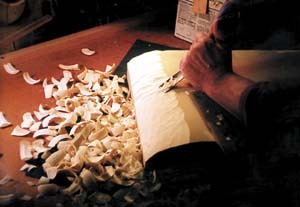


 Photo Gallery2 weeks ago
 Ask Signs of the Times2 weeks ago
 Paula Fargo1 week ago
 Real Deal6 days ago
 Photo Gallery1 week ago
 Women in Signs2 weeks ago
 Projects6 days ago
 Women in Signs2 weeks ago