Preparing for the American Sign Museum’s official opening, we installed several vintage signs. Though many exhibits are outdoor signs, installation principles remain basically the same indoors. Ten years after my sign-contractor career, I’ve received an unexpected refresher course installing the museum displays.
Cookie-cutter project
Many of the same challenges I encountered as a sign contractor confronted me at the museum, which recently acquired a large, porcelain-enamel sign that formerly identified a Nabisco bakery in Rochester, NY. This sign’s three sections comprise formed pans, whose side returns measure approximately 21/2 in. The assembled sign, which weighs approximately 300 lbs., had to be installed so that no mounting hardware is visible. But instead of fastening the sign to a sturdy, exterior wall, we installed it on a conventional, drywall surface.
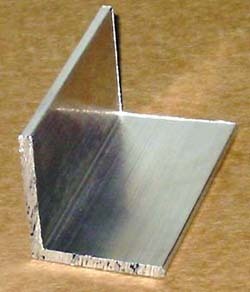
To prepare for the installation, I fastened several, aluminum-angle brackets (Fig. 2) to the wall surface. Having taped a pattern of the oval-shaped sign onto the wall, I positioned the mounting brackets just inside the sign-perimeter outline. Because of the sign’s weight, I located each mounting bracket where a wall stud intersects the sign’s outline. We secured each bracket with a 5/16-in.-diameter lag bolt, lifted the assembled sign and pushed it back against the wall surface.
Because the wall brackets fit closely inside the side returns, some "shoehorning" was necessary. After the sign was pushed back, flush with the wall, its weight alone held it in place. I then installed sheetmetal screws through the side returns at the mounting-bracket locations (Fig. 1). Although the Nabisco sign is comparatively heavy, the same method is frequently used to install non-illuminated and backlit channel letters.
Hanging five
The heaviest neon sign we’ve installed in the main exhibit area is a 500-lb., porcelain-faced, drugstore sign from Missoula, MT. This projecting, double-faced sign was originally attached to the building facade via two, horizontal, steel angles, which extend through the cabinet’s middle and protrude on one side. A steel guy-cable was also attached between the building wall and the top of the sign’s street-side end.
To ensure a safe installation, I drilled two, 1/2-in.-diameter holes through the flange of a roof-support beam on the ceiling. I inserted 1/2-in.-diameter, forged-steel eyebolts in each hole to hold the suspending chains. One eyebolt is located directly above the sign’s upper, protruding steel angle, and the second eyebolt is located above the steel-angle bracket that formerly attached the guy cable.
To ensure maximum weight-bearing capacity, load an eyebolt as closely as possible to a line formed by the bolt’s center axis. Use a plumb bob or level to locate the overhead attachment points. When suspending signs from eyebolts, tighten each bolt securely and use lock washers.
Each of the Missoula sign’s eyebolts is rated to withstand more than a ton of dead weight, but I incorporate a substantial safety factor into all of the museum’s suspended signs.
Sign companies occasionally suspend heavy signs from high ceilings. For example, to suspend a large sign from an automobile showroom ceiling, eyebolts or other mounting hardware can be attached directly to steel, roof trusses. Trusses are typically located 2 ft. or more above the acoustic tiles of a drop ceiling. The suspending cables, chains or rods protrude through the drop ceiling to hold the sign at the desired height.
To properly position a suspended sign, install sturdy, horizontal braces between adjacent ceiling trusses or beams. When installing heavy signs, remember that steel channels and square tubes resist bending forces far better than steel angles.
Wall-mounting precautions
I encountered a particularly challenging situation when attaching a large, vertical, neon sign to one of the museum’s plasterboard walls. This wall partitioned two adjacent lease spaces. When the wall was built, no one suspected that it would eventually support objects as heavy as large, neon signs. To complicate matters, the contractor spaced metal studs 24 in. apart, instead of the standard, 16 in.
Two critical factors affect the installation of heavy wall signs. First, wall studs must bear the brunt of the sign’s dead weight, even when additional anchors draw the sign flush against the wall. Second, fasteners must be securely, but not excessively, tightened, and never stripped. Firm contact between a sign’s backing and the wall surface creates multiple friction points, which bolster the fasteners’ holding force.
Metal studs, which are perhaps stronger than wood, present certain obstacles when attaching heavy objects to a wall. Metal studs, which frame many exterior walls in new construction, are fabricated from relatively thin sheetmetal, and powered screw guns can easily strip out fastener holes. Stripped screws can pull out under a sign’s weight and also prevent firm securement of the sign against the wall. Conversely, a standard wood stud, a solid mass that engages the entire length of a wood screw or lag bolt, prevents stripping when installing fasteners.
When attaching signs to metal studs, always use fasteners specifically designed for metal. Lag screws and wood screws incorporate very coarse threads; sheetmetal screws are somewhat finer. But even metal screw threads will strip out holes in the studs’ thin walls if the screwdriver’s force is too great. Although drywall screws firmly grip metal studs, they are too thin to individually support substantial weights.
When fastening signs to metal-stud walls, use your screw gun to insert self-drilling fasteners through the studs, until the screw heads are approximately 1/4 in. from the surface. Then, use a hand screwdriver to carefully tighten the fasteners. Manual tightening enables you to feel when the screw is firmly engaged, but not stripped.
Because the bearing points are so much smaller when screws are installed in metal, rather than wood, you may need to use more fasteners to achieve the same holding strength. If a sign is especially heavy, toggle bolts provide secure fastening to metal-stud walls. Toggle bolts can also provide stronger holding force when attaching signs to hollow walls. Depending on the diameter, each toggle bolt provides 50 to 110 lbs. of weight-bearing capacity.
Because it had been designed to attach to a sturdy, masonry wall, the vertical, neon sign we recently installed is equipped with only two mounting points — on the top and bottom. Steel-angle brackets atop the sign are positioned to slide down behind the top, horizontal wall support, while the lower brackets attach directly to the bottom support. To secure this installation, I used four, 1/4-in.-diameter, "Tek screws" (two on each side) to attach each of the wall supports.
Expansion-type anchors
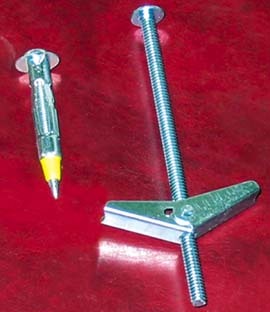
Molly bolts and plastic anchors (Fig. 2), which fasten signs to hollow walls, support lightweight, flush-mounted signs. The maximum weight capacity of a molly bolt placed in a hollow, plasterboard wall is 40 to 50 lbs. But this is somewhat misleading — ordinary drywall isn’t designed for load-bearing applications. On drywall surfaces, therefore, don’t use hollow-wall fasteners to install signs weighing more than 50 lbs.
A key factor in wall-sign installations is weight distribution. A fascia-type sign that spans a long area may be safely installed by using numerous, smaller fasteners. However, use heavy-duty fasteners to secure heavy, compact signs. Also, remember that fasteners placed at the bottom of a sign bear the brunt of the load.
The museum ceiling’s concrete-slab deck (common in many older, industrial buildings), supported by structural beams and covered by a plaster layer, is well suited for inserting lead anchors to suspend signs weighing 100 lbs. or less. Although this ceiling can support much heavier signs, expansion-type anchors shouldn’t be used when strong loads are exerted in the direction of bolt withdrawal. For this reason, plastic anchors should never be used in overhead applications.
Plastic, by its very nature, is easily deformed by mechanical stress, which increases the likelihood that the anchor will eventually pull out. My museum installations, therefore, incorporate only lead anchors for suspending signs not exceeding 100 lbs.


 Tip Sheet2 weeks ago
 Photo Gallery3 days ago
 Ask Signs of the Times5 days ago
 Real Deal2 weeks ago
 Paula Fargo18 hours ago
 Benchmarks1 week ago
 Photo Gallery19 hours ago
 Women in Signs2 weeks ago