Artists have been decorating with goldleaf for nearly 5,000 years. Since Egyptian antiquity, gold has been revered for its radiant luster and ability to add a touch of elegance and beauty to whatever surface it adorns. Today, gilded signage remains one of the highest forms of sign artistry.
Yet, despite the industry’s technological advances, signmakers still hand-apply goldleaf to substrates – as they did eons ago. An adhesive, called size, is applied to the substrate with a brush. Size has evolved from blood or egg whites to today’s gelatinous, water- and oil-based mordants. Glass gilders now use a waterbased size, whereas surface gilders have used oil size for centuries.
But wait! There is something new to report in this ancient field – a new size alternative that creates a unique, brilliant gild.
A new size in town
The new technique involves using a polyurethane adhesive, Gorilla Glue®, as the size. I learned about this procedure from renowned gilder Joe Balabuszko. He gilded the 11-story-high, carved letters that identify the Chicago Stock Exchange. I asked Joe where he learned the Gorilla Glue® technique, but he couldn’t remember. So, unless someone comes forth, Joe receives the plaudits as the technique’s originator, and I’m the promulgator who decided to name the technique: I call the procedure stippled gilding.
Advertisement
We recently used stippled gilding for the logo on three handcarved, gilded signs we produced for a restaurant. The logo comprised a large, script “A” against a square background. We coated three HDU squares with three coats of Jay Cooke’s Primer, followed by two coats of TJ Ronan bulletin colors, with a final, custom-mixed coat of 1Shot® lettering enamel. After these routine steps, we’re ready to start the new gilding technique.
First, we cover the coated squares with a cut-out mask of the logo using GerberMask I removable vinyl mask. Then, I apply a generous bead of Gorilla Glue throughout the logo. We had three squares, which measured 7, 10 and 23 in. sq. Larger letters require a few more beads of glue.
Next, we evenly spread the glue across the masked letter with a chopstick. Some chopsticks have beveled ends, which work quite well for spreading. If the sticks aren’t beveled, I suggest cutting one.
Advertisement
Once I spread the glue evenly, I let it set for 10 minutes. Because of the polyurethane glue’s physical and chemical nature, it absorbs moisture from the atmosphere and expands. Our relative humidity ranged from 40 to 65%. The clear glue turns a slightly milky white as it expands during curing. If you encounter low humidity, a bit of water-misting might be necessary. To perfect your technique, experiment with practice masks.
After the 10 minutes elapses, I use a chopstick’s beveled edge to stipple the spread-out glue. This requires moving the stick up and down uniformly across the entire glue surface to make that surface uneven, or “stippled.” After the glue has been completely stippled, I let it set for another 10 minutes to expand further by absorbing more moisture.
While waiting for the 10 minutes to elapse, I carefully remove the vinyl mask. Wear vinyl or rubber gloves to prevent the glue from contacting the skin; using tweezers can also be very helpful. I remove the vinyl mask before applying goldleaf because the mask will be virtually impossible to remove when the glue solidifies.
Noble metal
After the second 10-minute curing interval, the gilding process commences. Loose-leaf gold is applied with a gilder’s tip. We use 23½k goldleaf, but lower gauges can also be used. Don’t let the tip touch the glue because it can ruin the tip’s expensive bristles. As the gold leaf touches the glue, it fuses to its surface, assumes its contours and retains its brilliance. It should be duly noted that patent gold (goldleaf attached to a backing sheet) can’t be used for this technique. Applying patent gold requires pressing the gold onto a sized area. If patent gold were pressed onto the stippled adhesive, this would flatten the stippled finish and nullify the effect.
Advertisement
Any “holidays,” a gilder’s term for missed spots, can be remedied by applying small pieces of leaf torn off from the goldleaf booklet. An artist’s white sable brush works very well here, but don’t touch any exposed glue.
When gilding is complete, I use a white-sable brush to burnish the gold. Burnishing isn’t polishing; gold doesn’t need to, nor can it, be polished. Use the soft, white sable brush to clean up any overlaps, to gently press the gold to the glue surface and to remove any excess gold shavings.
The stippled-gilding effect dazzles. Because polyurethane glue expands as it cures, and because we stippled the glue, we’ve created a 3-D, randomly textured pattern of rich, glistening gold. Had we handcarved the letter A, we would’ve produced incised facets, which, when gilded, would appear similar to the other carved lettering on the sign.
And, had we merely surface gilded to produce a flat letter, the reflectivity of the letter’s gold would depend on the observer’s location, and, at times, the logo wouldn’t have optimal visibility. We could’ve etched the gold on the flat surface with “engine turnings,” but this bright effect could create an inappropriate image for a trattoria. Thus, stippled gilding seems to be the perfect solution. Notice the logo’s eye-catching, random ripples, and how the hills’ and valleys’ decoration guarantees reflectivity from any angle.
I attached the logo appliqué to the substrate by first screwing four screws into the HDU logo panel’s reverse side. I snipped off the screw heads and pressed the panel, which now had sharp edges, onto the motherboard to create indentation marks. On the marks, I drilled holes into the substrate to accept the screws. I poured silicone on the holes and substrate and attached the logo appliqué.
The three completed, installed signs show handcarved lettering, wheat shafts and the new, stippled-gilding logos. After torture tests conducted in my shop, I’m confident stippled gold’s durability resembles an oil-sized gild. I’ve saved considerable time using stippled gilding versus slow size’s 48-hour curing time. But, it’s also very satisfying to know that, in some small way, we’re helping to transform the ancient, elegant art of gilding for the 21st Century.
Mathematical and scientific theories are sometimes said to be elegant, which means the theory is pleasingly ingenious and simple. We think stippled gilding offers similar elegance.

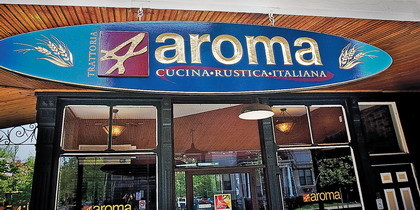
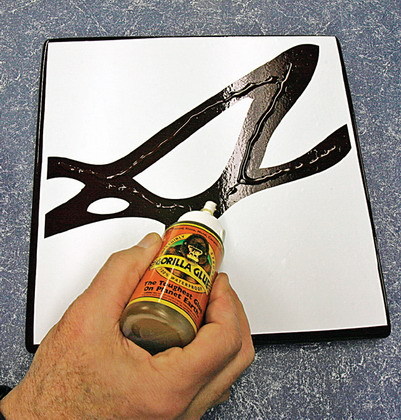
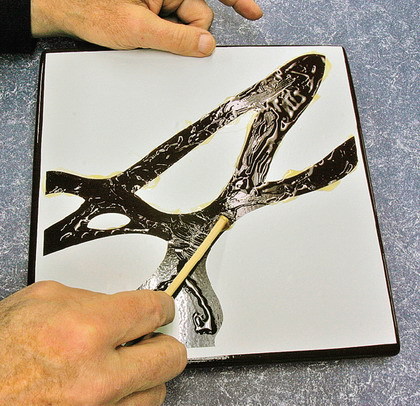
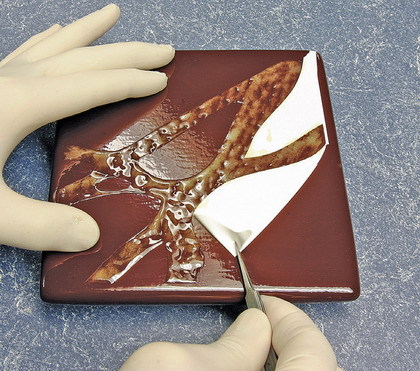
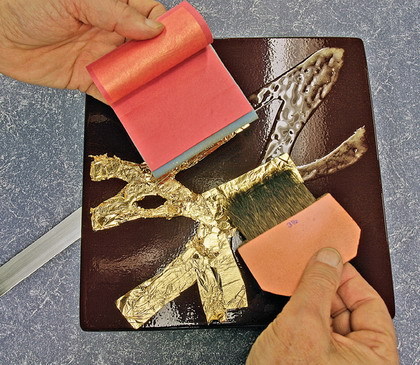
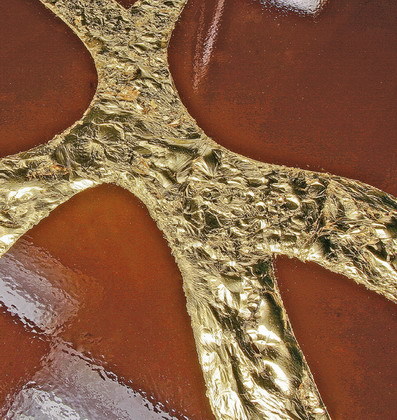
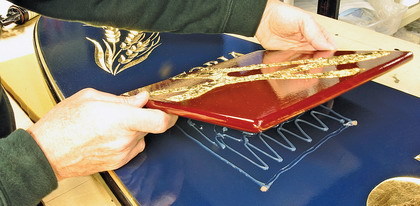
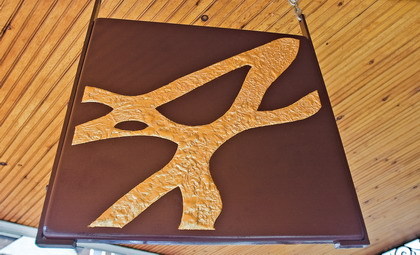
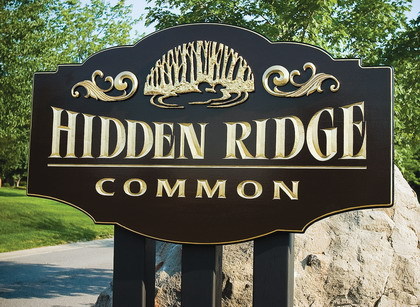


 Photo Gallery2 weeks ago
 Ask Signs of the Times2 weeks ago
 Paula Fargo1 week ago
 Real Deal5 days ago
 Photo Gallery1 week ago
 Women in Signs2 weeks ago
 Projects5 days ago
 Women in Signs2 weeks ago